This article explains the five types of insert fields available in DriverReach’s eDocs solution and describes the features of each.
These fields are powerful, versatile tools that make it a snap to create customized eDocs! For those already familiar with insert fields who feel ready to start making an eDoc, please visit Creating eDocs for step-by-step instructions.
Introduction to Insert Fields
The eDocs system features five types of insert fields:
- Input fields, which require input from an individual to contain data. There are six different types, organized into internal and external categories.
-
- Internal input fields pertain to those within your company who are users of the DriverReach system.
- External input fields pertain to your company’s applicants and personnel.
Note: Input fields feature drag-and-drop placement with no inline text capabilities
-
- Data point fields with both inline and drag-and-drop placement capabilities are based on information housed within the DriverReach system. These include:
It's important to understand that the presence of an insert field on an eDoc does not automatically ensure that the corresponding data will be available for every record. For instance, consider a lead or partial application for an applicant whose record does not include a social security number. In such cases, if a document contains an insert field without data for a specific record, that insert field will appear empty when the document is received by the record holder. Our system allows documents to be sent to recipients regardless of the availability of all data points, and within each category, fields are listed in alphabetical order.
Input Fields
External vs. Internal: Why Does It Matter?
When selecting input fields ( color-coded with orange hues), users may toggle between external and internal categories using buttons located at the top of the input field area.
.

As seen in the image above, external and internal input fields each contain six fields. Four are found in both categories (Checkbox, Date, Free Text, and Radio Button), but choosing the correct category is important because this indicates which type of user will have access to that field for input.
The external category should be used for recipients outside of the company’s DriverReach account, such as applicants and personnel (which is why this category is the only one with Applicant Signature and Applicant Signature Date fields); the internal category applies to users of the DriverReach system, such as recruiters, account managers, counter signers, etc. (which is why this category is the only one with Counter Signature and Counter Signature Date fields).
To protect data integrity, validation is built into the system to ensure that neither external nor internal users can populate data into fields that are not designated for them.
Users of your company’s DriverReach account may enter information into internal fields either before sending out the document or after it has returned, but recipients will not be able to enter data into internal input fields.
Optional vs. Required Fields
For each field, users may specify whether they would like that field to be required or optional for recipients to complete. Recipients will not be able to finish the document until all required fields have been completed, but they are able to move forward without taking any action on optional fields.
During the eDocs creation process, users will notice an asterisk icon to the left of each field. When that asterisk is black ✱, it means the field is not required. This asterisk will turn blue ✱ when a mouse hovers over it. Clicking on the asterisk will classify that field as required and turn the asterisk orange ✱. To unselect the asterisk and make the field optional once again, simply click on the asterisk a second time so that it turns black.

From the recipient’s perspective, if a field has been marked as required, a red “Field is required” validation will appear beside the field, halting recipients’ progress until they enter the requisite data as indicated in the image below. Optional fields trigger no such prompt.

Input Field Types
Checkbox - External or Internal
The checkbox is available as both an external and an internal field, and it allows users to give recipients the ability to select one or more options from a given list of choices (unlike radio buttons, which force users to choose one item from a list of two or more options).

To insert a checkbox into an eDoc, simply click on the appropriate button from the list of input fields and drag it to the eDoc.

When the checkbox insert field is added, one checkbox appears in the document. This checkbox begins what is considered a group, and this group can consist of as few as one checkbox up to as many checkboxes as the user would like. To add another checkbox to a group, simply click on the checkbox and then select the “+” sign from the input fields menu that appears. Another checkbox will appear directly underneath the first. Continue to do this until there are as many checkboxes as you need to complete the list of choices.

Users may either add checkboxes without text and place them on the document near existing text or add labels to checkboxes by clicking on the small “L” icon at the top of the checkbox toolbar. Type the label name and format the font and alignment of the label using the editing tool that appears when you type. To remove a label, simply click on the small “L” icon again at the top of the checkbox toolbar, and it will disappear.

To move a group of checkboxes to a different location within the document, click on the small alignment tool icon that looks like two perpendicular arrows and hold it to drag the group to the desired location.

To delete an entire group of checkboxes, click on any checkbox in the group and then select the trash can icon at the bottom of the checkbox toolbar.

To delete just one checkbox, click on that specific field and select the small red “x” in the upper right corner to make it disappear.

Date - External or Internal
The date field is available both as an internal and external input field. This field only displays using the mm/dd/yyyy format. The system recognizes when the date field is accessed by a recipient through a mobile device and automatically displays the numerical keyboard for ease of data entry.

To insert a date into an eDoc, simply click on the appropriate button from the list of input fields and drag it to the eDoc.

To delete the date field, click on the field, and then select the small red “x” on the upper right side of the field.

Free Text - External or Internal
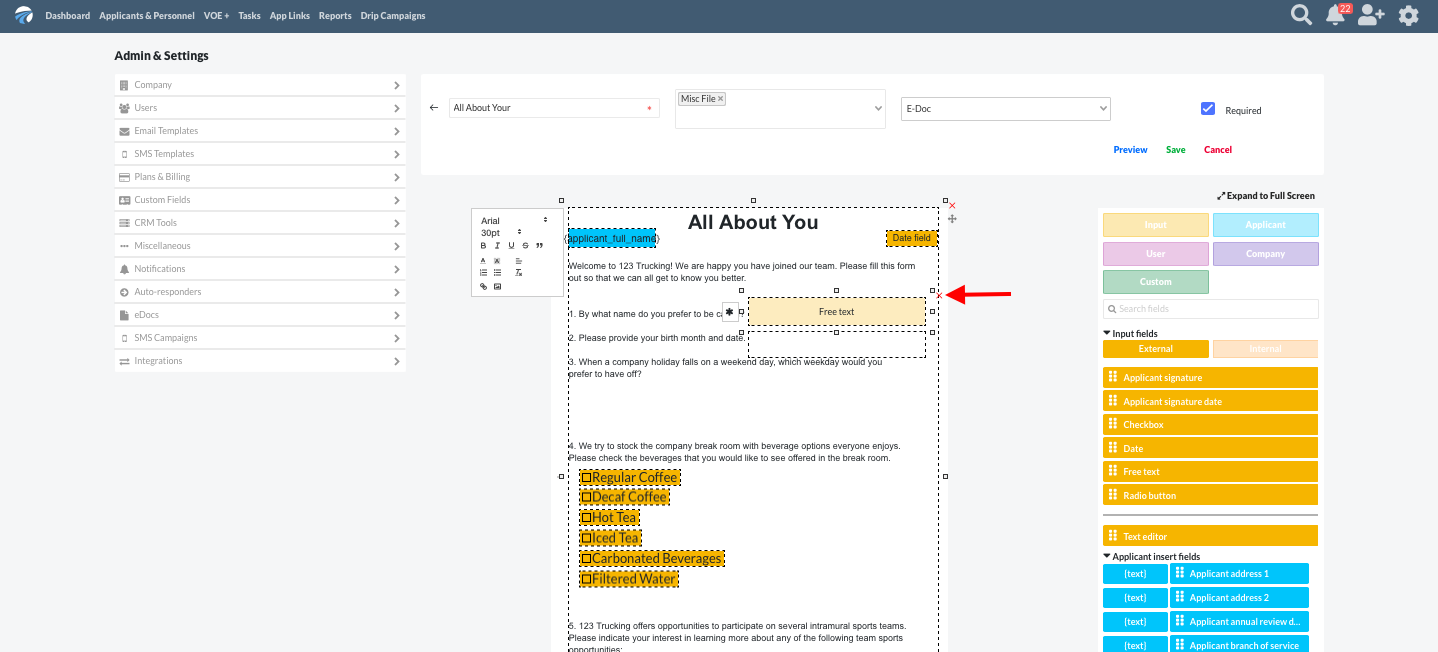
The free text field is available both as an external and internal input field. This field allows users to freely type in a response. If the amount of text entered reaches the borders, the field dynamically shrinks the text size to allow the user to continue to input information. If users should reach the text size limit, a validation appears to make them aware that no additional text may be entered.

To insert a free text field into an eDoc, simply click on the appropriate button from the list of input fields and drag it to the eDoc.

To resize the free text field, click on the field. Then hover the mouse cursor over one of the small white squares located near all four corners of the field or at the top and bottom of the field until a small black arrow appears. Click the mouse and hold to drag the arrow back and forth until the field is the desired size.
To delete the free text field, click on the field, and then select the small red “x” on the upper right side of the field.
Radio Button - External or Internal
The radio button field is available both as an external and internal input field and allows users to provide recipients with a list of two or more options from which they must only choose one option (unlike checkboxes, which allow users to select as many checkboxes as they wish). Radio buttons can be placed without a label near existing text, or users may add labels directly to radio buttons.

To insert a radio button into an eDoc, simply click on the appropriate button from the list of input fields and drag it to the eDoc.

Every time a radio button insert field is added to a document, it begins what is considered a group, and as such, dragging and dropping a radio button field into an eDoc always leaves two radio buttons in its place.

Add labels to radio buttons by clicking on the small “L” icon at the top of the radio button toolbar. Type the label name and format the font and alignment of the label using the editing tool that appears.

To remove a label, clicking on the small “L” icon again at the top of the radio button toolbar will make it disappear.

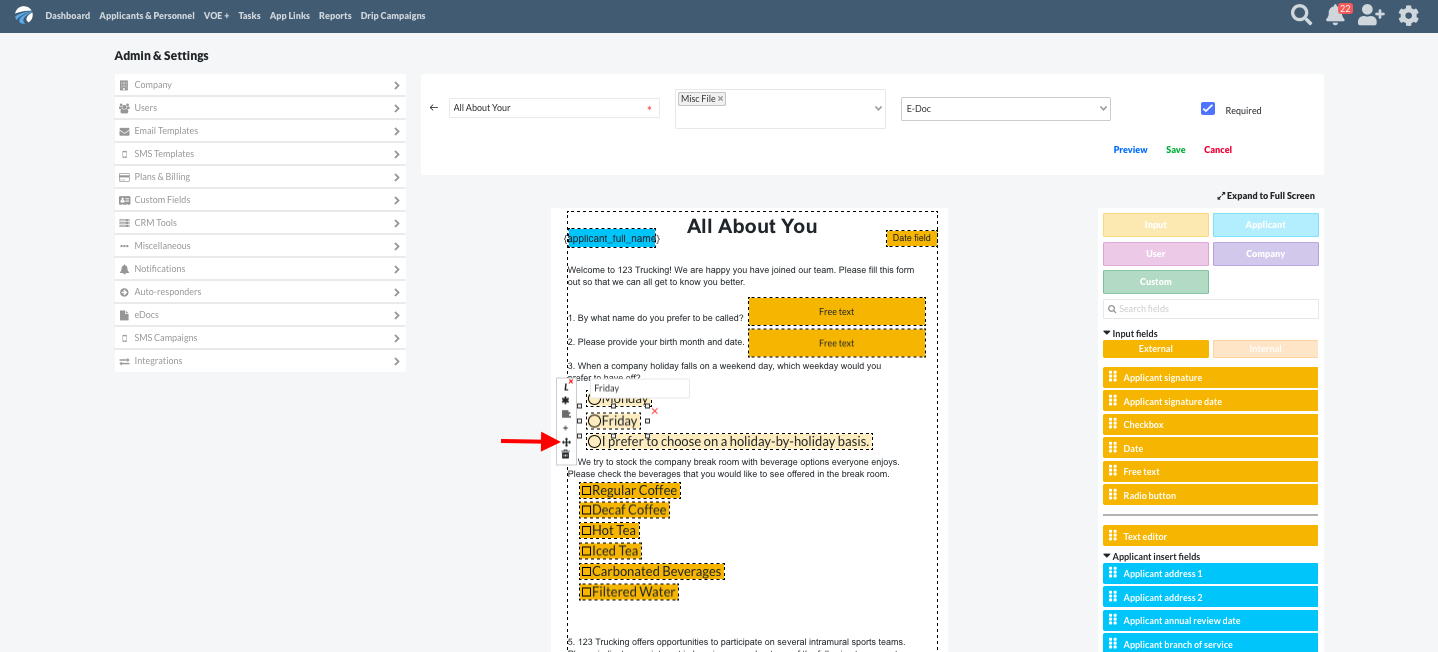
To add another radio button to a group, click on the group and then select the “+” sign from the input fields menu to the left of the radio button. Another radio button will appear. Repeat this process until there are as many radio buttons as required to complete the list of choices.

To delete an entire group of radio buttons, click on any radio button in the group and then select the trash can icon at the bottom of the radio button toolbar.

To delete just one radio button (note that this only works in a group of three or more radio buttons, as each group must contain a minimum of two radio buttons), click on that specific field and select the small red “x” in the upper right corner to make it disappear.

To move a group of radio buttons to a different location within the document, click on the small alignment tool icon that looks like two perpendicular arrows and hold it to drag the group to the desired location.
Signature and Signature Date Fields
In eDocs, applicant signature and applicant signature date fields (external) as well as counter signature and counter signature date fields (internal) feature the same set of capabilities and tools. Just as is true with the date input field, both signature date and counter signature date fields display using the mm/dd/yyyy format. The system recognizes when the date field is accessed by a recipient through a mobile device and automatically displays the numerical keyboard for ease of data entry.
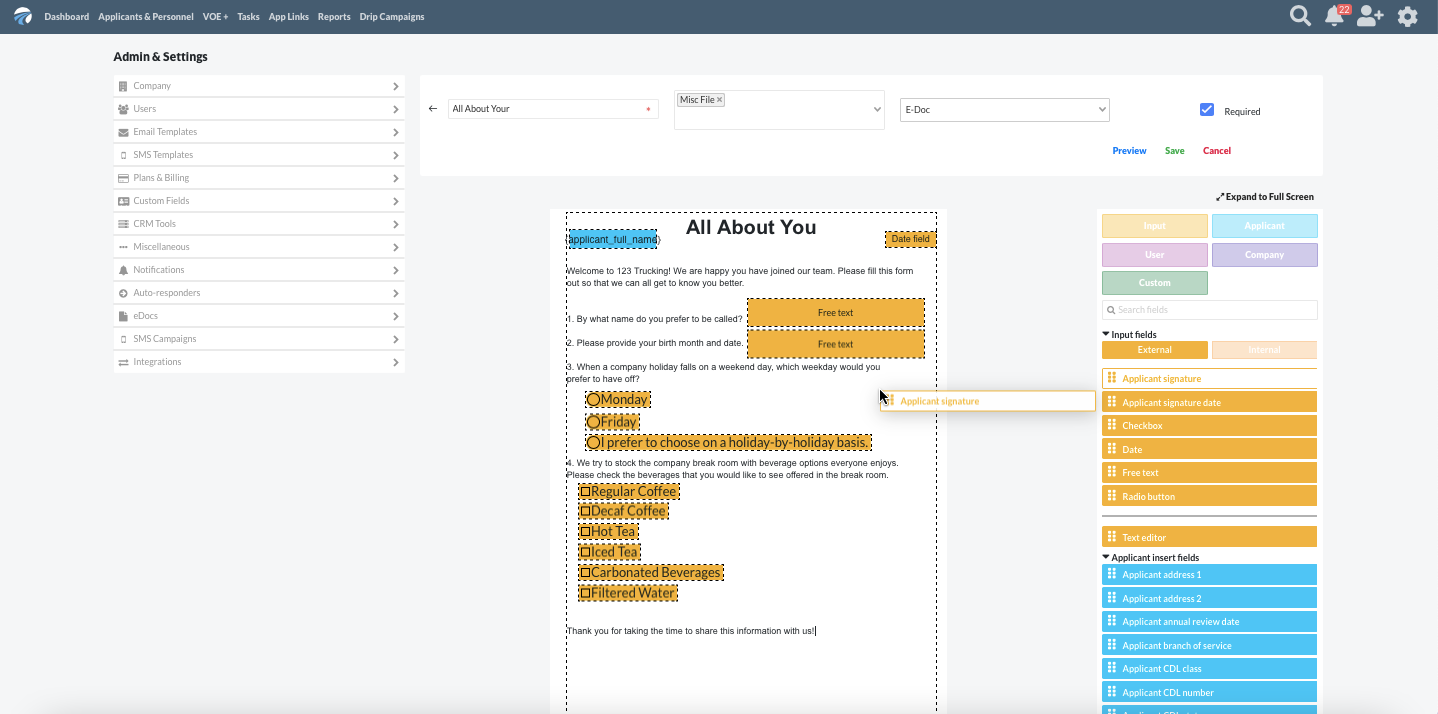
For example purposes, we will use applicant signature in the descriptions below, but these instructions apply to all four of these signature-related input fields.


To insert a signature-related input field into an eDoc, click on the appropriate button from the list of input fields and drag it to the eDoc, dropping it in the correct location.
To delete a signature-related input field, click on that field and select the small red “x” in the upper right corner to make it disappear.

Data Point Fields
The other four types of insert fields are all data point fields, which means that they are populated by pulling specific pieces of information about applicants, personnel, and leads saved within the DriverReach system. These fields include applicant, user, company, and custom insert fields, and they have one important feature that distinguishes them from input fields: you can insert them into an eDoc inline or via the drag and drop method.
Inline vs. Drag and Drop
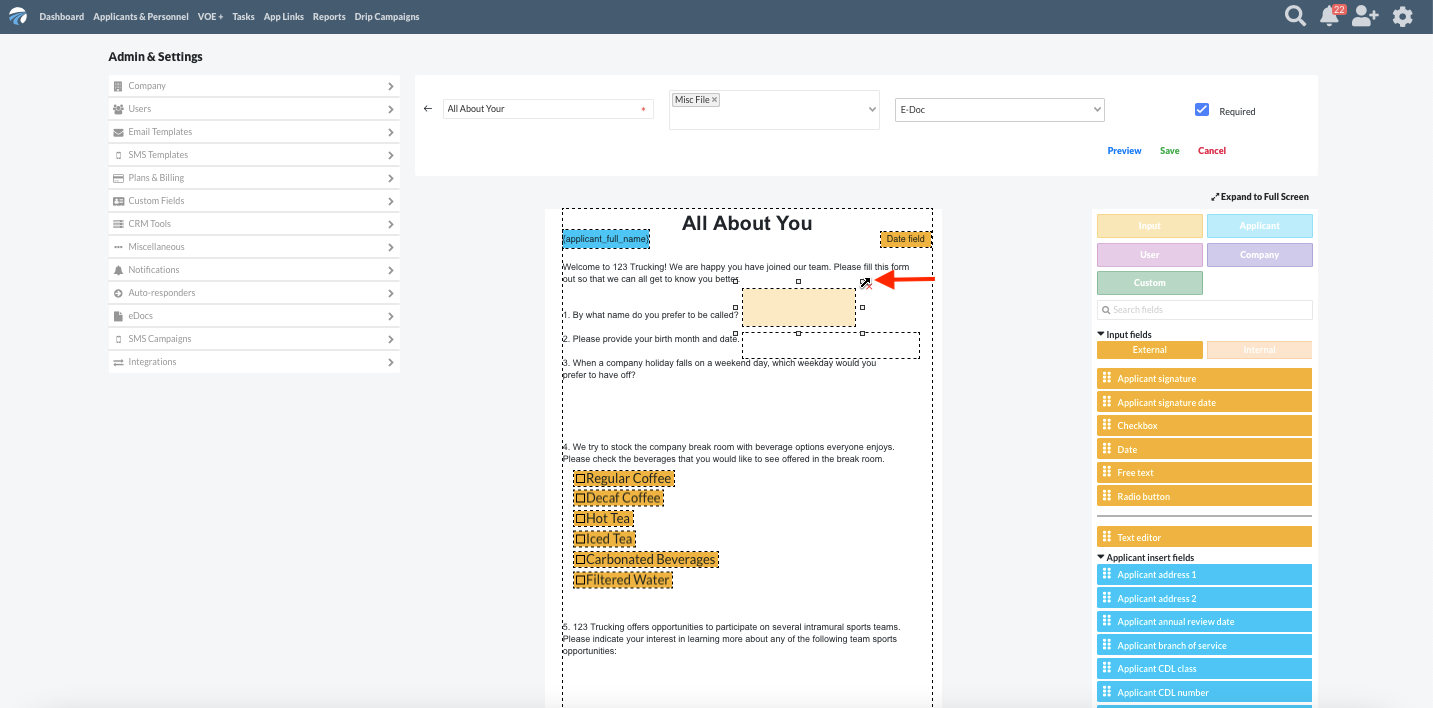
When a user has clicked into a text editor field, both the inline and drag-and-drop insert fields are visible and available for use for the applicant, user, company, and custom insert fields. If the text editor is not actively in use (no cursor is active inside of it), then the inline insert items will not be visible, and only the drag-and-drop items will be present. In the image below, the inline fields are listed in the left-side column under the “Applicant Insert Fields” heading, and the drag-and-drop fields are listed in the right-side column.

The inline insert capability makes it easy to add a data insert field inline to (i.e. right next to/on the same line as) text. Using the inline feature ensures that the data format of the insert field is the same as the format of any typed text. The drag and drop method is useful when a data point input is to be added to a predesigned, uploaded form or when it is to be added directly to an eDoc outside of the text editor. The images below illustrate how these fields look after placement within the text editor using the user and company insert fields as examples.

Applicant Insert Fields
Applicant insert fields, color-coded blue, include all of the various data points that the DriverReach system has for individual records–such as applicants, personnel, and leads–in the system. Examples of these fields include name, social security number, date of birth, CDL number, and the applicant’s record. If a specific data point in the system does not exist for the individual record in question (for example, if a lead record does not have a social security number), then the data point will simply be left blank on the document for that individual's record. This missing data will not prevent the user from sending the document. Applicant insert fields can be added to an eDoc in either of two ways:
- Inline by simply placing the cursor in the text editor and then clicking the (text) button in the left column, or
- Via the drag and drop method by clicking on the item from the right column and dragging and dropping it in the text editor.

User Insert Fields
User insert fields, color-coded magenta, include all of the various data points that the DriverReach system has for the actual user creating the eDoc. Examples of these fields include name, email, phone number, and signature. When building a document template, if one user sends documents to a recipient with user insert fields included, those fields will be populated with that user’s information. If a second user sends documents to the same recipient with user insert fields included, that document will be populated with information from the second user. User insert fields may be added to an eDoc two ways:
- Inline by simply placing the cursor in the text editor and clicking the (text) button in the left column, or
- Via the drag and drop method by clicking on the item from the right column and dragging and dropping it in the text editor.

One of the user insert fields is a signature–this is the user’s signature and is applied to the document at the time the document is sent. This field should not be confused with a counter signature, which only applies to documents that have been returned by a recipient and requires a counter signature upon receipt.

Company Insert Fields
Company insert fields, color-coded purple, are mapped to company data housed within the administration section of the DriverReach platform. To change this data, users with the appropriate clearance must edit it there. Contact information for the company, such as address and phone number, correlates to the main location address rather than to any other locations associated with the organization. The company’s DOT link, website address, and EIN number are also available as insert fields.
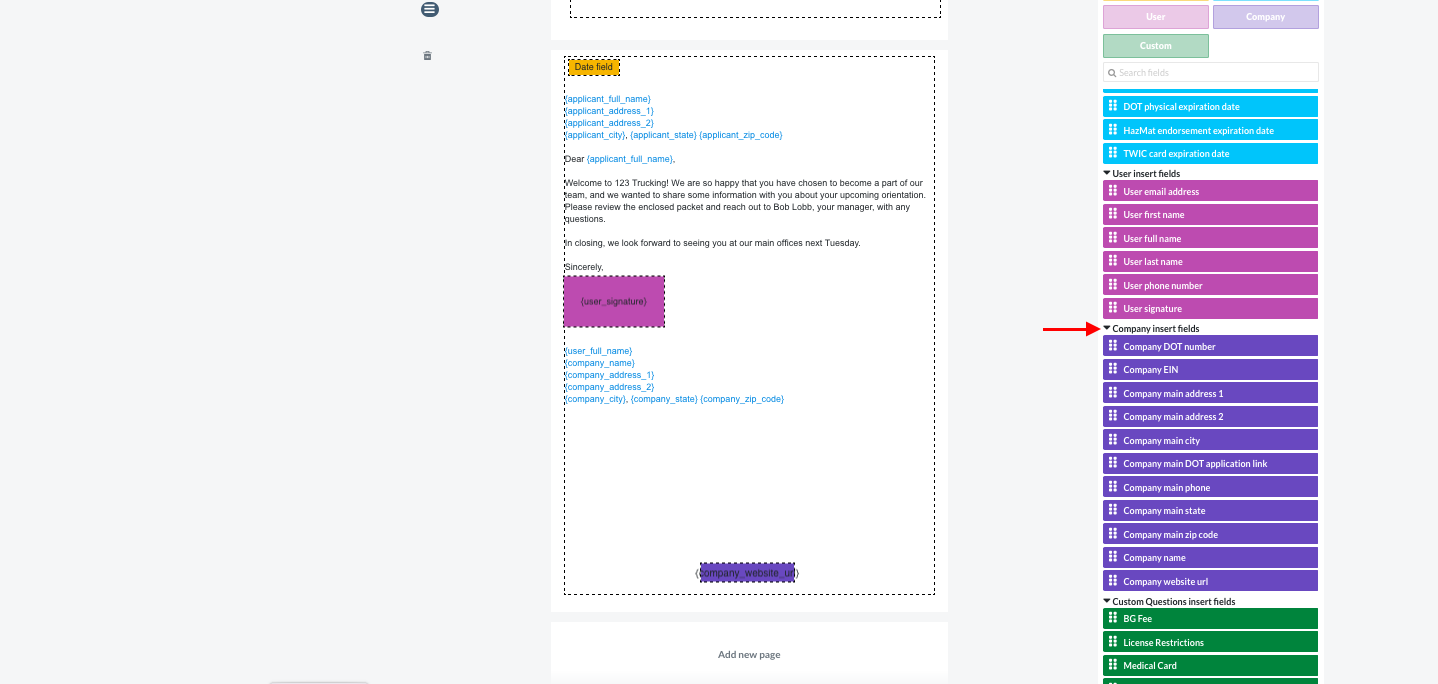
Company insert fields may be added to an eDoc two ways:
- Inline by simply placing the cursor in the text editor and clicking the (text) button in the left column, or
- Via the drag and drop method by clicking on the item from the right column and dragging and dropping it in the text editor.

Custom Insert Fields
Custom insert fields, color-coded green, correlate to custom questions. Custom questions are an upgrade feature available on the DriverReach platform. If custom questions are included in a user’s DriverReach account, then the option also exists for the user to flag those questions to be available as insert fields. If there are no custom questions included with a user’s DriverReach account, custom questions insert fields for that account will also be absent. Of course, because of the customized nature of the data they are based on, custom insert fields will also look different for every company with this upgrade feature.

Custom insert fields may be added to an eDoc two ways:
- Inline by simply placing the cursor in the text editor and clicking the (text) button in the left column, or
- Via the drag and drop method by clicking on the item from the right column and dragging and dropping it in the text editor.

Beyond Insert Fields
Now that we’ve introduced eDocs insert fields and explained how they work, visit Creating eDocs for step-by-step instructions on building eDocs that make excellent use of these powerful, versatile tools.
Watch the video to learn more about internal insert fields: