With DriverReach's Applicant Stage Automation (ASA), users can set up custom automations to ensure that re-engaging applicants bubble up to the top of your recruiting funnel and receive the prompt attention and communication that is key to winning them over and hiring them. If an applicant who had previously applied or worked for you applies a second time (or even returns to your pipeline as a lead sent in through the API from a job board or lead generation partner), ASA can route them directly into your recruiting team's work list. ASA is totally customizable so you can connect any exit stage (e.g. any of the custom levels/reasons under No Current Interest or Terminated) to any other stage or stage level. Work smarter, act faster, and respond better to the highest quality applications -- here you'll discover how ASA saves you time and money and find step-by-step instructions for implementing an ASA and deleting an ASA within the DriverReach platform!
Save Time and Money with ASA
DriverReach is all about empowering our customers to leverage technology in order to recruit the best candidates as quickly and as efficiently as possible. We've learned from our users that one of the ways trucking recruitment software lets customers down is its inability to recognize that an applicant is actually already in the recruitment pipeline and therefore may require a special case scenario the software is not built to anticipate. One example is an applicant who applied just last month and made it to the "Active Prospect - Approved" stage but then ended up accepting a position elsewhere and leaving your recruitment pipeline. If this applicant were to re-apply to your organization due to dissatisfaction with his or her current employer, he or she should be assigned some type of priority status and, to save the applicant and your organization time and effort, may skip past some recently completed recruitment stages. Other recruitment platform algorithms simply send this individual right back to the beginning of the applicant pipeline. As a result, both the applicant and the recruiter expend unnecessary effort redoing work--a frustrating experience for both. Worst of all, organizations waste time and miss out on filling an open position with an interested, qualified individual who has already successfully passed through certain recruitment stages. Ready for step-by-step instructions on how to eliminate these hiccups from your recruitment process using ASA and how to delete an existing ASA? You're in the right place.
Step-by-Step Guide to Creating an ASA
Step 1
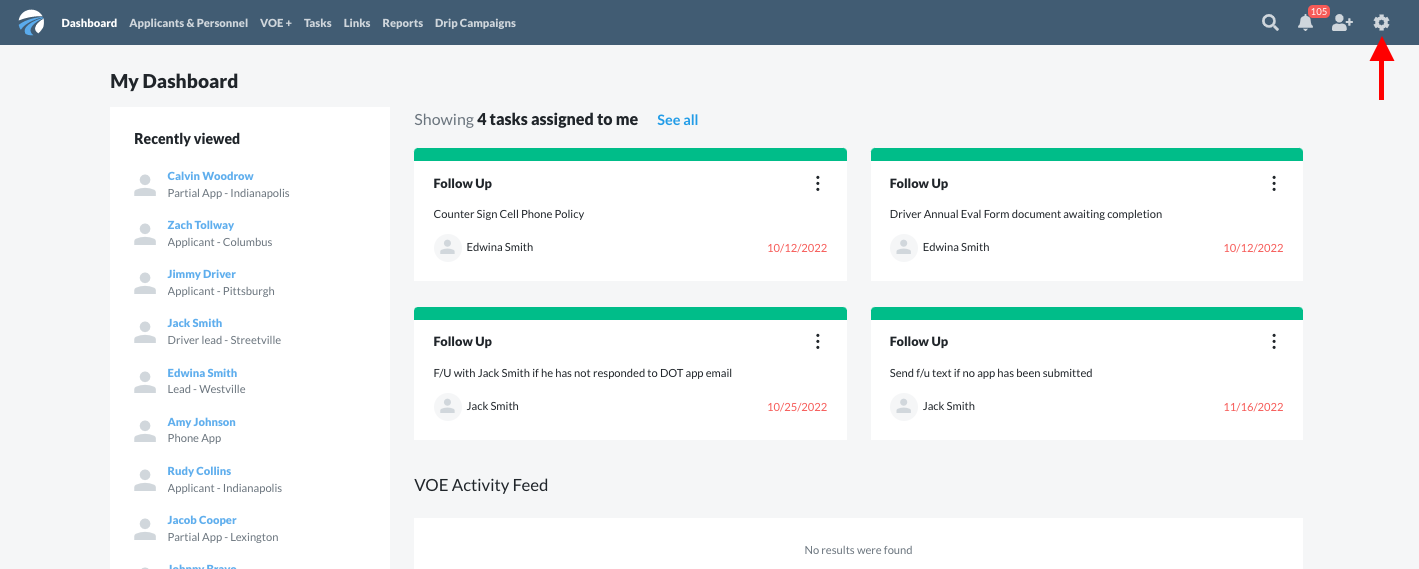
Select the cog icon in the top right corner of the screen from within the blue main navigation menu.
 Step 2
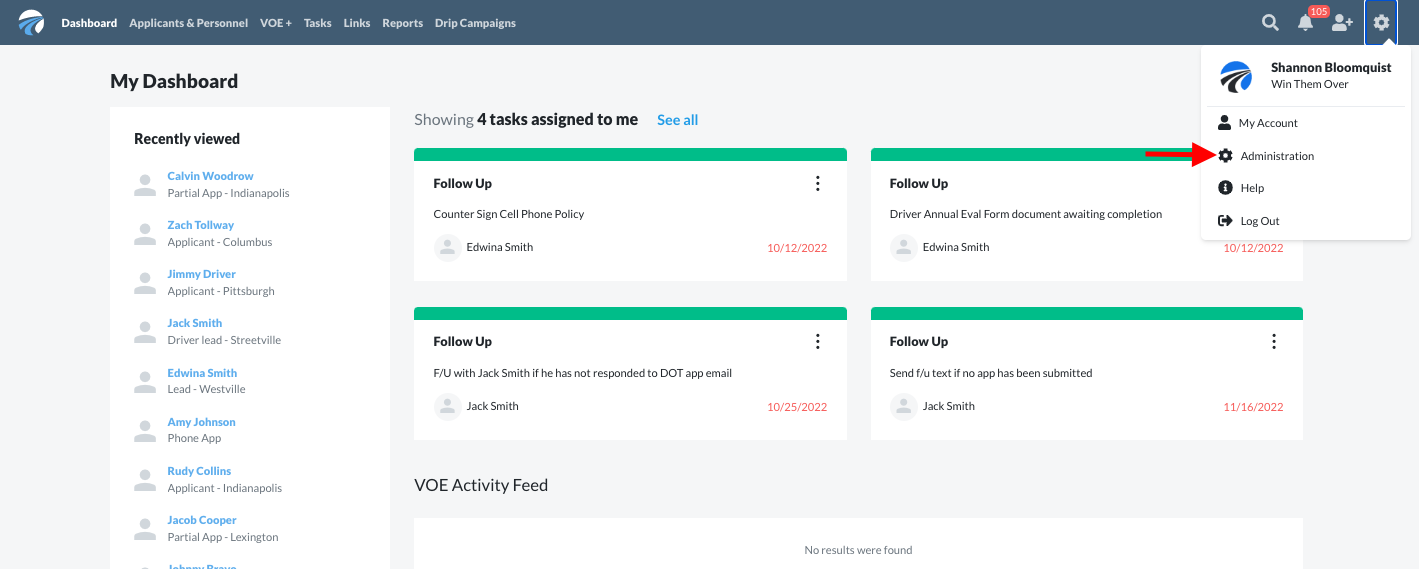
From the drop-down menu that appears, select the cog icon labeled "Administration".
 Step 3
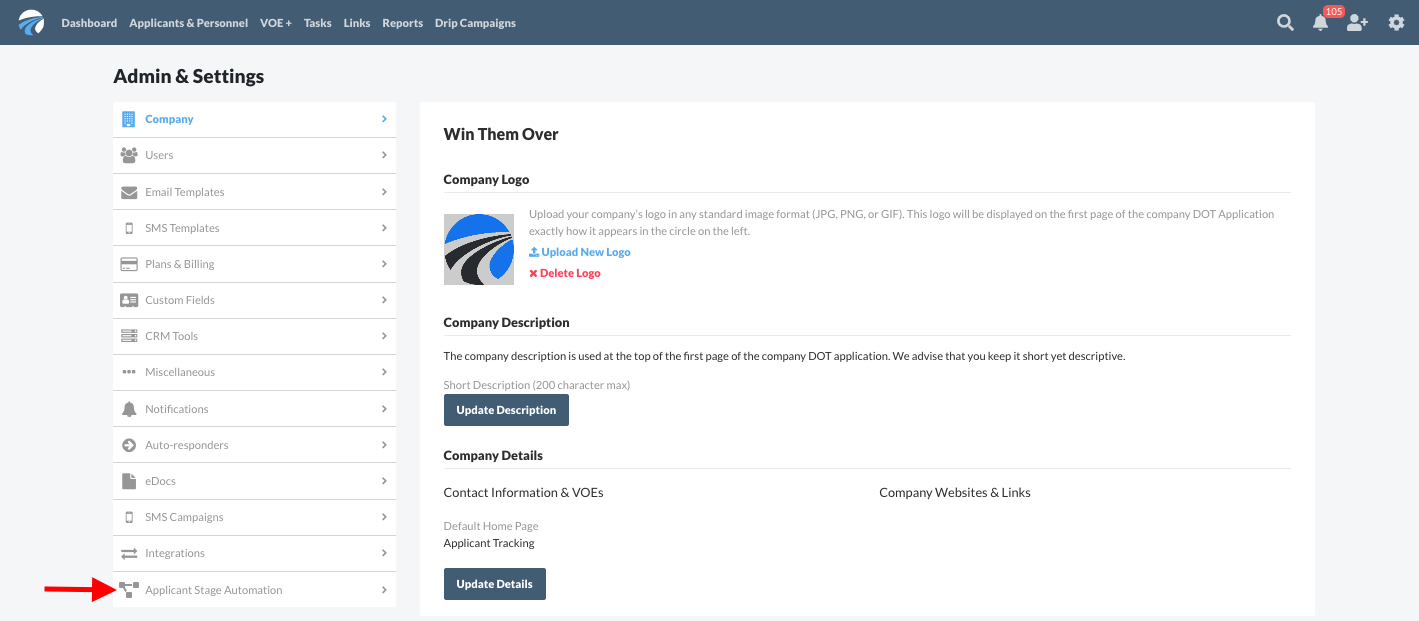
Within the "Admin & Settings" menu running down the left side of the window, select "Applicant Stage Automation".
 Step 4
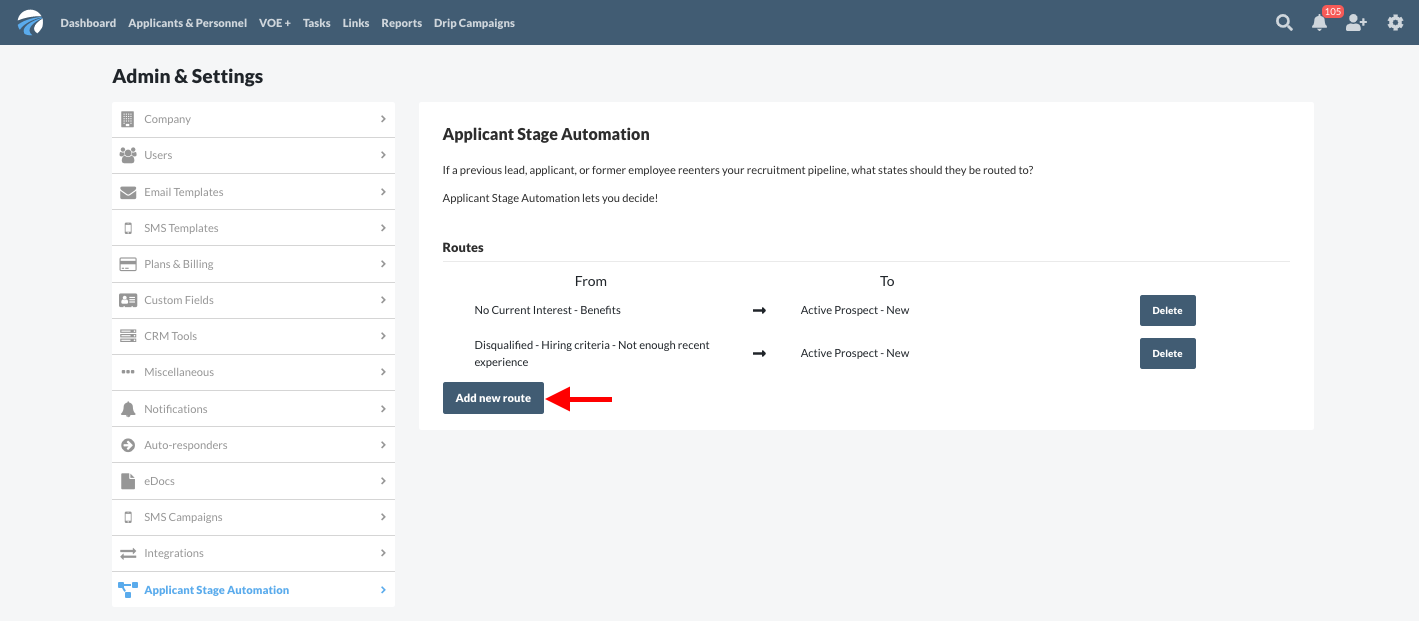
Click the blue "Add new route" button (if routes are already present as they are in the screenshot below, you may have to scroll down to find the button at the bottom of the list of those options).
Step 5
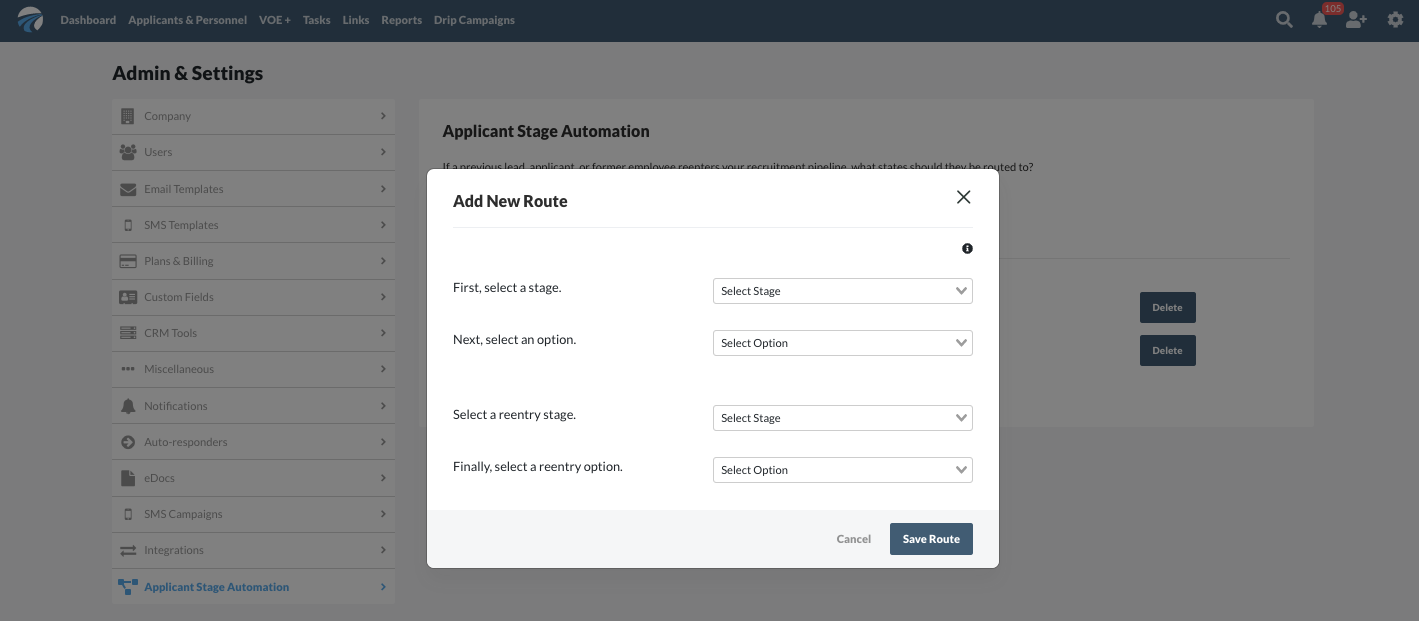
In the pop-up window that appears, make the appropriate selections.
 Step 6
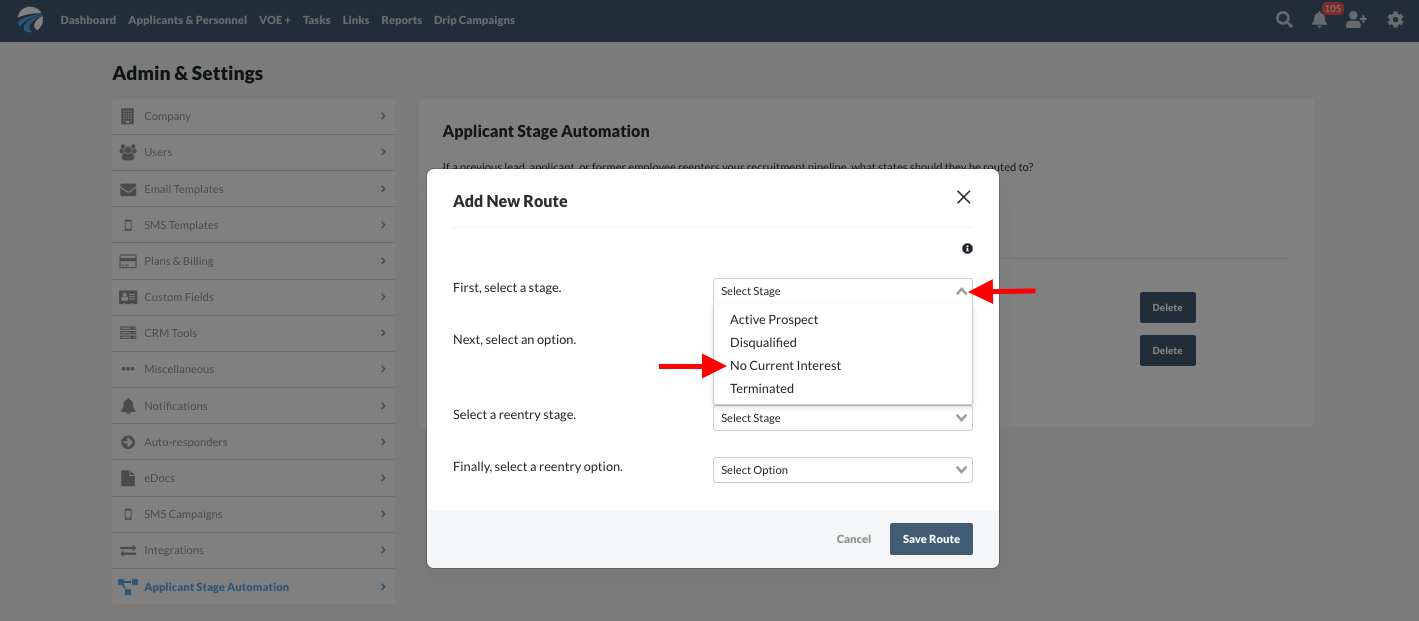
These selections will depend on the situation and will vary between users. In this example situation, our premise is that 123 Trucking recently increased its pay rate for drivers. Recruiters know of several qualified applicants who indicated no current interest a few months ago because 123 Trucking's pay package just didn't meet their needs. These same applicants may wish to re-apply after receiving marketing information announcing this attractive wage increase. Let's use the ASA feature to make sure those previous applicants enter 123 Trucking's recruitment pipeline in the correct stage to save everyone time and effort. To begin, click on the drop-down menu labeled "First, select a stage". The first selected stage in this case will be "No Current Interest" to be sure it only applies to those labeled that way in the system.
 Step 7
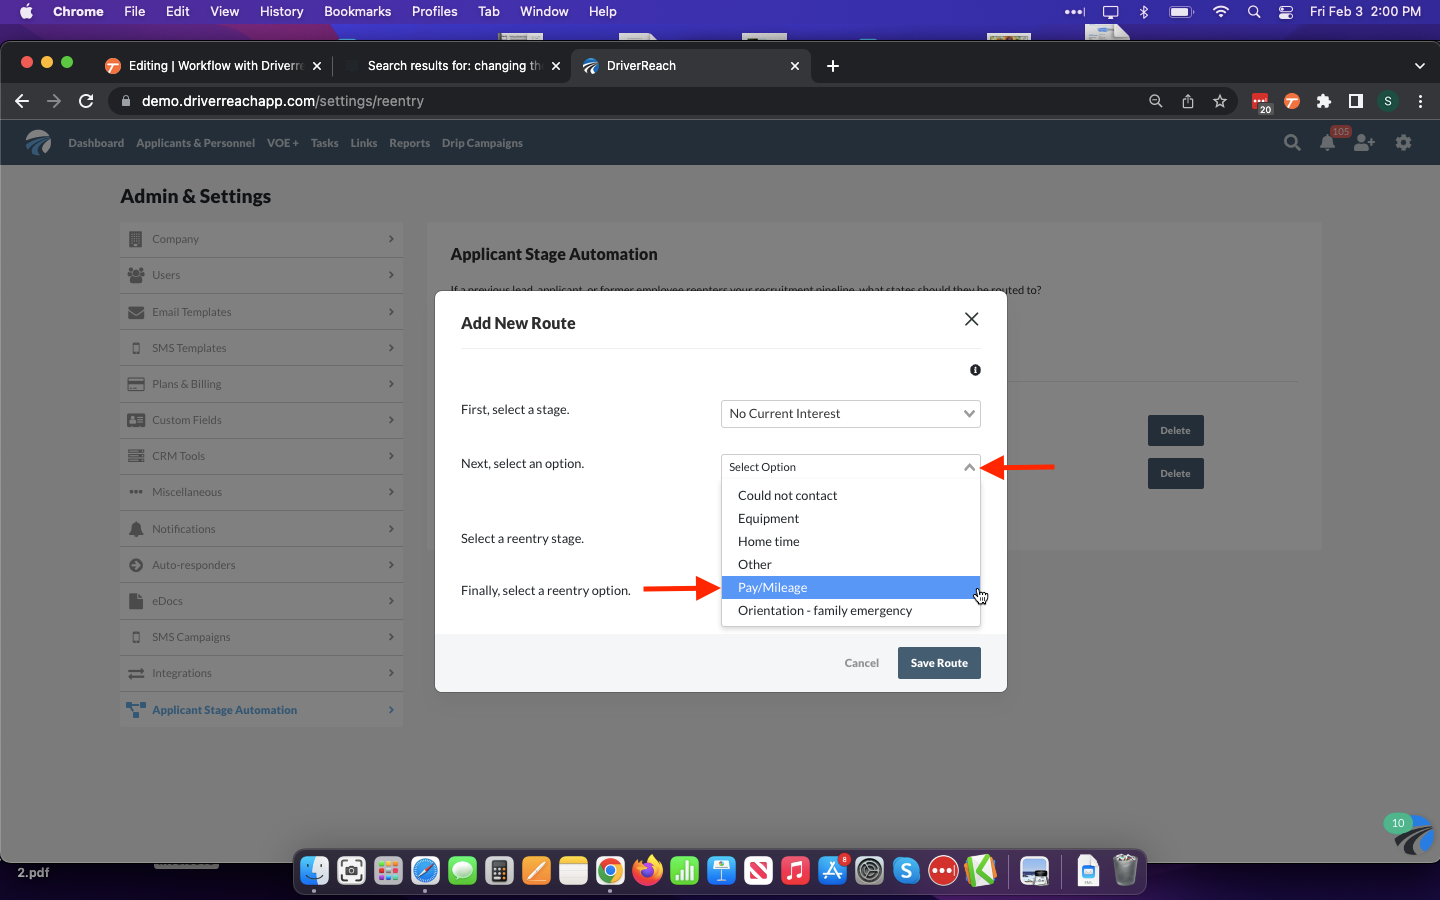
Next, we can make this ASA even more specific by selecting "Pay/Mileage" from the "Next, select an option" drop-down menu--now we have narrowed it down to only those with no current interest due to pay or mileage rates.
 Step 8
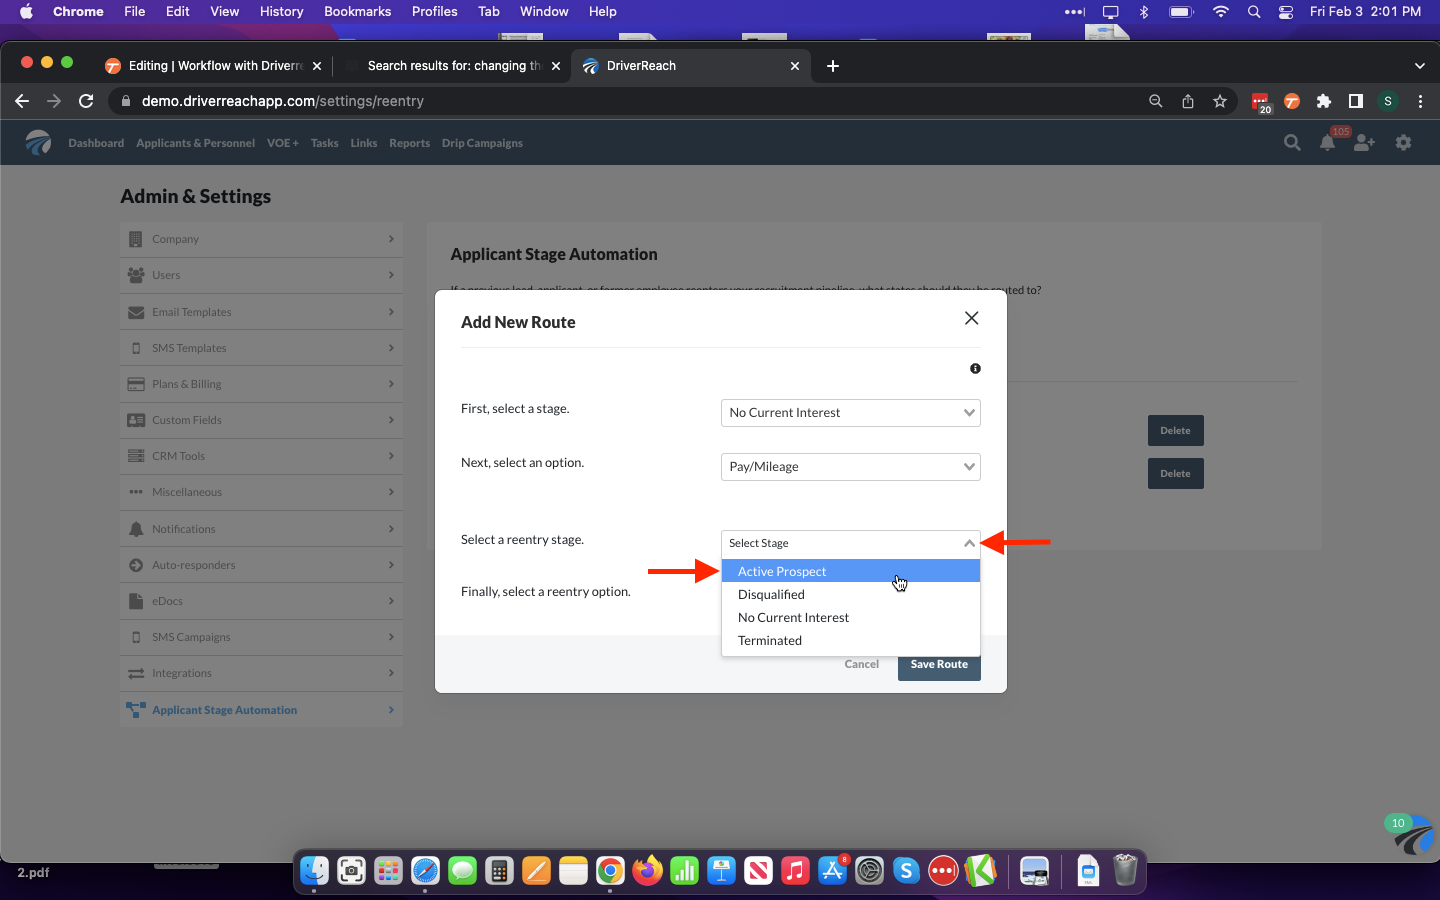
Moving down to the "Select a reentry stage" drop-down menu, we will select "Active Prospect" from the list.
 Step 9
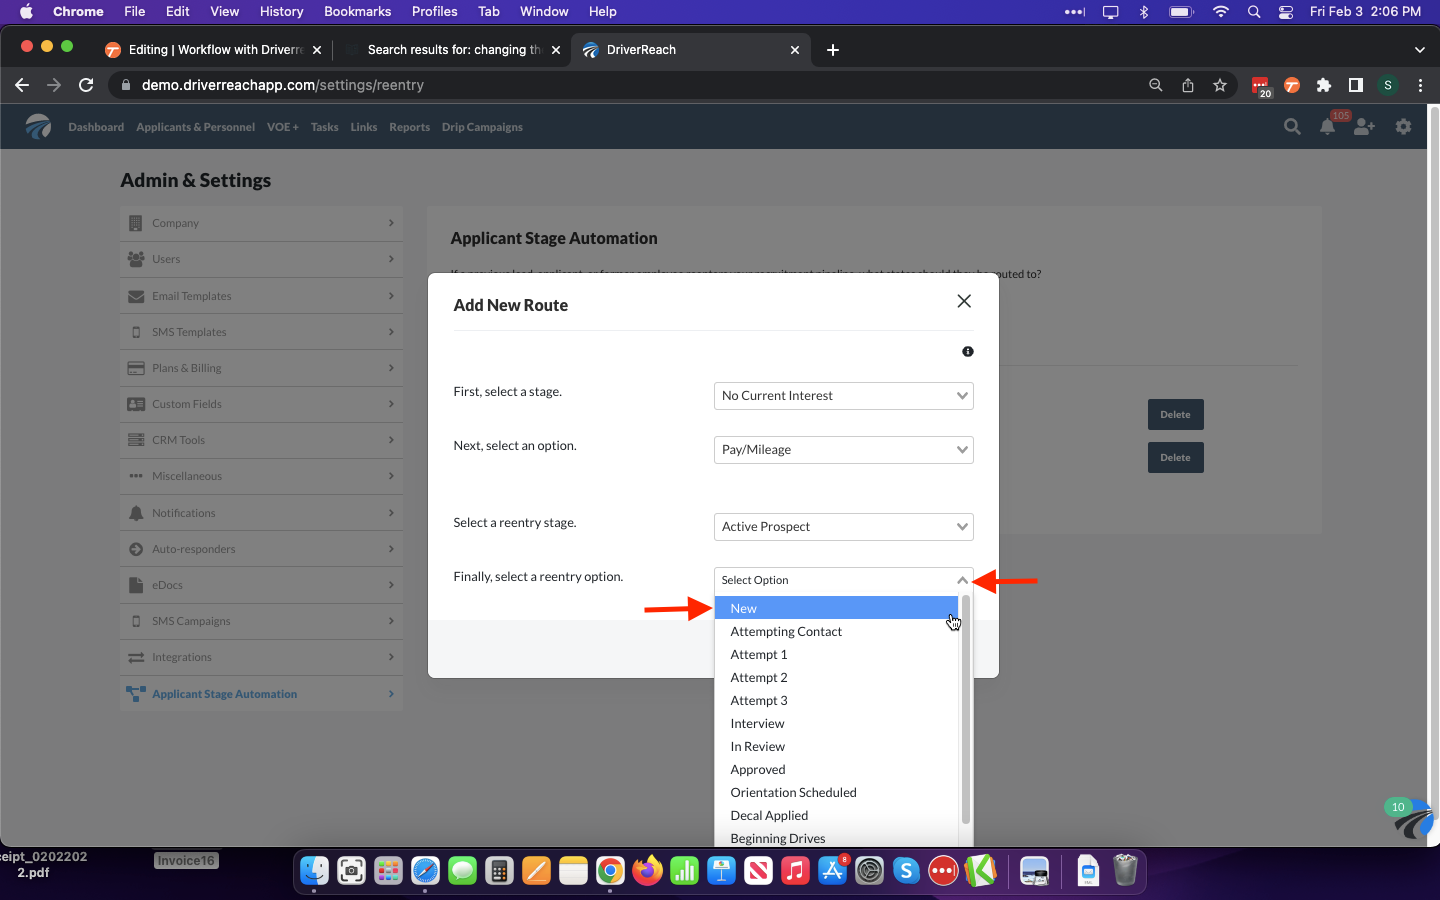
For the "Finally, select a reentry option" drop-down menu, we will select "Active Prospect - New" to make sure that any former applicant returning to this recruitment pipeline who has been marked as "no current interest - pay/mileage" will reenter the system as an "Active Prospect - New" instead. This more accurate stage will also serve to alert recruiters as quickly as possible that the applicant has re-engaged. Recruiters now have the opportunity to give these applicants the time and attention required in order to win them over to the 123 Trucking team while their interest is piqued.
 Step 10
Click the blue "Save" button located in the lower right corner of the pop-up window to add this ASA to your list and make this change official. Clicking the white cancel button will discard all changes and close the pop-up window.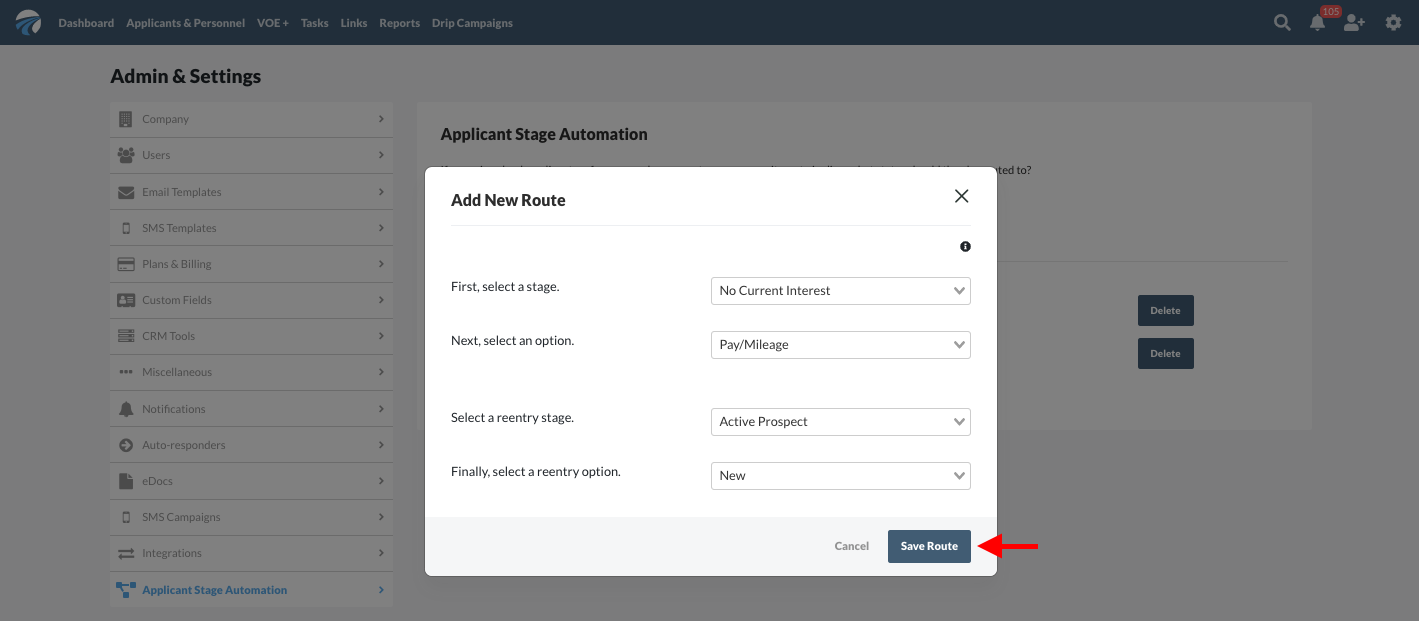
Step 11
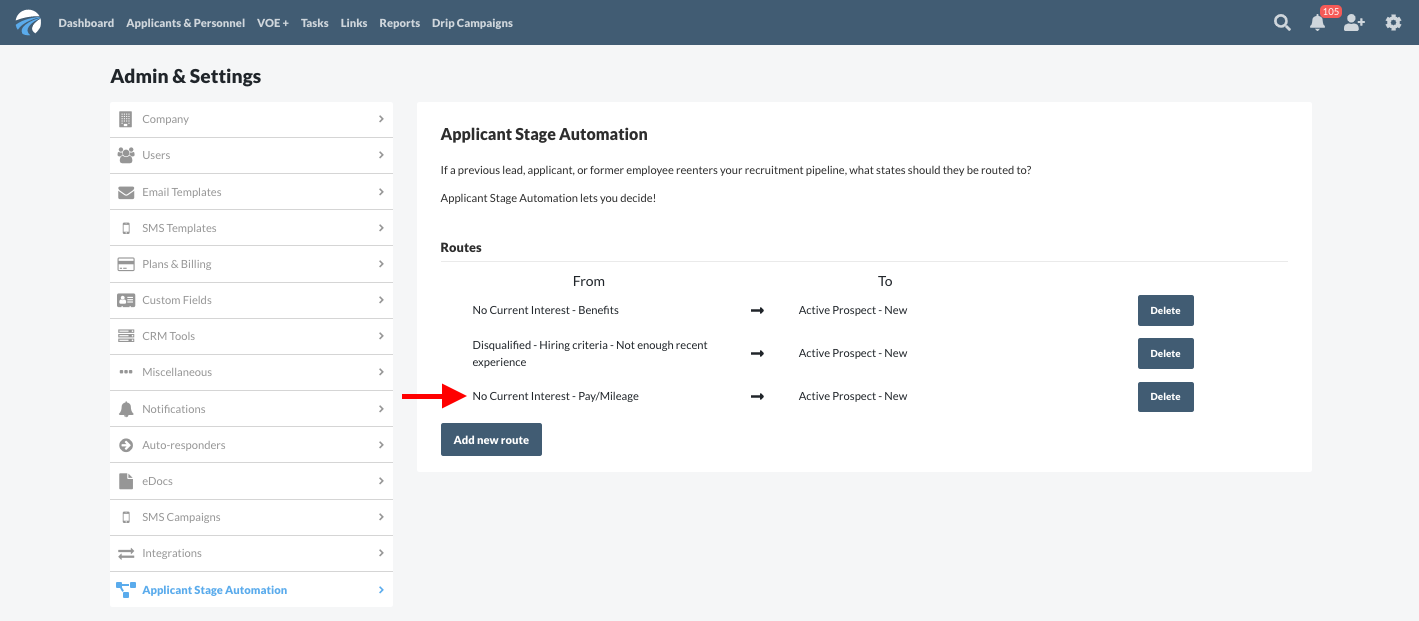
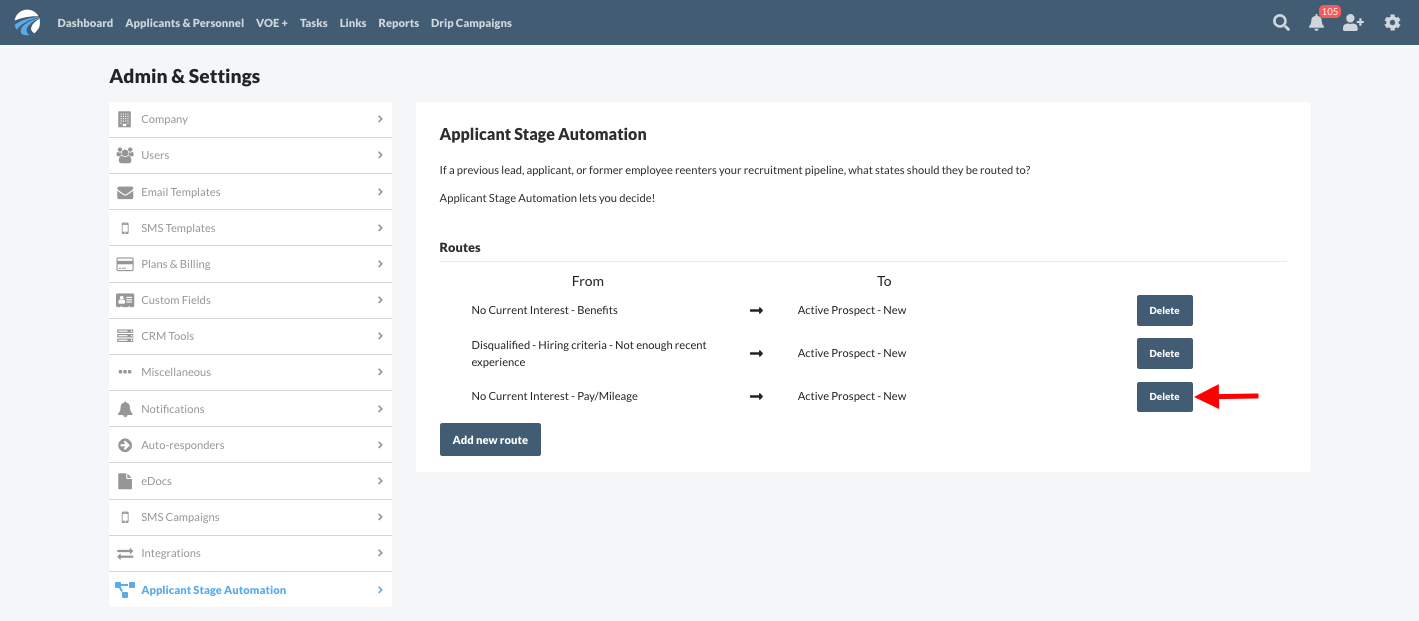
The new ASA is now saved on the ASA landing page and is officially in effect for all applicants who meet the chosen criteria.
Deleting an ASA
Step 1
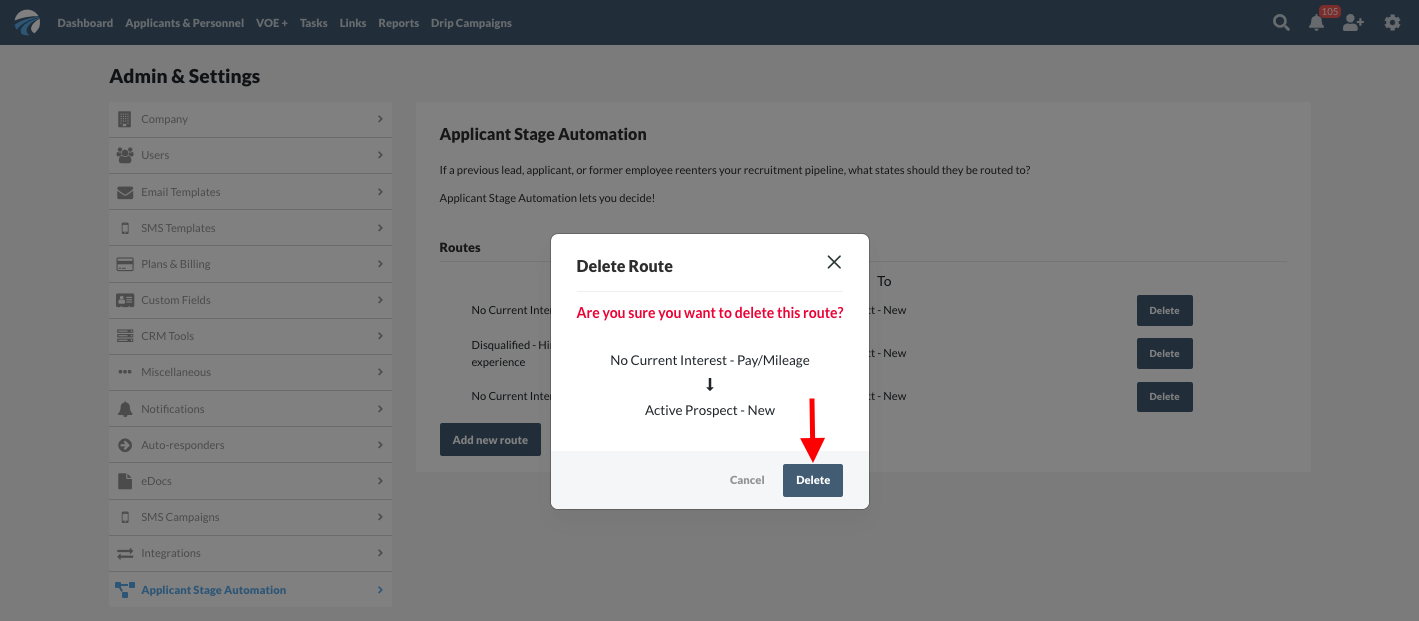
Delete an existing ASA from the ASA landing page by simply clicking on the blue "Delete" button next to that route.
Step 2
In the pop-up window that appears asking whether you are sure you want to delete the route, select the blue "Delete" button to confirm your choice. Alternatively, select the white "Cancel" button if you do not wish to delete the route after all.
