DriverReach's integration with Vertical Alliance streamlines the recruitment process. Read on to learn more about how these two powerful platforms can work together for you!
Table of Contents
- Vertical Alliance Categories
- Initial Integration Set-Up
- Behind the Scenes
- Triggers
- Manually Assigning Users to Groups
- Checking Status of Assigned Materials
What are the definitions of Vertical Alliance categories?
The Vertical Alliance platform consists of three categories: users, groups, and assignments. Before we explain our integration with Vertical Alliance, let's define each of these categories.- Users are the individuals who learn topics on the Vertical Alliance platform.
- Groups are a way to organize users who share a specified characteristic--for example, all applicants in orientation may be grouped together, while all hired applicants may form a different group.
- Assignments are the courses that contain the content for a Vertical Alliance account.
It's useful to note that groups do not automatically have assignments selected for them. In fact, it is possible for a group to have no assignments--in this case, when a user is placed in a group without assignments, that user will not receive any courses. To ensure that a user automatically receives courses, make sure to associate assignments with groups. For more information or assistance with this issue, please reach out to your Vertical Alliance representative with questions.
How do I tackle the initial integration set up?
To take advantage of the DriverReach/Vertical Alliance integration, you must be on the i3 system with Vertical Alliance. Both the DriverReach and Vertical Alliance platforms provide a way to uniquely identify applicants, which is the term used by DriverReach (in the Vertical Alliance system, the term "users" is employed). Within the DriverReach platform, this primary unique identifier is an applicant's email address, but the Vertical Alliance platform employs a variety of usernames to identify users. These usernames may or may not consist of an email address.
To ensure records are not duplicated when being transferred from DriverReach to Vertical Alliance, the DriverReach platform must first verify that the record in question does not currently exist in Vertical Alliance. For brand new records, this is not an issue because each user is created with a unified username initially, and then locked in with a GUID (a unique numerical identifier that exists behind the scenes in the Vertical Alliance platform).
Record duplication can become a problem for DriverReach customers in two situations:
- First, when a brand new DriverReach customer has an existing Vertical Alliance account, or
- Second, when a longer-term DriverReach customer has had a Vertical Alliance account for some time but has never attempted an integration between the two.
In the initial setup of the integration, as many records as possible should be matched together with the GUID. This can be accomplished by uploading an initial file containing data points which may include the individual's email address, SSN, or phone number. Additionally, the file should contain the record's GUID from the Vertical Alliance platform.
When the file is loaded into DriverReach, the system will scrub all of the account’s records, looking for any of the unique identifiers provided (email, SSN, phone number, etc.), and then associate the GUID to that record. This process prevents duplication and ensures that the DriverReach customer pays only for unique users in the Vertical Alliance platform.
How does DriverReach's Vertical Alliance integration work behind the scenes?
The DriverReach/Vertical Alliance integration is based on triggers relating to the applicant stage in DriverReach and the applicant's group in Vertical Alliance. A triggering event occurs based upon a change in an applicant's stage within the DriverReach platform. These triggering events may be tied to specific groups created within the Vertical Alliance platform. When an applicant's stage changes to one associated with a Vertical Alliance group, a predetermined assignment tied to that group is sent to the user in question. The topics of setting up triggers and manually assigning users to groups as well as checking the status of assigned materials are covered in later sections--first, read on for foundational knowledge about stages, groups, and how triggers work within our Vertical Alliance integration.
DriverReach Stages
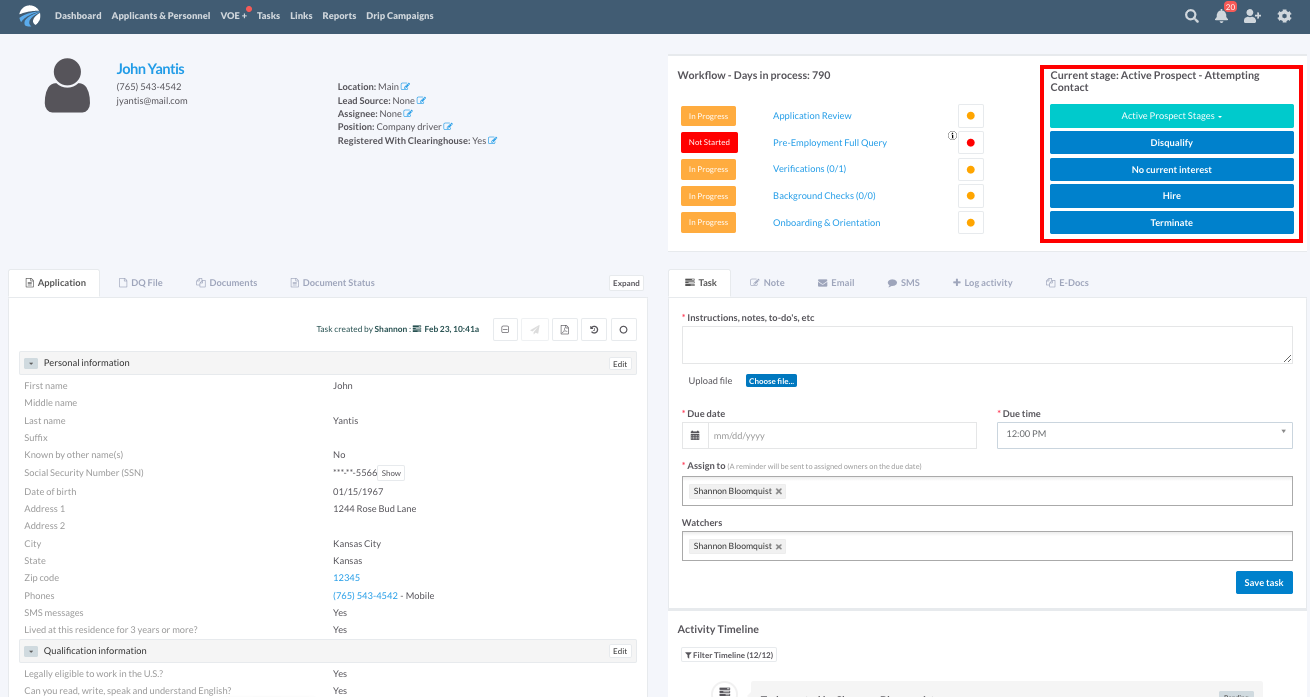
DriverReach stages for each applicant are listed in the upper right-hand corner of that applicant’s profile page as highlighted below and may consist of customizable stages, active prospect stages, and/or hard-coded stages (i.e. hired, terminated, etc.).
Vertical Alliance Groups
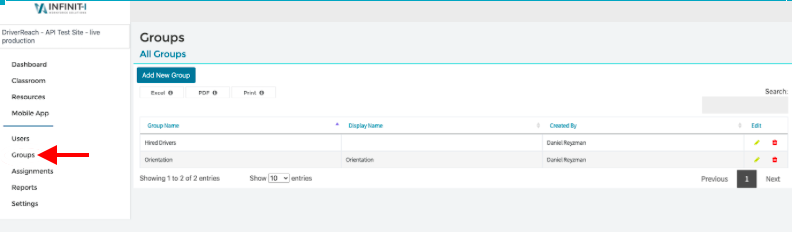
Vertical Alliance allows subscribers to add new groups within its platform--for example, below there are two groups listed: hired drivers and orientation. In this case, anytime an applicant within the DriverReach system reaches the orientation or hired stage, an event is triggered with Vertical Alliance based on any created groups associated with that stage. Subscribers to Vertical Alliance may create various groups and must associate an assignment for those groups in order to make sure applicants within the DriverReach system receive those assignments once a triggering event has occurred. To learn how to manually assign users to a group in Vertical Alliance when those users do not fit squarely into an automated rule you have set up, DriverReach makes it possible to assign a record manually to any group established in Vertical Alliance.
How do I set up a trigger, add criteria, and deactivate users?
This section covers how to set up a general trigger within the DriverReach system, how to add criteria to that trigger to make it even more specific, and provides examples of triggers with added criteria. It also explains how to deactivate users using the trigger function.
General Trigger
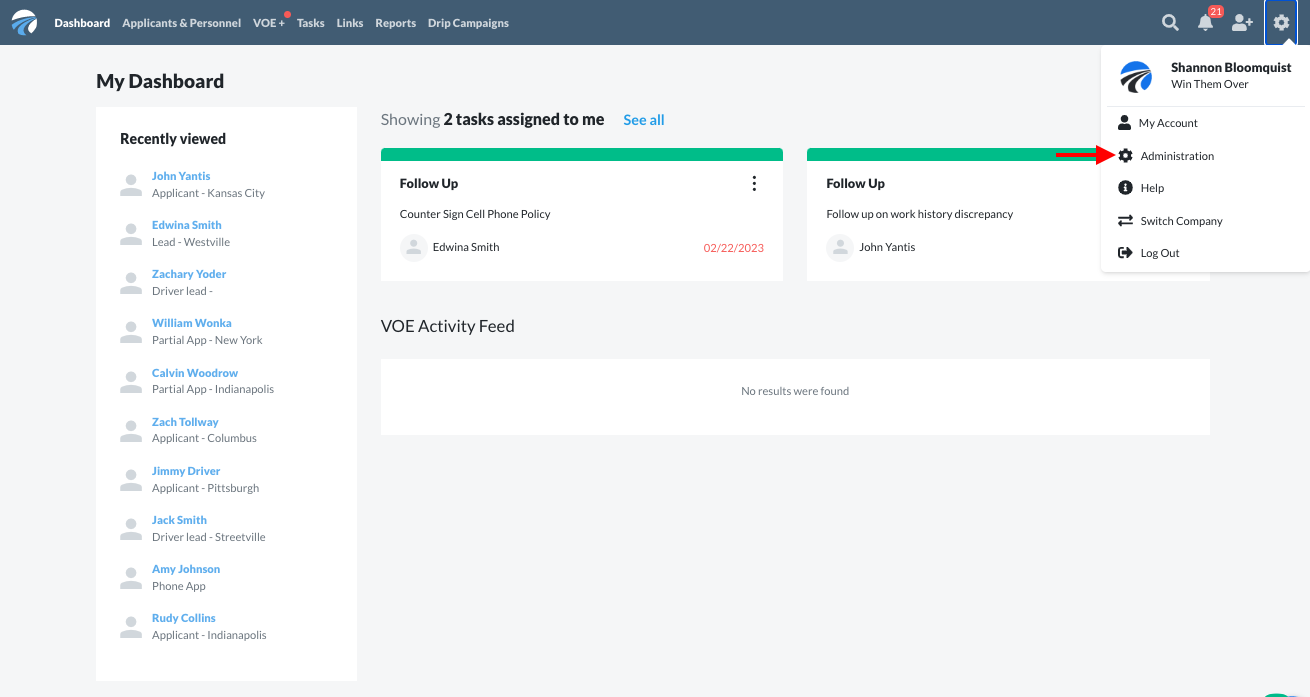
Step 1
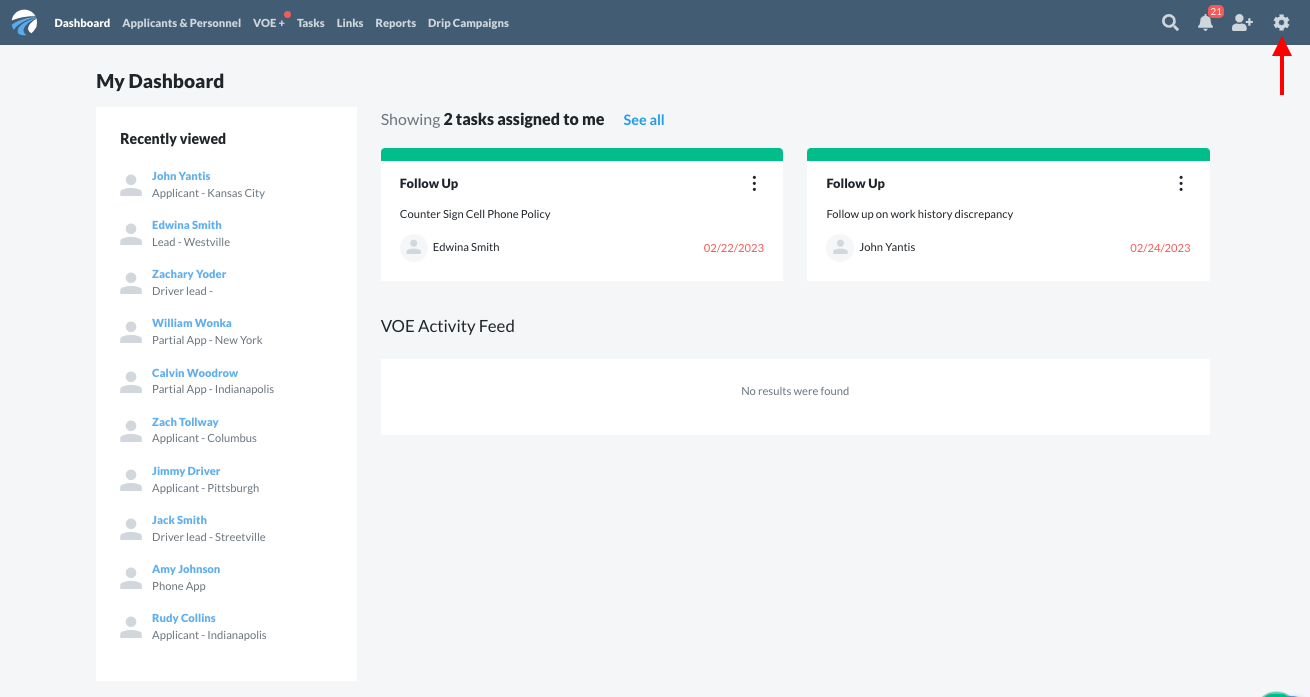
From any screen within the DriverReach system, select the cog icon located on the far right-hand side of the main blue navigation menu.
Step 2
Select "Administration" from the drop-down menu that appears.
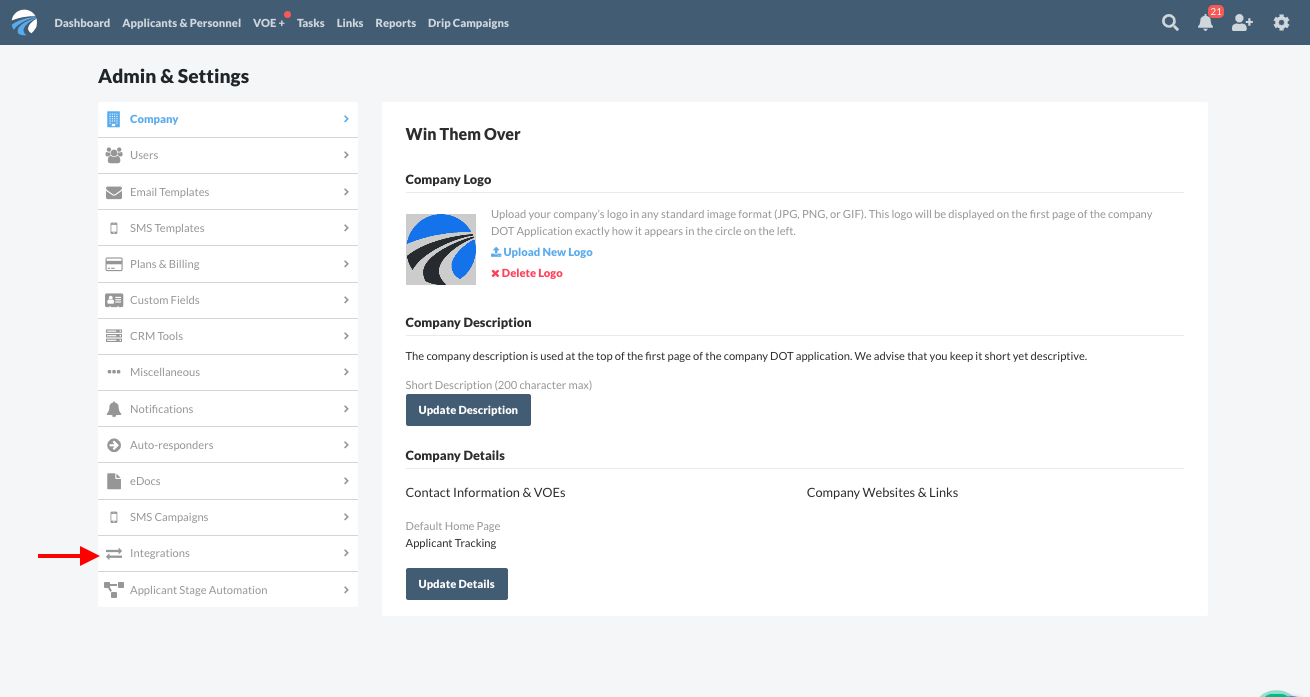
Step 3
Within the "Admin & Settings" menu running down the left-hand side of the screen, select "Integrations".
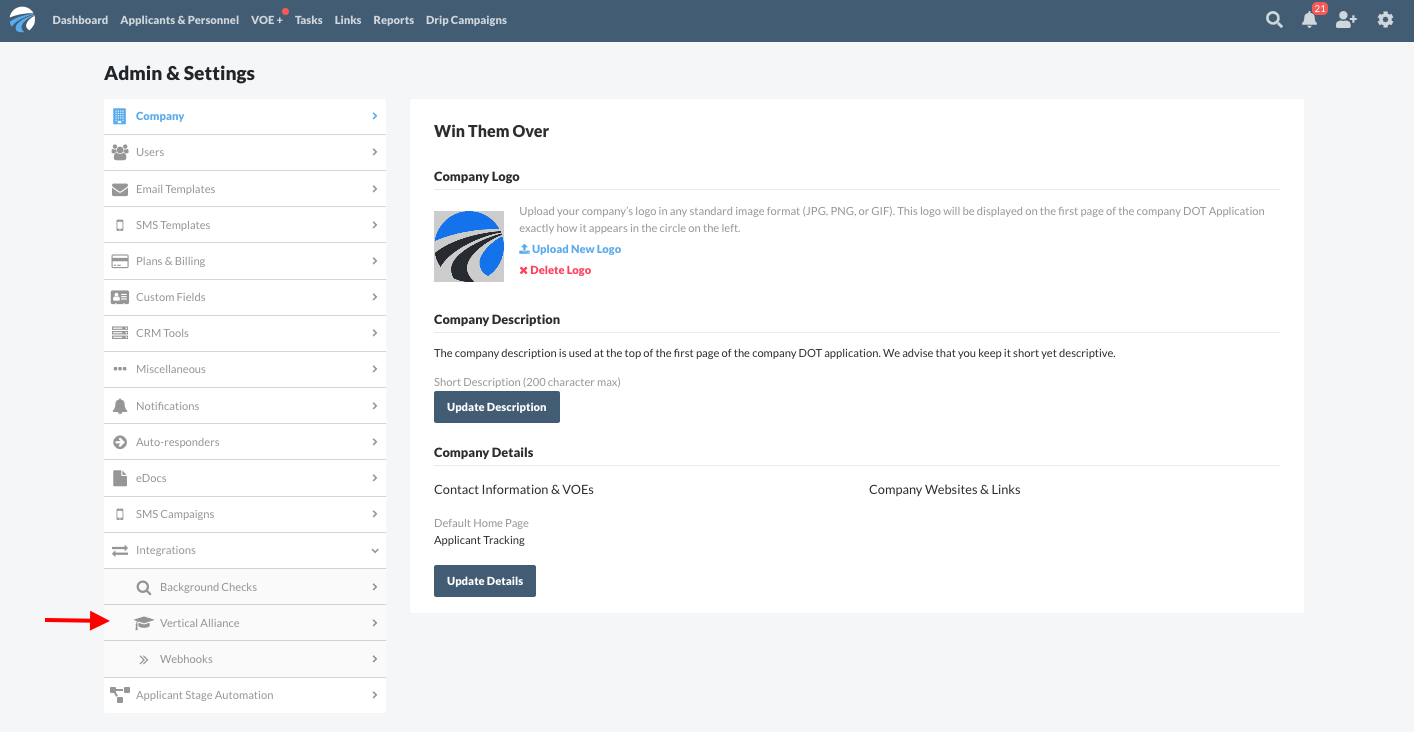
Step 4
Select "Vertical Alliance" from the submenu that appears.
Step 5
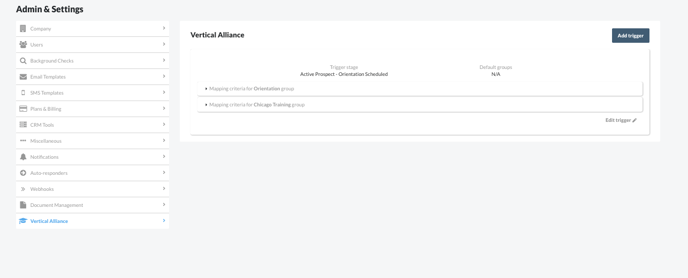
The Vertical Alliance landing page will show a list of any existing triggers--the example below shows three.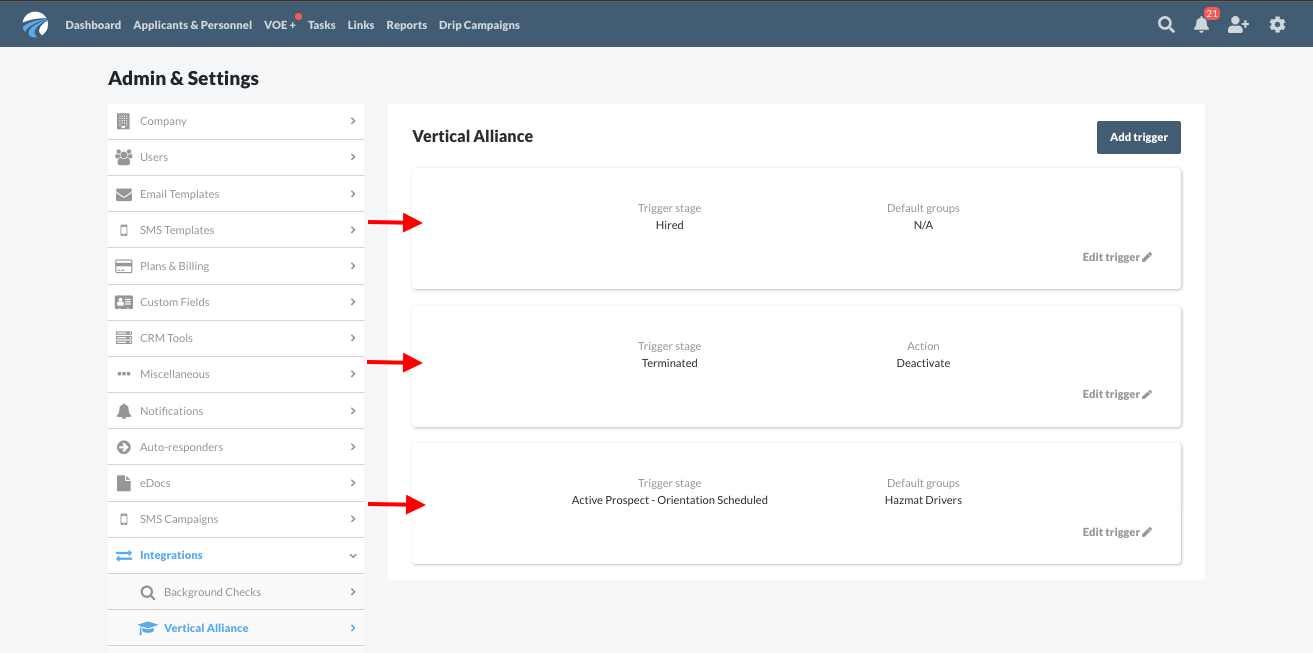
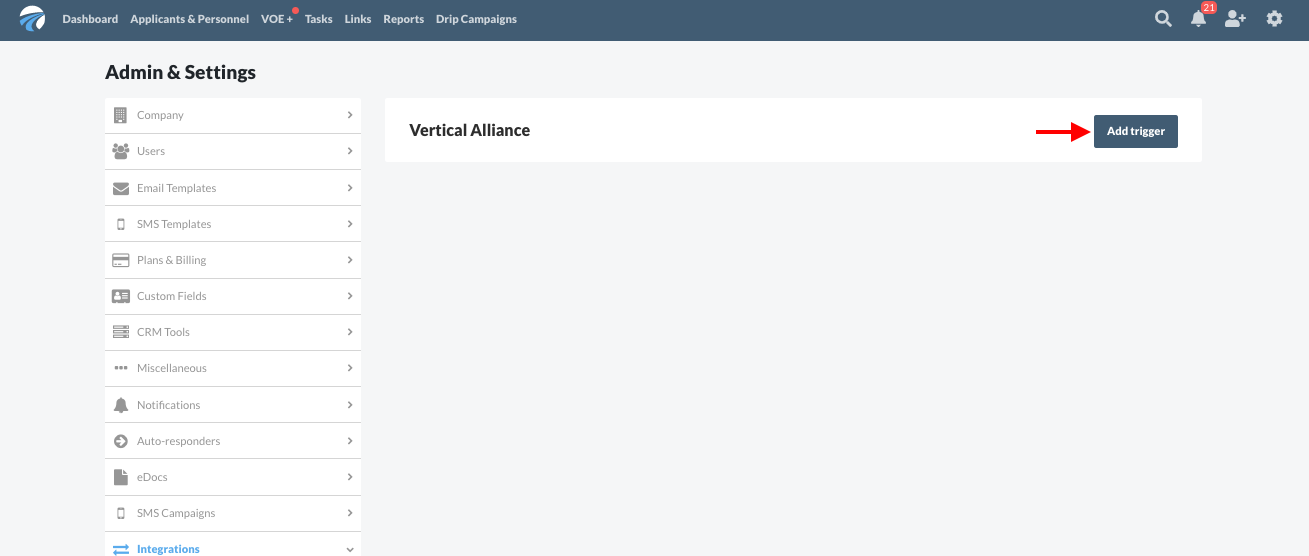
Step 6
If your organization has yet to add a Vertical Alliance trigger, your landing page will look like what you see below. To add a new trigger, select the blue "Add trigger" button located on the top right-hand side of the page.
Step 7
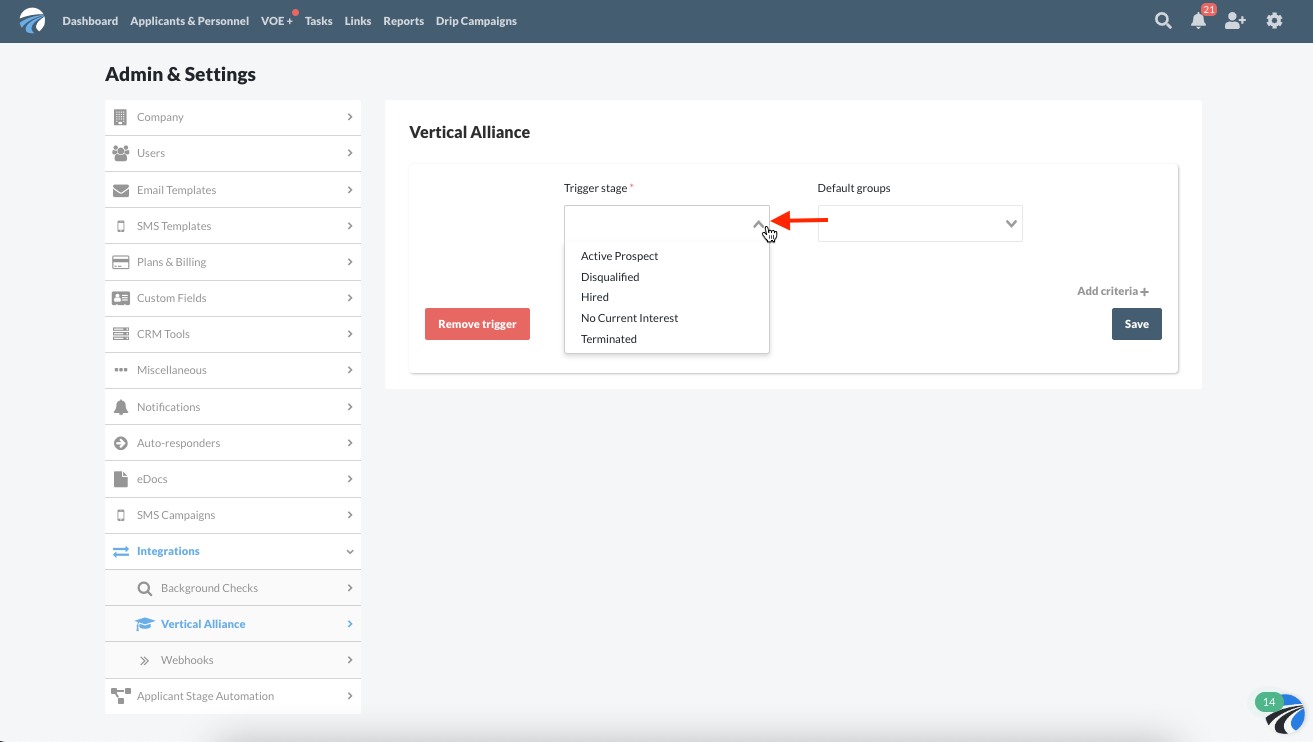
Clicking on the "Trigger stage" drop-down menu brings up a selection of choices of various stages available, populated to be identical to your DriverReach account set-up. This is a required field as noted with the red asterisk next to the menu title; simply click on the stage of your choice to select it.
Step 8
Note that the "Trigger stage" field contains both custom stages set up specifically for your account and also fixed stages. To find your organization's custom stages, select “Active prospect” in the trigger stage. Once active prospect is selected, a sub-menu will appear as you see below entitled “Active prospect level.” This sub-menu contains all the stages specifically customized to your account so that you may choose from any of them.
Step 9
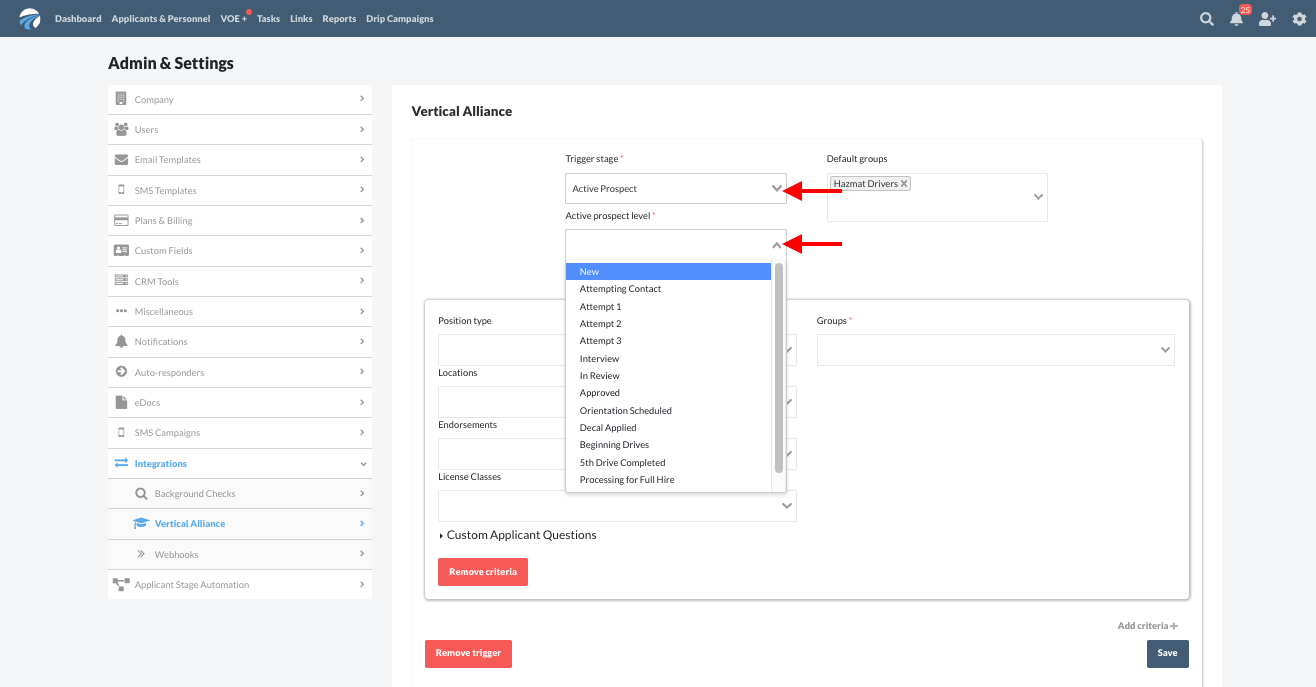
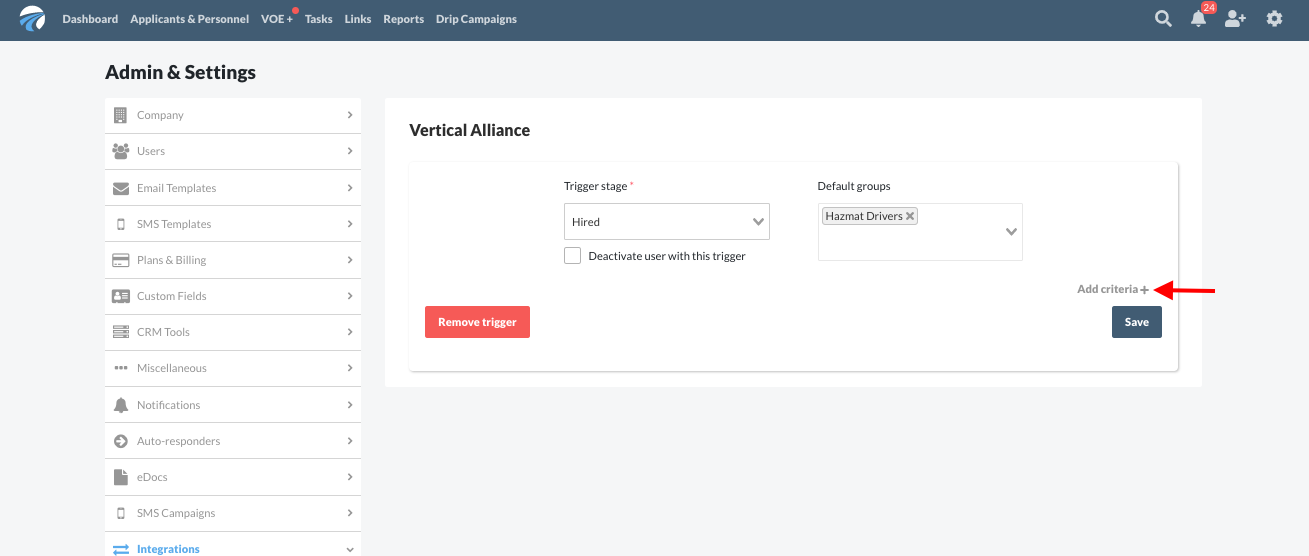
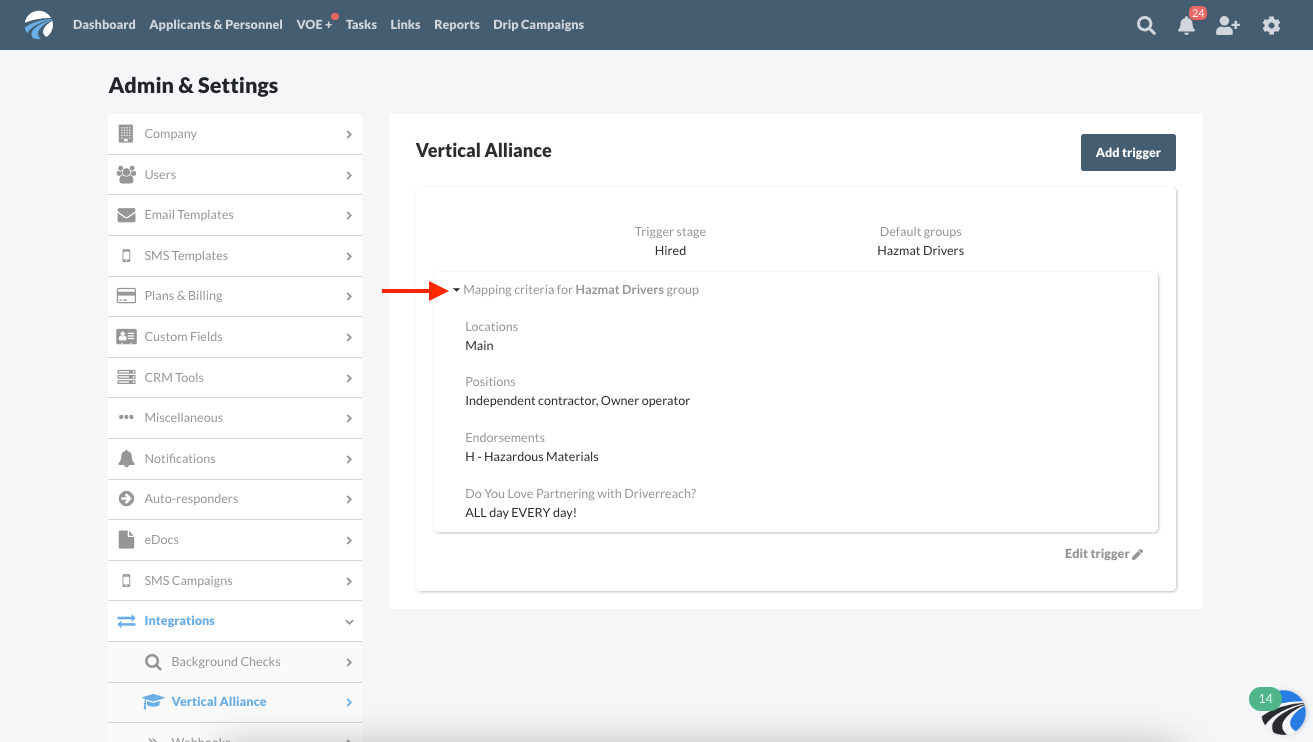
The menu on the right-hand side of the Vertical Alliance screen is the "Default groups" menu; it contains a list of the groups you have set up in Vertical Alliance, and you may choose as many groups as you like to apply to a trigger. If there is something you feel is missing in this drop-down menu, you would need to add that group to your Vertical Alliance account in order to see it listed here. "Default groups" is an optional field, so it is not marked with a red asterisk. Choosing an option within this menu will ensure that all records within the stage specified will be assigned to whichever default group(s) you have selected. In this case, we've selected "Hired" as our trigger stage and "Hazmat Drivers" as our default group.
Step 10
One option at this point is to go ahead and save the trigger as-is; do so by clicking the blue "Save" button. A second option is to add further criteria, and this is explained in the next section.
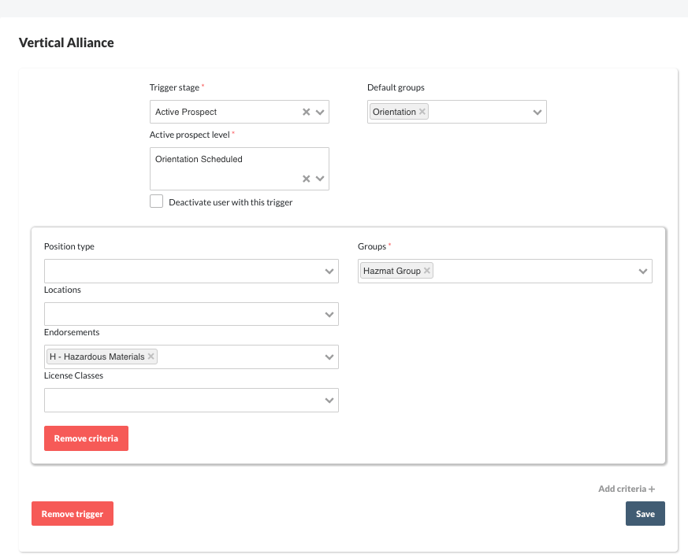
Adding Criteria to a Trigger
Adding criteria to a trigger makes it possible to specify parameters at a highly granular level. You may choose to add all drivers of a certain stage to a default group but also assign drivers to additional groups based upon extra criteria. You may add one or more sets of criteria to any default group. Read on to learn how adding criteria works.
Step 1
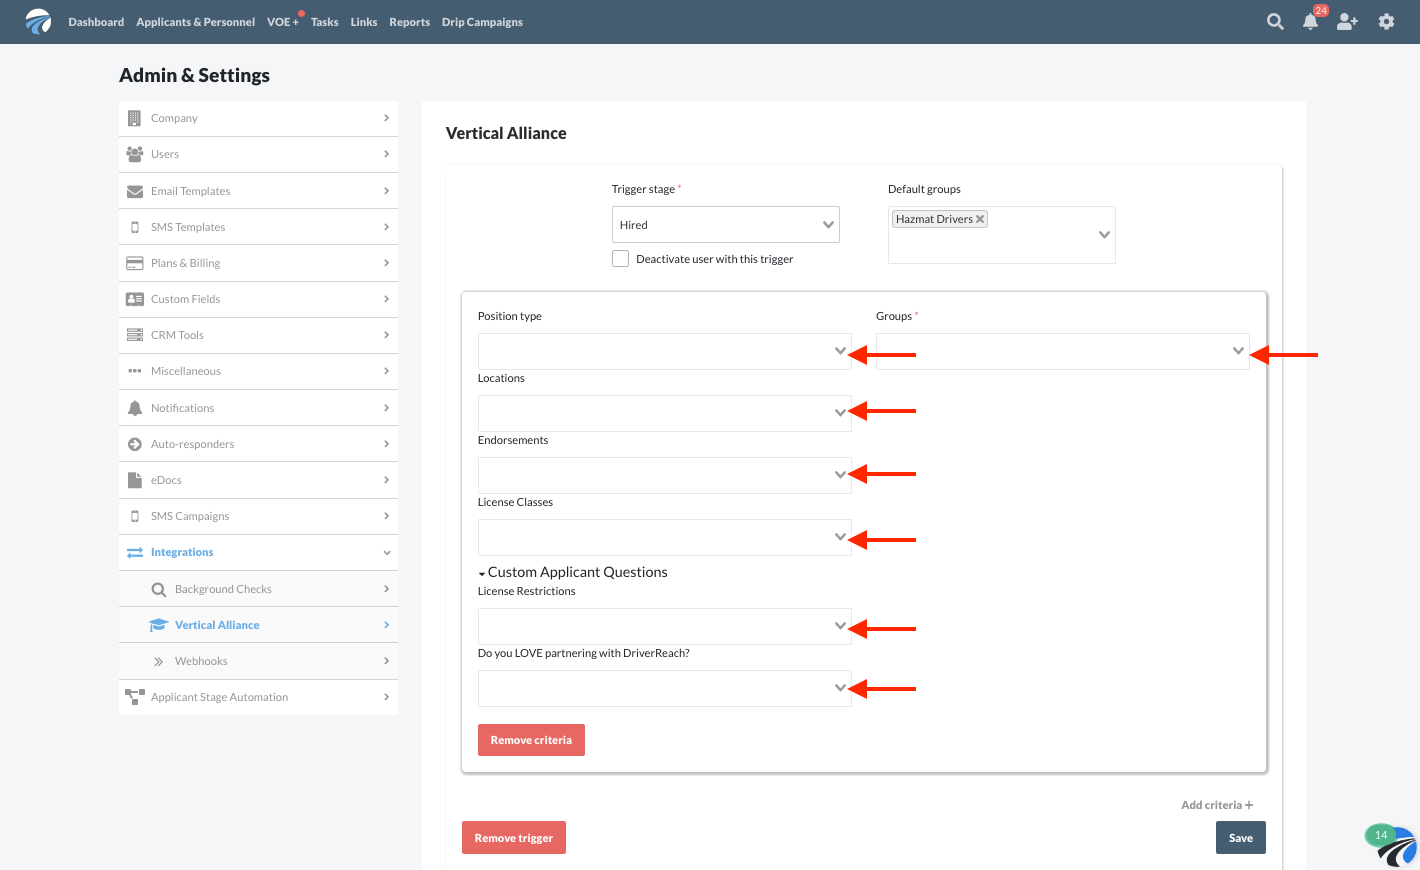
On the trigger you wish to modify with further criteria, click on the light gray "Add criteria +" text located above the blue "Save" button.
Step 2
Upon selecting "Add criteria +", a new submenu will appear with the following options:
- Postion type
- Locations
- Endorsements
- License Classes
- Custom Applicant Questions (if your account has them)
- Groups (remember, these are set up within the Vertical Alliance platform and not modifiable within DriverReach)
Step 3
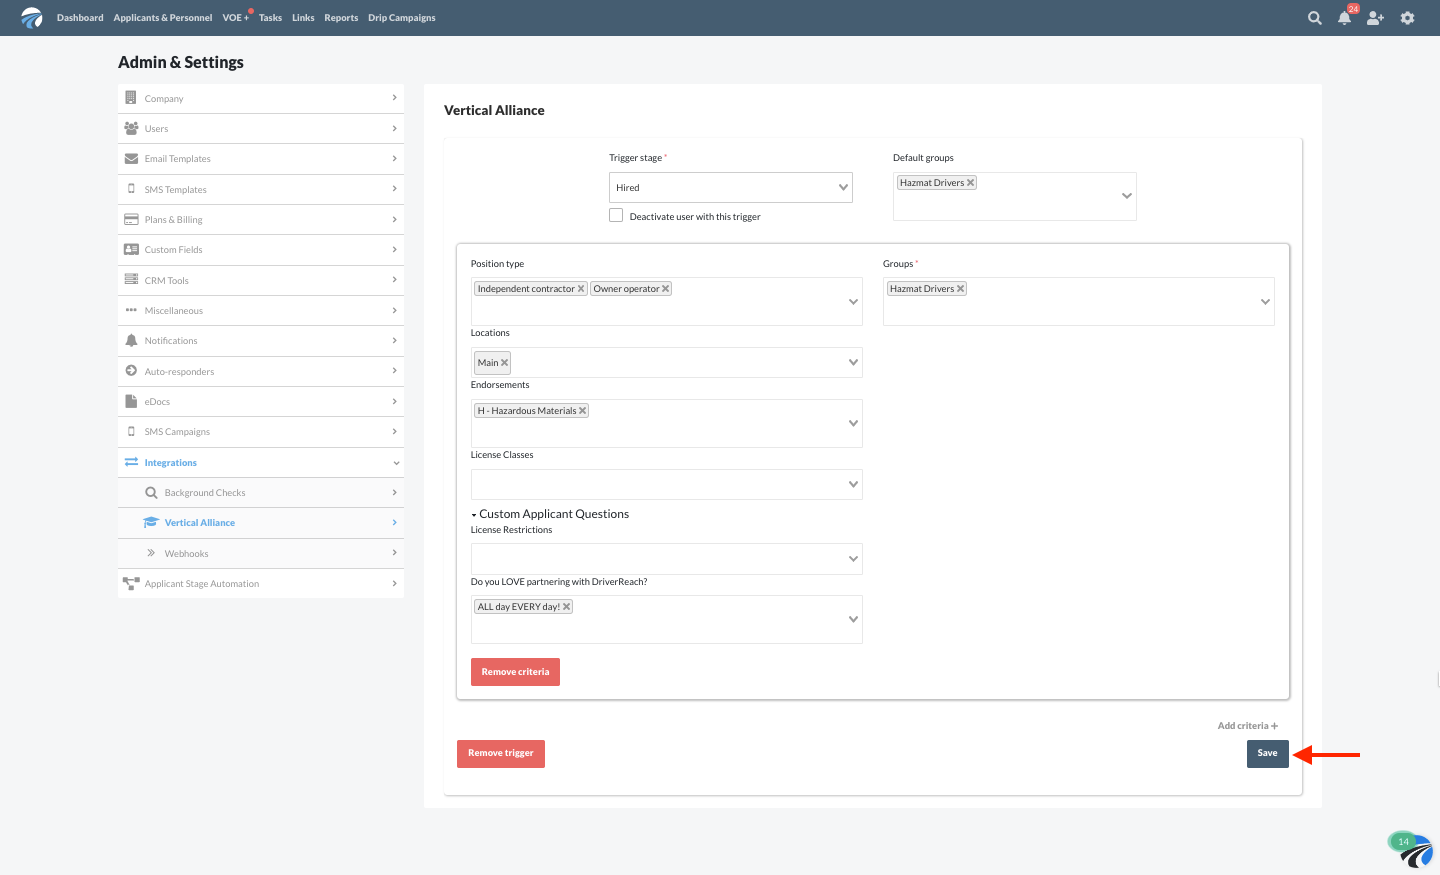
Make selections for any of the options within the "Add criteria +" submenu. "Groups" is the only required selection as noted by a red asterisk. All other fields are optional within this submenu, and as seen in the example below, many fields allow more than one option to be selected at one time. You may choose to add all individuals in a certain stage to a default group but also assign some of those to additional groups based upon extra criteria. Once your selections are complete, clicking the blue "Save" button will add this criteria to this trigger; selecting the orange "Remove criteria" button will clear the criteria and close the submenu without saving changes.
Step 4
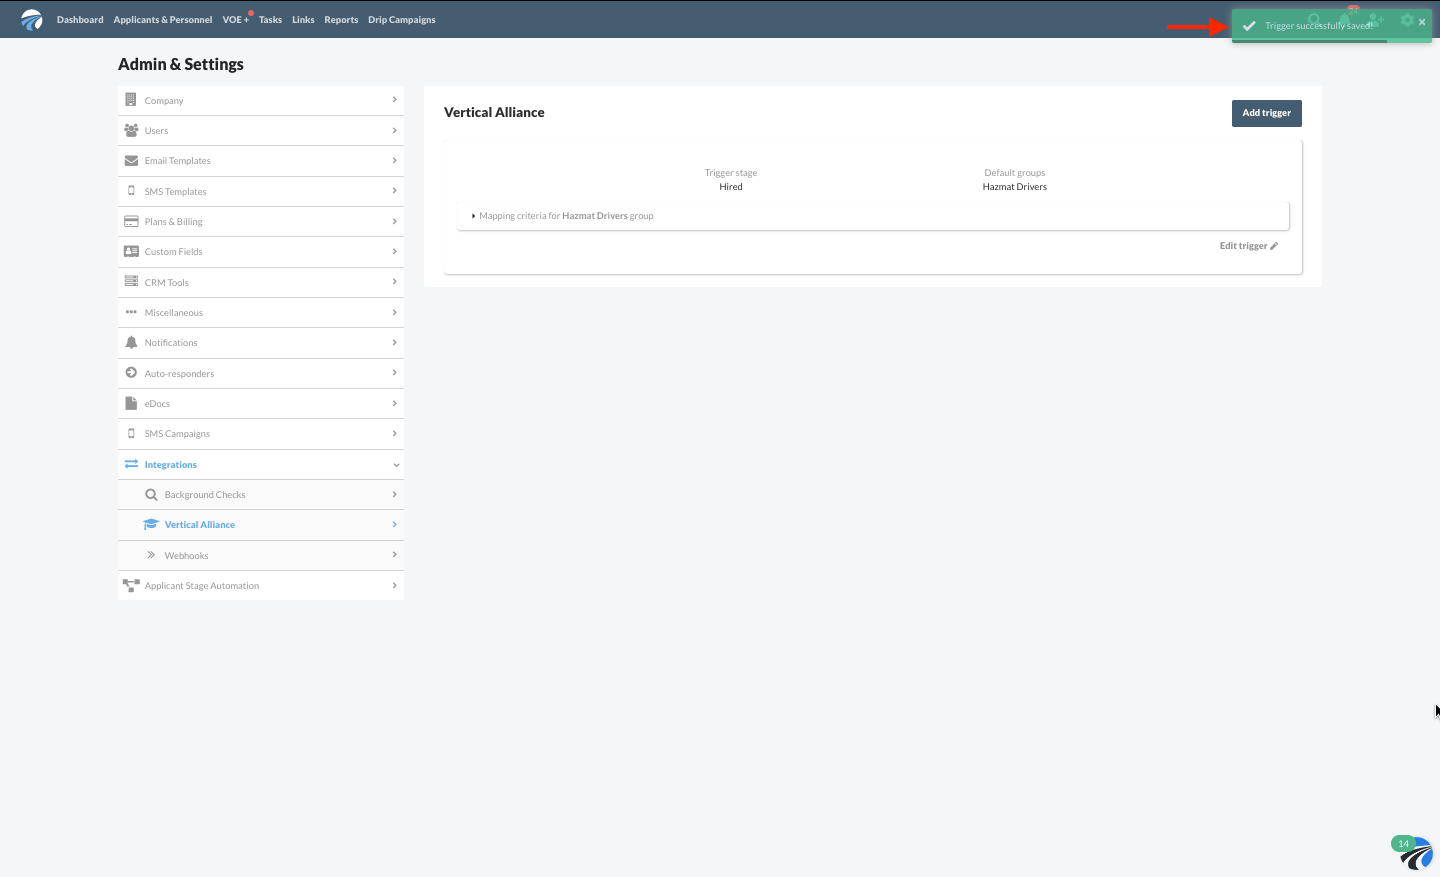
Once you click the blue "Save" button, the system will save the criteria as a part of the trigger to which you've added it and a small green confirmation will appear in the upper right-hand corner of the screen.
Step 5
The trigger now shows up on the Vertical Alliance landing page within DriverReach. To view the criteria for a trigger, click on the light gray criteria heading and the details will populate underneath. Now that we've covered the mechanics of adding criteria, click here to see some examples of how this useful feature can make your triggers even more effective.
Examples of Triggers with Added Criteria
The "Add criteria +" feature is helpful one with so many useful applications--let's take a look at some examples to help illustrate this valuable tool.
- Example 1: The trigger below applies to a general orientation group all drivers are assigned to, but the added criteria assigns drivers with a hazmat endorsement to an additional hazmat group for extra training.
- Example 2: In the trigger below, all individuals have a single trigger stage, but every driver must be assigned to a different group dependent on their location, so we have set the main trigger and then associated all group assignments by location.

- Example 3: There are no limits for the user adding additional criteria to a single trigger; below is an example of a trigger with multiple sets of criteria added to it:

Deactivating Users
To easily manage and keep individual records up to date in the Vertical Alliance platform, the DriverReach/Vertical Alliance integration allows you to deactivate them. One example of how you might use deactivation is to make sure that every driver that is terminated is also deactivated in Vertical Alliance.
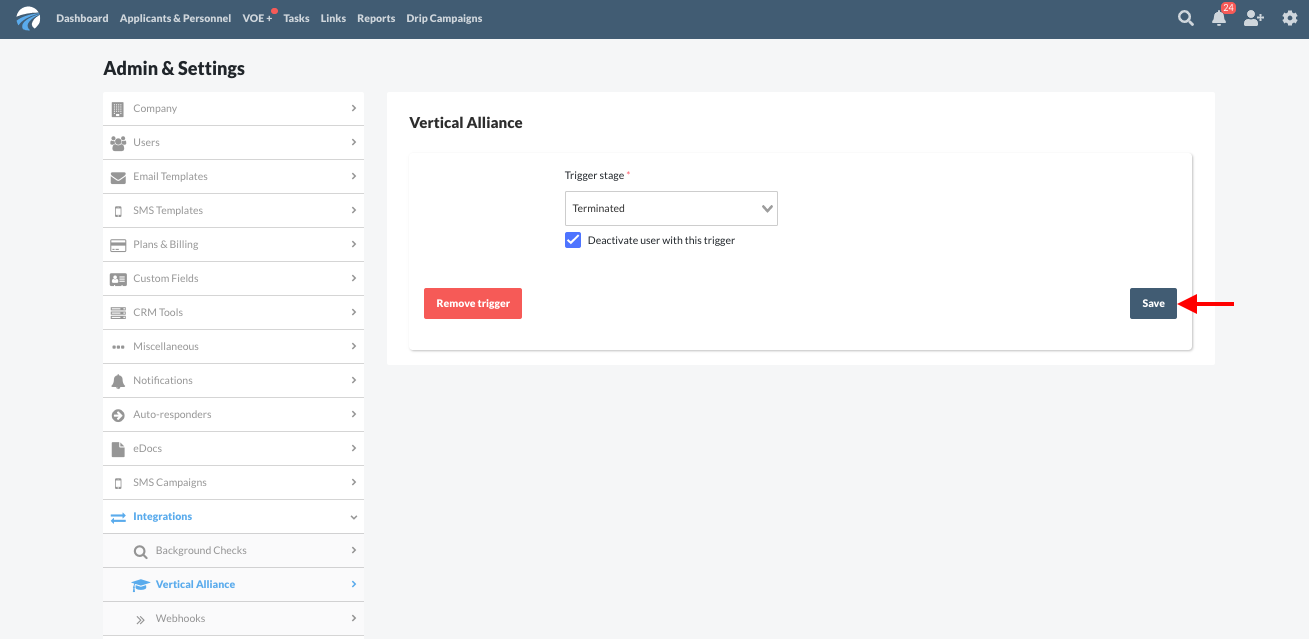
Step 1
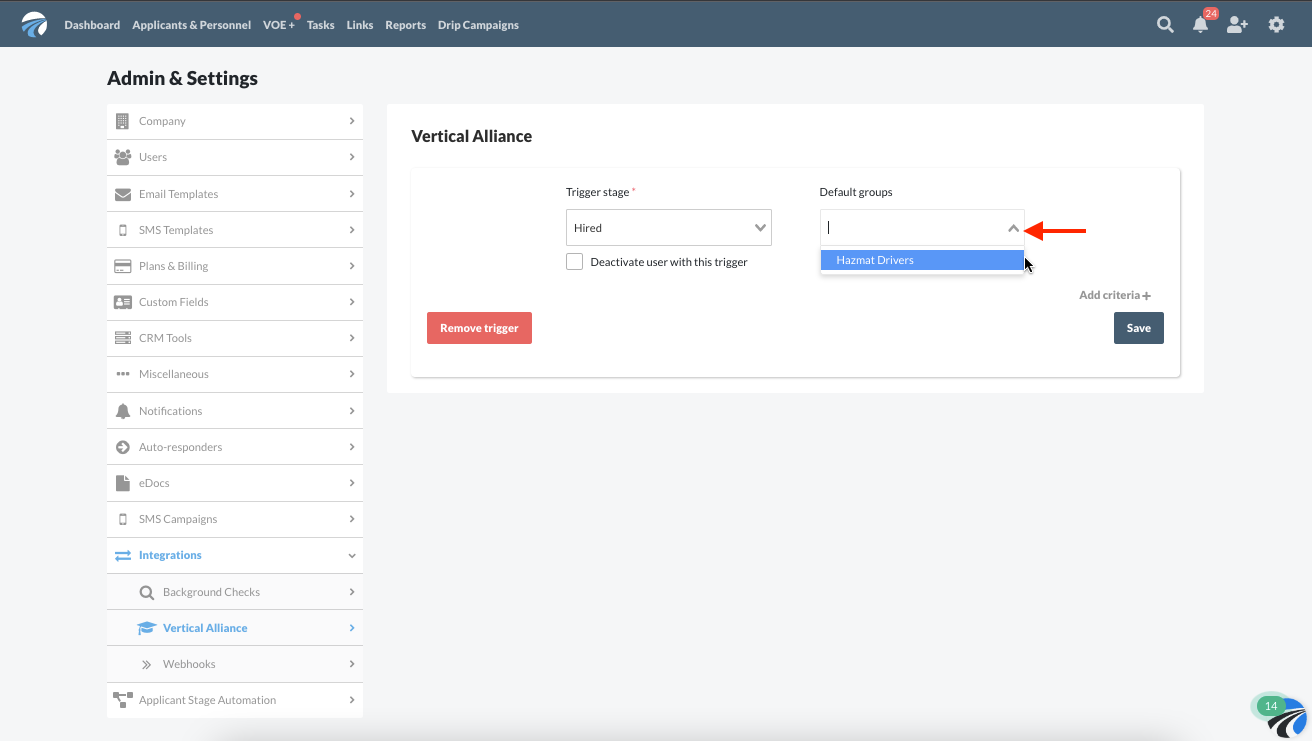
To set this type of action up, once the appropriate trigger is selected from the drop-down menu, click on the deactivate user checkbox. Upon selecting the checkbox, you will see the default groups selection disappear, as no group choice is necessary for deactivation.
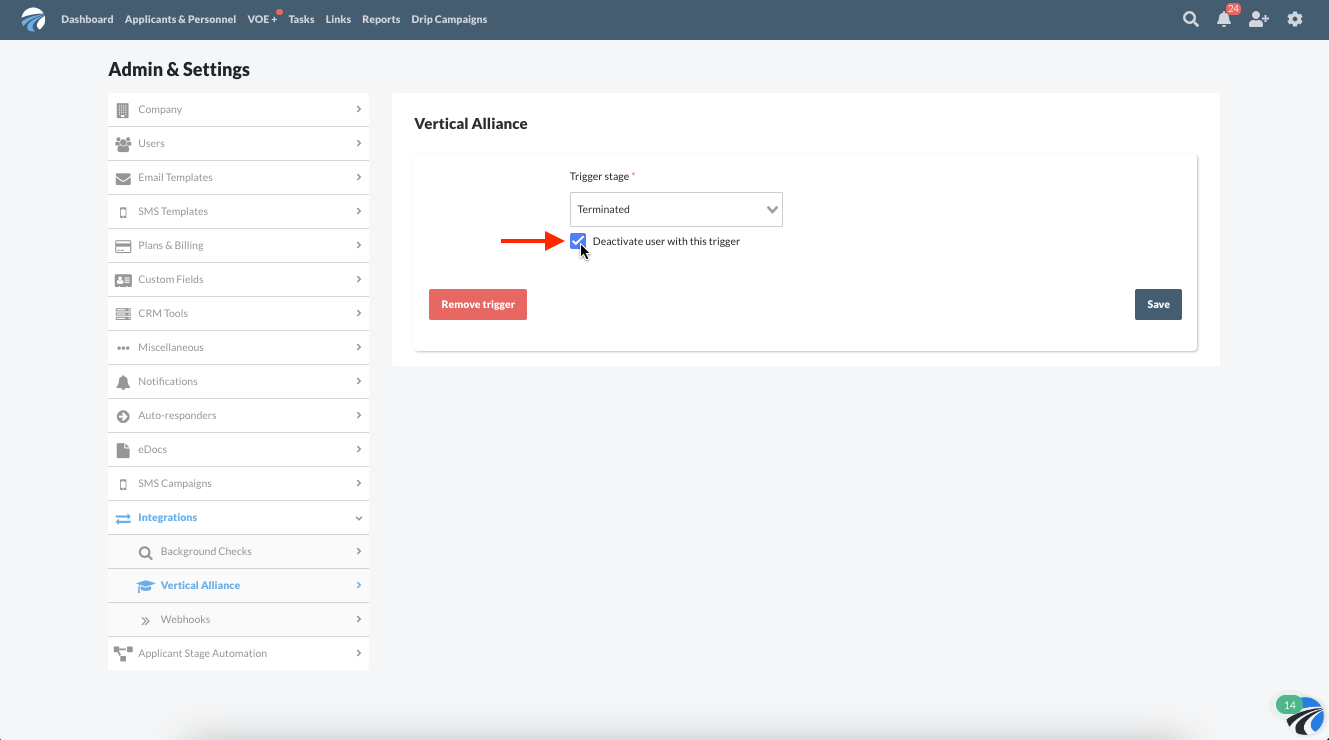
Step 2
Click on the blue "Save" button to deactivate all users in the Vertical Alliance platform who meet the requirements for this trigger.
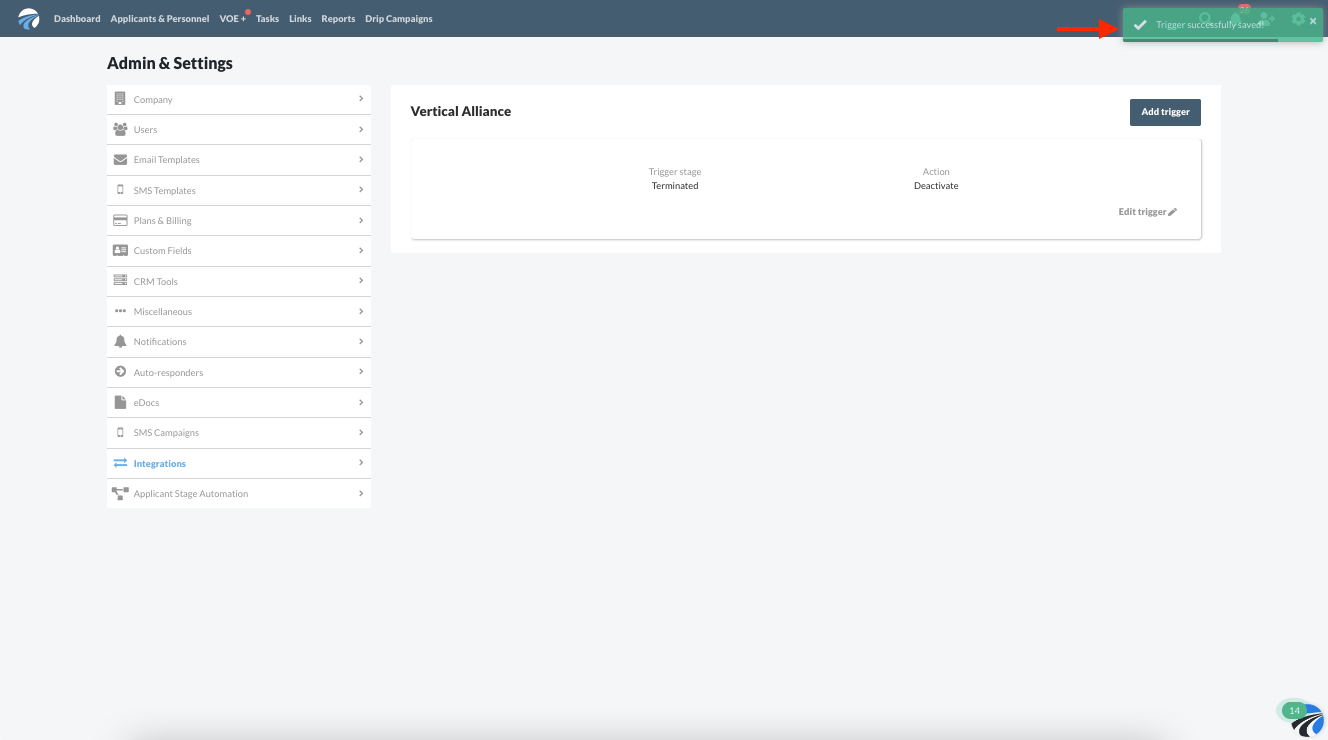
Step 3
A small green notification will appear confirming that the deactivate trigger has been saved. From now on, all individuals placed in the "Terminated" stage will automatically be deactivated in Vertical Alliance.
Manually Assigning Individual Records to a Group
In situations when you need to assign an individual to a group in Vertical Alliance but that individual does not fit squarely into an automated rule that you have set up, DriverReach allows you to assign that record individually to a Vertical Alliance group.
Step 1
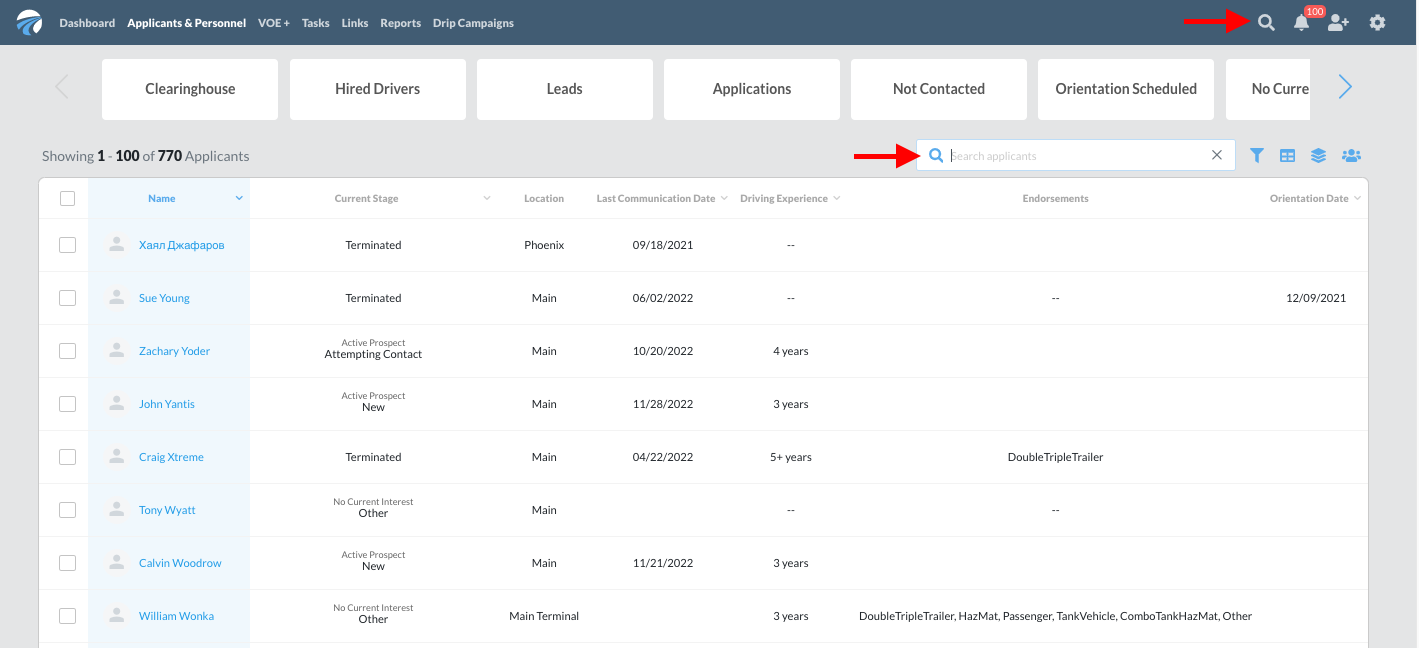
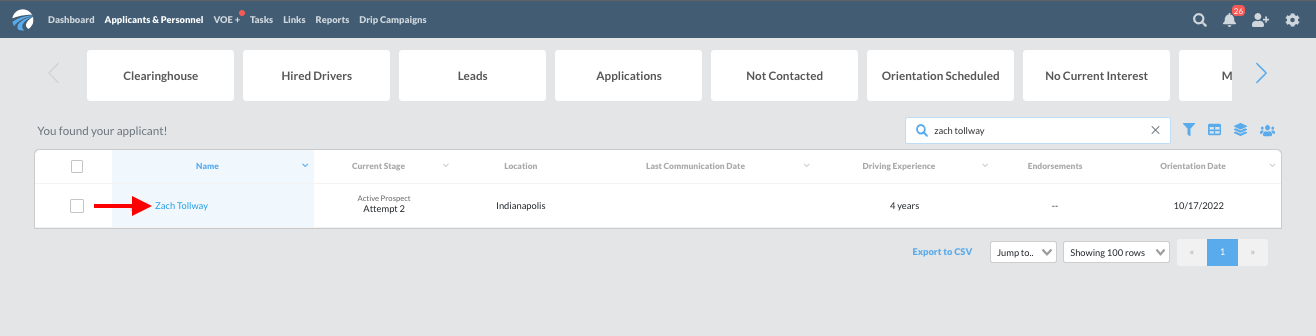
First, locate the individual's record. This may be done in one of two ways:
- From any page, type the applicant's name into the global search box after clicking on the magnifying glass icon located on the right side of the top blue menu bar.
- From the “Applicants & Personnel” page, you may employ any filters you would like to use for your search and then type some or all of the individual’s name into the “Search applicants” box on the right above the applicant table.
Step 2
Once the appropriate record is located, click on that individual's name to open the record.
Step 3
Navigate to the "Onboarding & Orientation" page by clicking on that link within the "Workflow" section of the individual's profile.
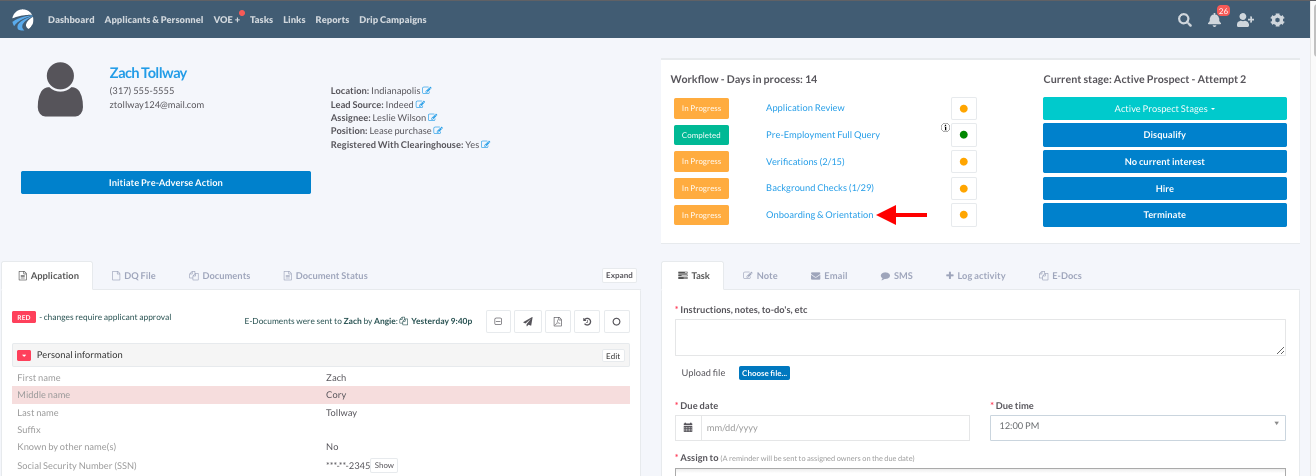
Step 4
Scroll to the bottom of the "Onboarding & Orientation" page to locate the "Vertical Alliance" section and click on the white “Assign Groups” button.
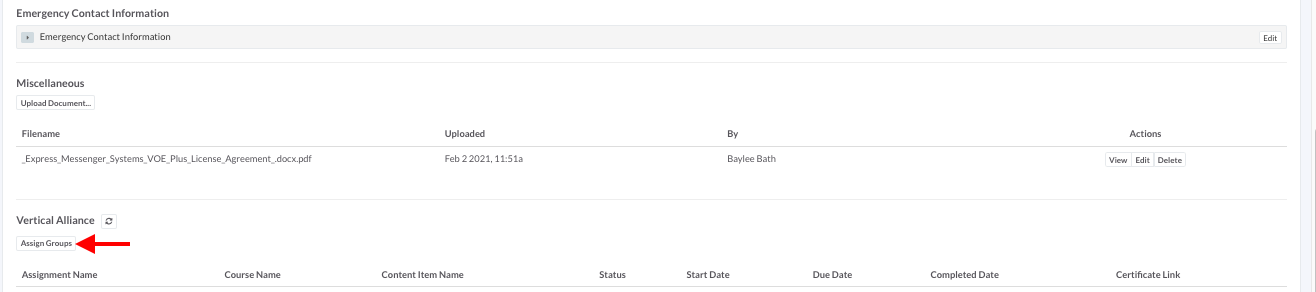
Step 5
Select the desired group from the choices that have been set up in Vertical Alliance; you may select multiple groups if desired.

Step 6
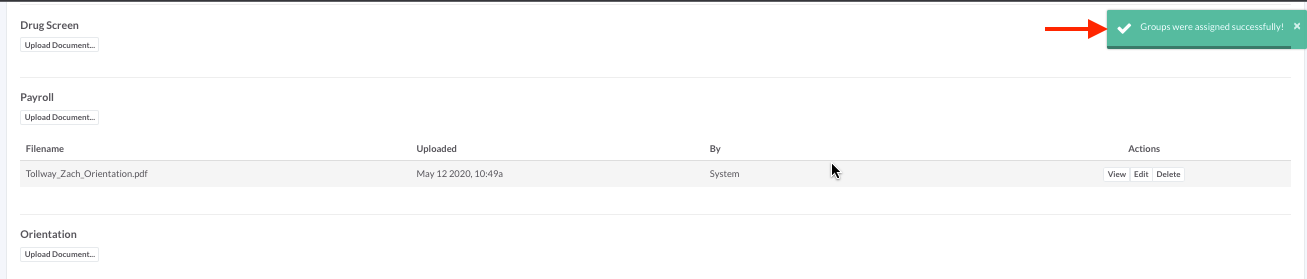
After making your selection(s), click on the blue "Send" button to officially associate thais individual to the selected groups. Note that if there are courses assigned to those groups in Vertical Alliance, this individual will also be assigned to those courses.

Step 7
A small green notification will appear confirming that that the assignment was made successfully.
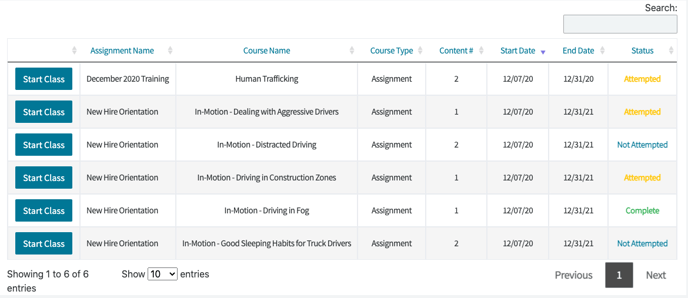
Checking the Status of Assigned Materials
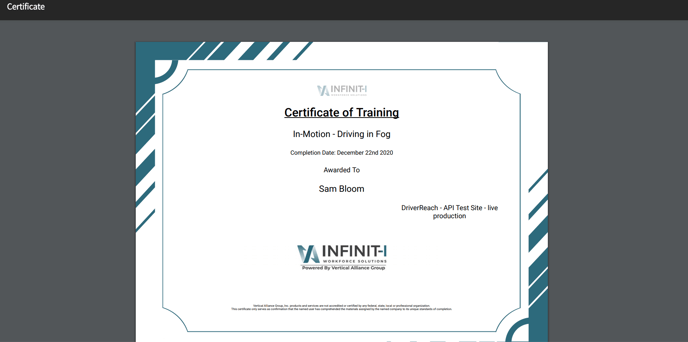
Checking the status of assigned materials can be done both in the Vertical Alliance and DriverReach platforms. The DriverReach platform reflects the course completion status; these update on a daily basis and may be manually refreshed using the refresh button in the Vertical Alliance section of the DriverReach platform. An example screenshot of the view within the Vertical Alliance platform is shown below as well and provides a wealth of information. Once a course is completed successfully, the completed certificate will also be available in the DriverReach platform through a link.
- View in DriverReach:
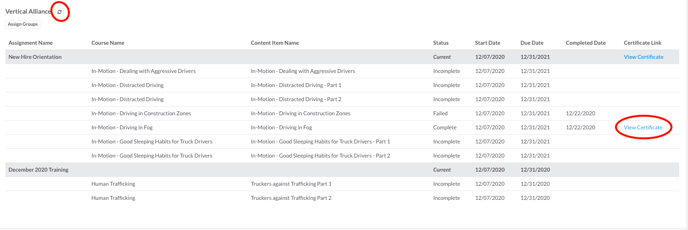
- View in Vertical Alliance:
- Example of Vertical Alliance certificate: