Are you ready to dramatically improve your hiring and onboarding efficiency with eDocs? This guide is a one-stop compendium of step-by-step instructions, tips, and tricks to getting the most out of DriverReach's powerful document management system.
Table of Contents
Pre-filling and Post-filling eDocsSearching, Reorganizing, and Deleting eDocs
- User's View:
- Recipient's View:
Introducing eDocs
DriverReach’s comprehensive document management system, eDocs, dramatically improves onboarding and hiring efficiency. With eDocs, our advanced subscription customers can quickly create, organize, and share customized mobile-friendly electronic documents, populating them with a variety of data points, free text fields, checkboxes, radio buttons, and electronic signature and counter signature options. They can also upload existing documents to the eDocs system. With just a simple click, users can easily share forms via text or email.
In addition to all of the above, our premium plan subscribers have access to the DriverReach Library section of eDocs – a wealth of expertly templated forms, constantly growing in number to meet the demands of new regulatory requirements and customer requests for commonly-used forms. This section explains how to find eDocs within the DriverReach system and the eDocs library structure.
Navigation
Step 1
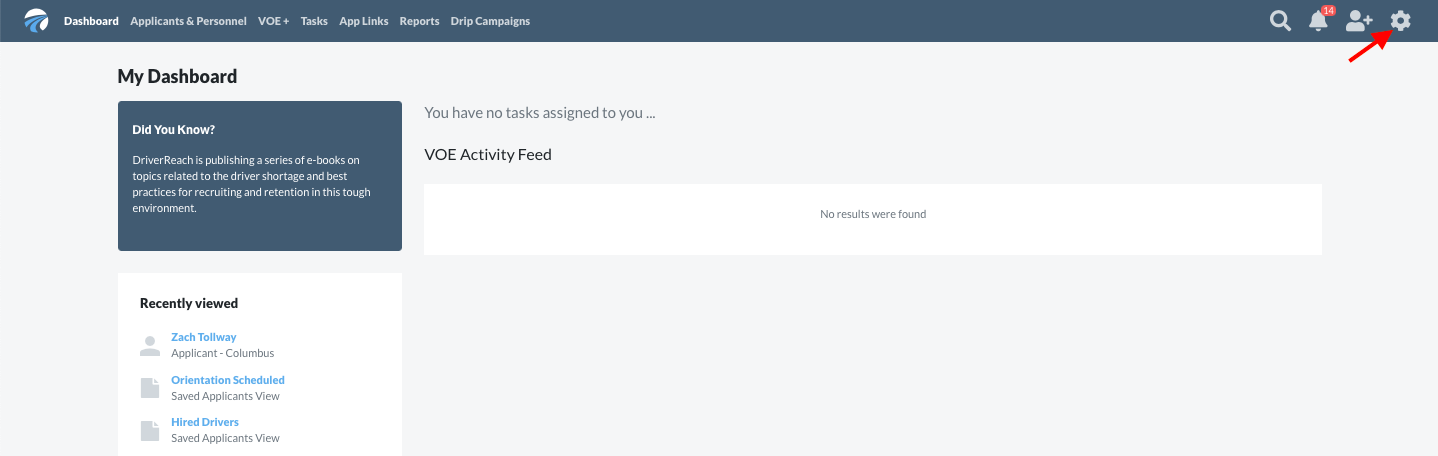
From any screen within the DriverReach platform, click on the cog icon located on the far right-hand side of the blue navigation bar along the top of the window.
Step 2
Select “Administration” from the drop-down menu that appears.

Step 3
Under the “Admin & Settings” heading in the upper left corner of the window, select “eDocs” from the menu list.

Step 4
Now on the eDocs landing page, you will see headings entitled “Your Library” and, for premium subscribers, “DriverReach Library” – please read on to learn about the organization and content of these two sections.

Your Library vs. DriverReach Library
To make eDocs as intuitive as possible, the library of documents has been divided into two distinct sections: “Your Library” and, for those on the premium plan, “DriverReach Library”. “Your Library” is located on the top section of the eDocs landing page, and it contains forms that have been created and uploaded by the user as well as any edited forms created with templates from the DriverReach Library section. For those with premium access, “DriverReach Library” is located on the bottom half of the document management homepage and contains a wealth of commonly used forms that have been pre-populated by DriverReach for your convenience.
Your Library
Editing Options
In the Your Library section, all editing tools are available, including the input and applicant insert fields along the right side of the document. This document can be customized as the user sees fit.

A Note about the Tool Tip
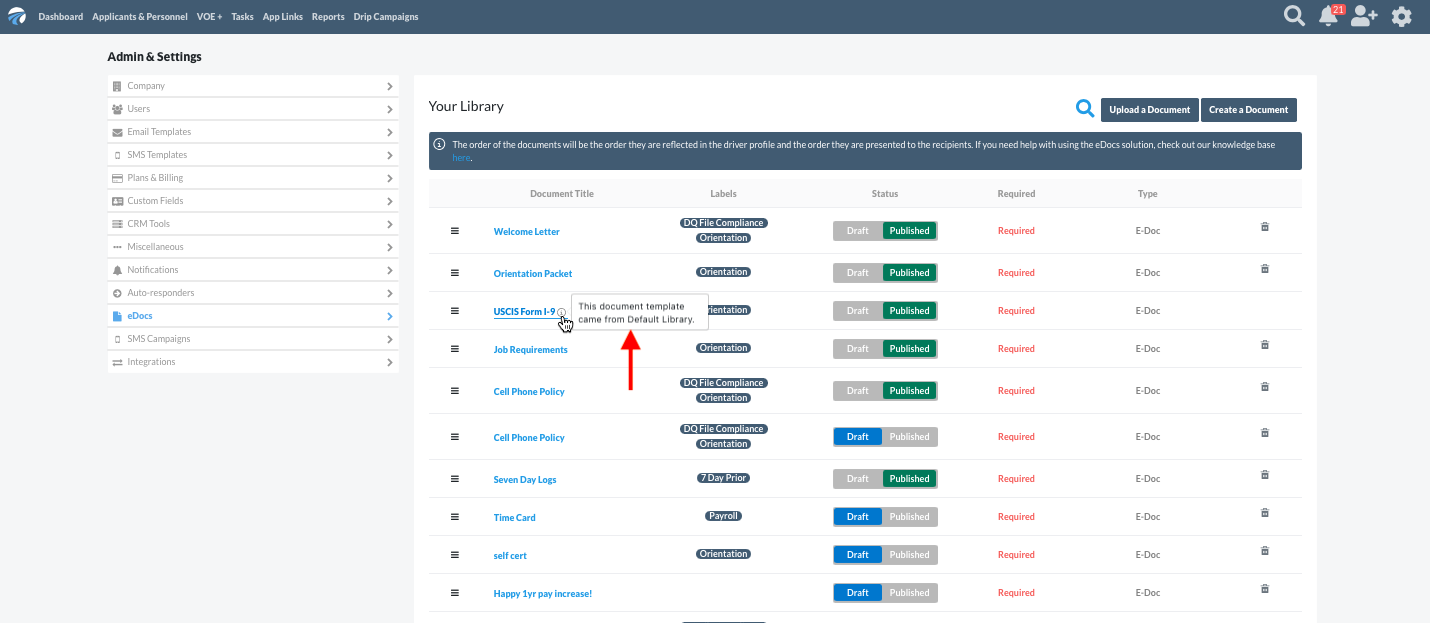
Documents that originated from the DriverReach Library section but were published with a label, document type, and/or required status edit are automatically saved in the Your Library section. These documents are identified by a gray lower-case i symbol with a circle around it, called the tool tip, which appears after the title of a document, as seen next to the USCIS Form I-9 below.

Hovering the mouse pointer over the tool tip causes a small notification to appear reminding the user that this particular document was created from a template that originated in the DriverReach Library section. Clicking on the tool tip will open the document for editing.
DriverReach Library (available to premium plan users only)
Editing Options
Documents within the DriverReach Library section give users the option to edit three specific fields, each marked with a red arrow below: the document label, the document type, and the document’s required status. Note that the editing tools menu along the right side of DriverReach Library documents will always be grayed out and unavailable to the user as pictured below.

Saving and Publishing
Whenever a DriverReach Library document is saved or published, it moves from the DriverReach Library section to the Your Library section. If it is unpublished within the Your Library section, the document returns to the DriverReach Library section.
Creating eDocs
This section explains how to create a new eDoc from scratch or upload an existing document to the eDocs platform, and, if desired, edit that document within the eDocs system. To begin any of these tasks, navigate to the eDocs landing page – for help finding it, please visit the Introducing eDocs section for step-by-step instructions. If you are looking for further information about insert fields, visit the Using Insert Fields section for an in-depth overview.
Creating an eDoc from Scratch
Step 1
On the eDocs landing page, click on the blue “Create a Document” button in the upper right corner of the “Your Library” display.

Step 2
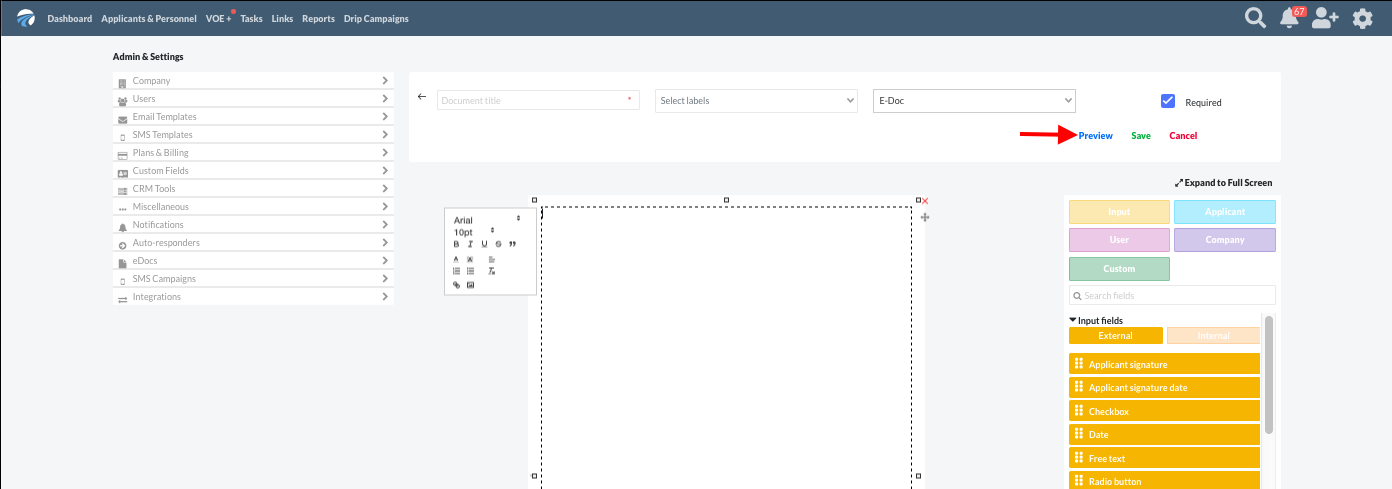
The document title can be entered in the text field on the top left of the eDoc template–in this case, we’ve entered “Test Document” as the title in the image below. Users may choose a document label (this field reads “Misc File” below) and category (this field reads “E-Doc” below) using the drop-down menus to the right of the title text field.

Step 3
To better view and make it easier to use the eDocs creation tools, users may wish to click on the “Expand to Full Screen” button on the upper right side of the window. Once in full screen view, a button in the same spot entitled “Return to normal view” can be selected to leave the full screen view and return to the previous view.

Step 4
If users wish to add and format text within the document, simply move the cursor inside the large text box and click. A text cursor will appear in the text field along with a formatting menu to the left. This works like any word processing menu, allowing users to manipulate the font’s look and feel as well as to format the document using bullets, indents, images, links, etc.

Step 5
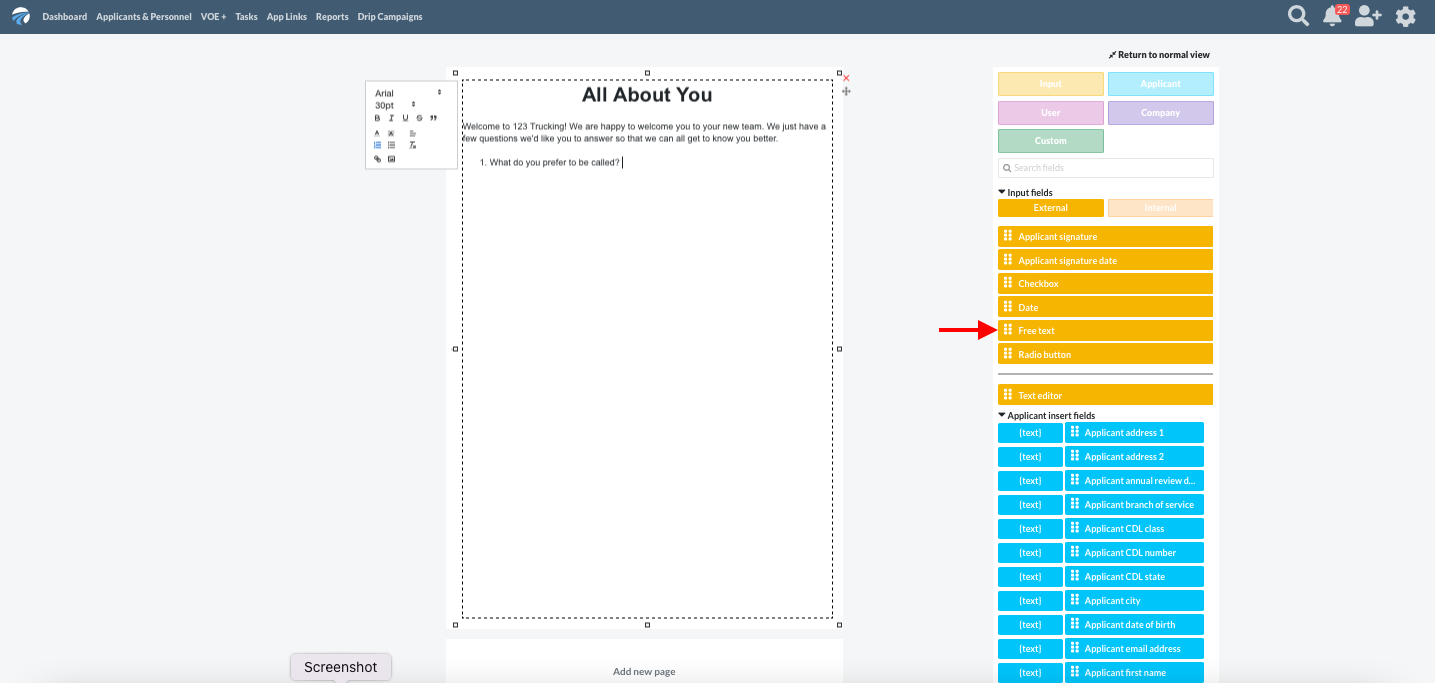
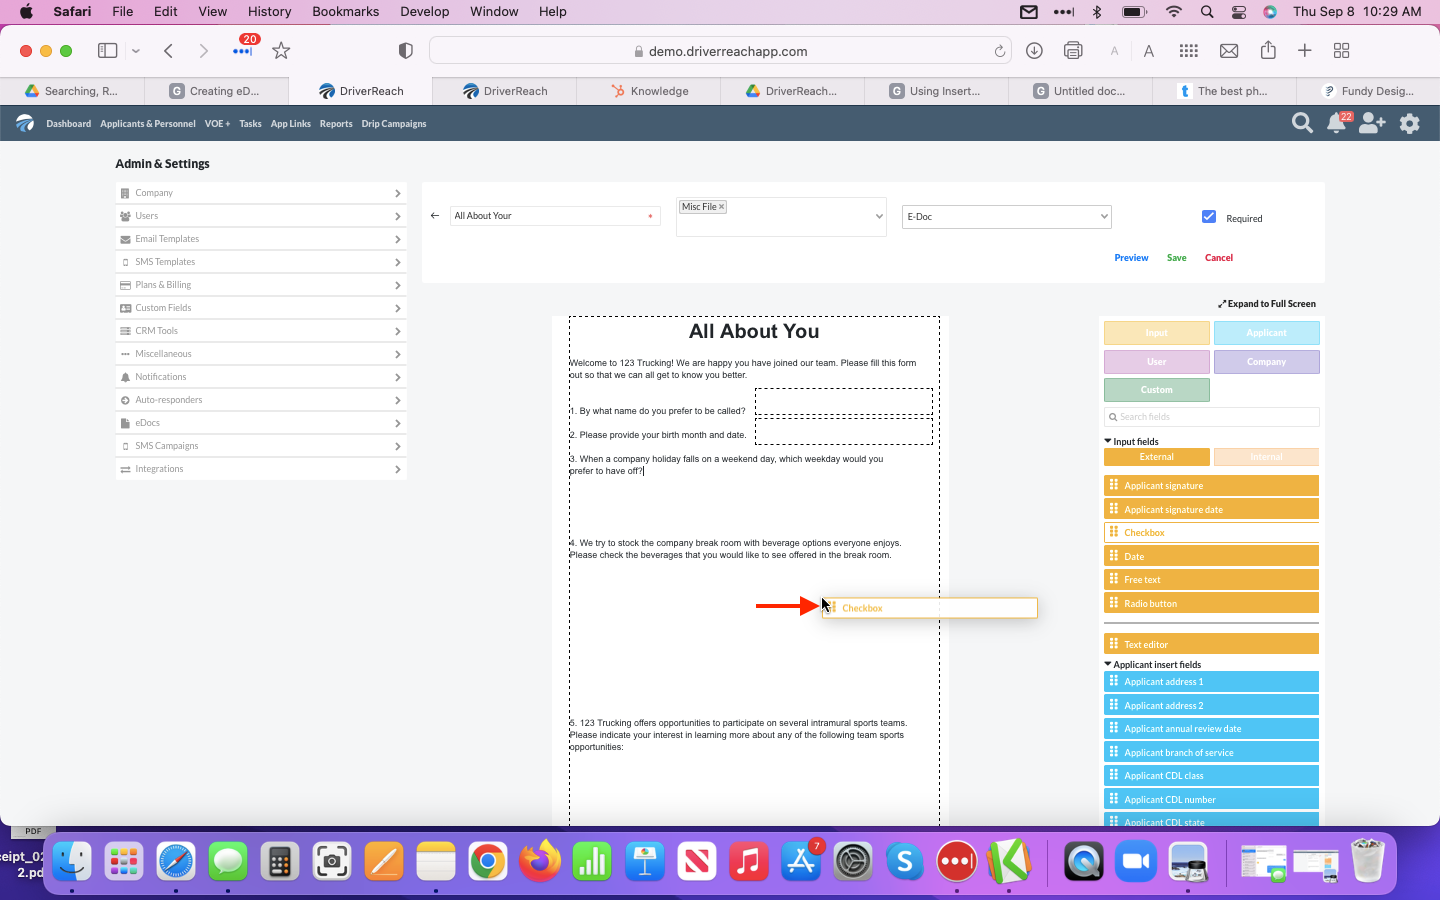
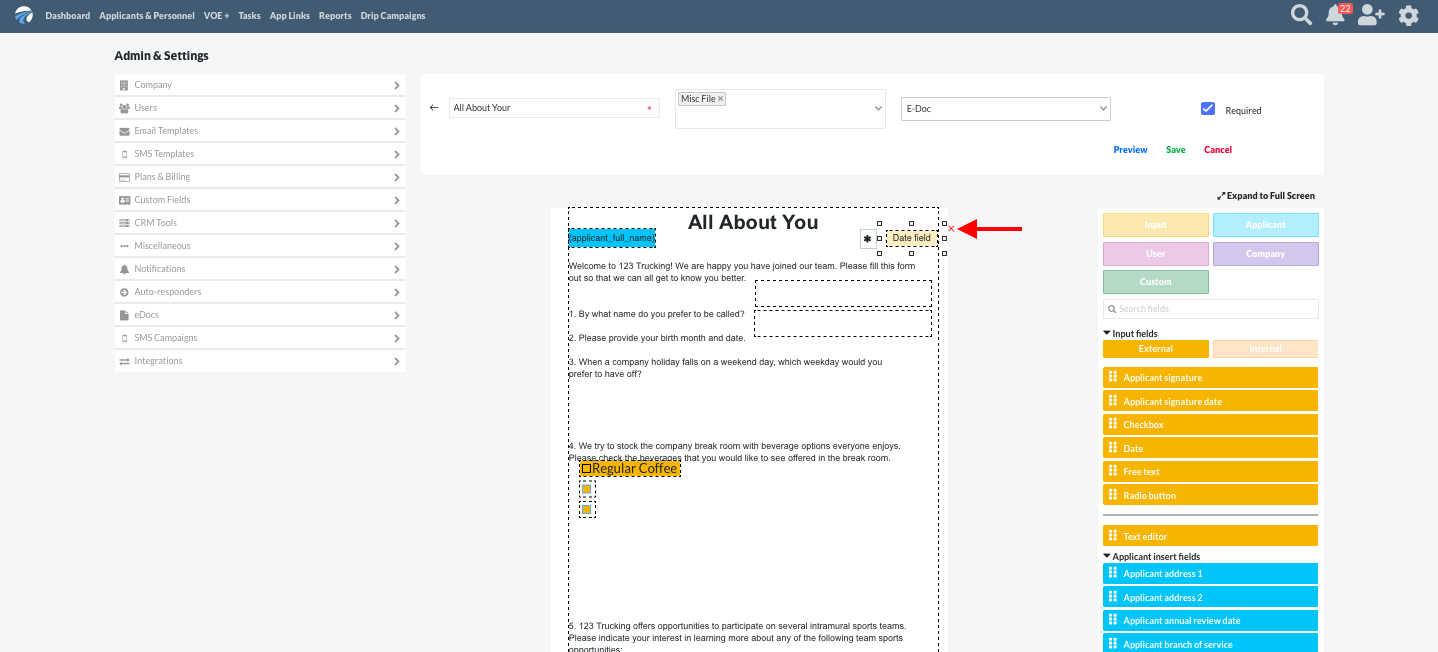
Now comes the fun part–customization! The eDocs solution offers a range of insert fields* to help you make your new eDoc exactly what you want it to be–from signature fields to check boxes to free text fields. Simply take a look at the menu of options to the right of the large text field, select the appropriate one, and drag and drop it where you want it to be within the document. Below, let’s say we are creating an “All About You” form that we would like new employees to fill out. We might want to ask a question with a free text field in the answer section allowing recipients to type in whatever they choose. After typing the appropriate question into the document, we would click and hold the yellow “Free text” input field option, dragging it to the document and dropping it right where we want it to be.
*Visit Using Insert Fields for information about the five types of insert fields available in DriverReach’s eDocs solution and the robust features of each.
Step 6
Input fields are easily resized by hovering the cursor over any corner or the center top or bottom of the field until a small black arrow appears. Click and hold this arrow, dragging it until the field is the desired height and width.

Step 7
Users may wish to make a field required, which means that the user will not be able to finish the document until that field has been completed. The black asterisk icon ✱ to the left of the field means the field is not required. This asterisk will turn blue when a mouse hovers over it; clicking on the asterisk will classify that field as required and turn the asterisk orange. To unselect the asterisk and make the field optional once again, simply click on it a second time.

Step 8
Delete any field by clicking on the small red “x” in the upper right corner of the field, or by selecting the trash can icon from the drop down menu to the left of the field.

Step 9
Documents can be multiple pages in length. If you need to add a page, click on the “Add a new page” button at the bottom of the last page in an eDoc.

Step 10
If you need to remove a page, select the trash can icon located in the top left corner of each page to delete that page.

Step 11
Selecting the blue "Preview" button located at the top right corner of the document creation screen opens a new tab in which the system will populate imitation data so the user is better able to view the document as it will look once completed.
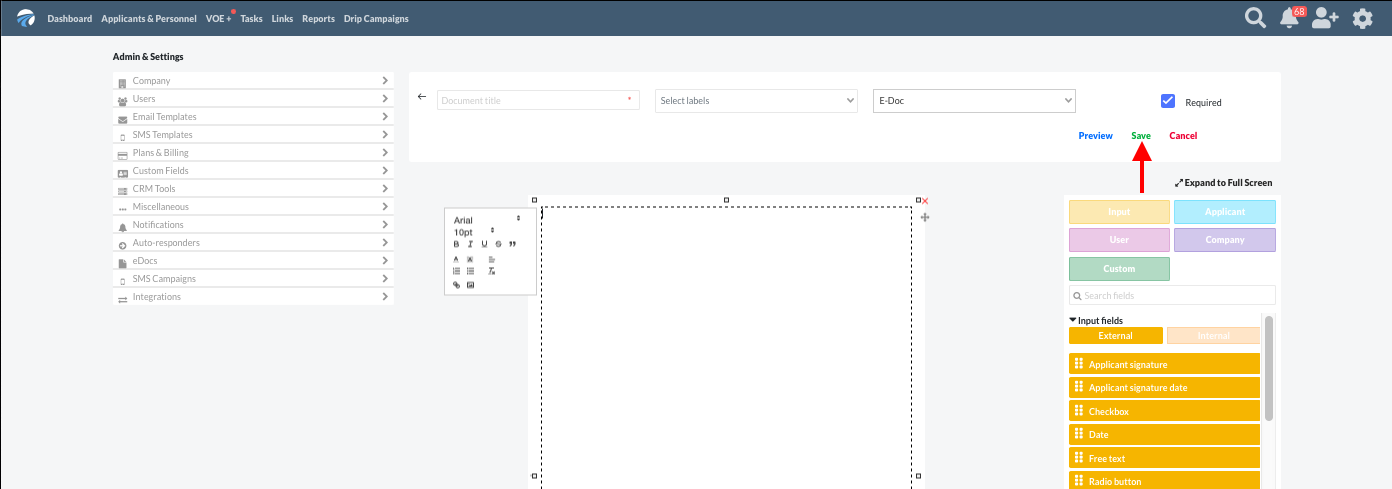
Step 12
Selecting the green "Save" button located at the top right corner of the document creation screen saves the document and returns the user to the eDocument management landing page.
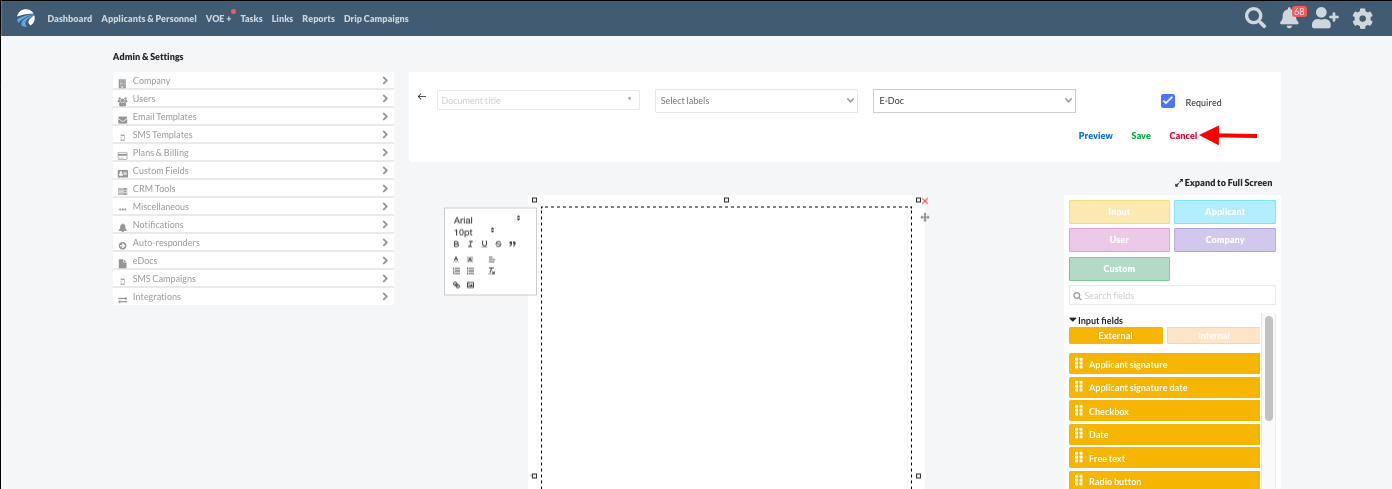
Step 13
Selecting the red "Cancel" button located at the top right corner of the document creation screen terminates the editing of the document and returns the user to the eDocument management landing page. Please note that while users may cancel a document, it may appear on the document management homepage as an untitled document. To fully remove the document, select the trash can in line with that document.
Uploading an Existing Document
Step 1
To upload a document, select the blue “Upload a Document” at the top right corner of the Your Library landing page.
Step 2
The upload screen will appear, prompting you to either “Drag and Drop Your File Here” to upload it, or to “Click to Choose a File” to locate the document by navigating to the file on your device.

Step 3
Please note that only pdf files may be uploaded. If a document to be uploaded is not in pdf format, that document must be converted into a pdf prior to uploading. If you require assistance with converting documents to the pdf file format, please visit Converting Documents to PDF and Removing Password Security for instructions. There is also a link to these instructions posted on the upload landing page as seen below.

Using eDocs Insert Fields
This section explains the five types of insert fields available in DriverReach’s eDocs solution and describes the features of each. These fields are powerful, versatile tools that make it a snap to create customized eDocs! For those already familiar with insert fields who feel ready to start making an eDoc, please visit the Creating eDocs section for step-by-step instructions.
Introduction to Insert Fields
The eDocs system features five types of insert fields:
- Input fields, which require input from an individual to contain data.
- There are six types of input fields organized into two categories: internal and external.
- Internal input fields pertain to those within your company who are users of the DriverReach system.
- External input fields pertain to your company’s applicants and personnel.
- Input fields feature drag and drop placement with no inline text capabilities
- There are six types of input fields organized into two categories: internal and external.
- Data point fields with both inline and drag and drop placement capabilities that are based on information housed within the DriverReach system. These include:
It’s important to note that simply including an insert field on an eDoc does not guarantee the data will be there for a particular record. An example of this is a lead or partial application for an applicant whose record does not include a social security number. If a document has an insert field that does not contain data for a particular record, when that record receives the document, the insert field will simply be blank. The system allows documents to be sent to recipients regardless of whether all data points are available, and all fields are listed in alphabetical order within their particular category.
Input Fields
External vs. Internal: Why Does It Matter?
When selecting input fields, color-coded with orange hues, users may toggle between external and internal categories using buttons located at the top of the input field area.
.

As seen in the image above, external and internal input fields each contain six fields. Four are found in both categories (Checkbox, Date, Free Text, and Radio Button), but choosing the correct category is important because this indicates which type of user will have access to that field for input. The external category should be used for recipients outside of the company’s DriverReach account, such as applicants and personnel (which is why this category is the only one with Applicant Signature and Applicant Signature Date fields); the internal category applies to users of the DriverReach system, such as recruiters, account managers, counter signers, etc. (which is why this category is the only one with Counter Signature and Counter Signature Date fields). To protect data integrity, validation is built into the system to ensure that neither external nor internal users can populate data into fields that are not designated for them.
Users of your company’s DriverReach account may enter information into internal fields either before sending out the document or after it has returned, but recipients will not be able to enter data into internal input fields.
Optional vs. Required Fields
For each field, users may specify whether they would like that field to be required or optional for recipients to complete. Recipients will not be able to finish the document until all required fields have been completed, but they are able to move forward without taking any action on optional fields.
During the eDocs creation process, users will notice an asterisk icon to the left of each field. When that asterisk is black ✱, it means the field is not required. This asterisk will turn blue ✱ when a mouse hovers over it. Clicking on the asterisk will classify that field as required and turn the asterisk orange ✱. To unselect the asterisk and make the field optional once again, simply click on the asterisk a second time so that it turns black.

From the recipient’s perspective, if a field has been marked as required, a red “Field is required” validation will appear beside the field, halting recipients’ progress until they enter the requisite data as indicated in the image below. Optional fields trigger no such prompt.

Input Field Types
Checkbox - External or Internal
The checkbox is available as both an external and an internal field, and it allows users to give recipients the ability to select one or more options from a given list of choices (unlike radio buttons, which force users to choose one item from a list of two or more options).

To insert a checkbox into an eDoc, simply click on the appropriate button from the list of input fields and drag it to the eDoc.
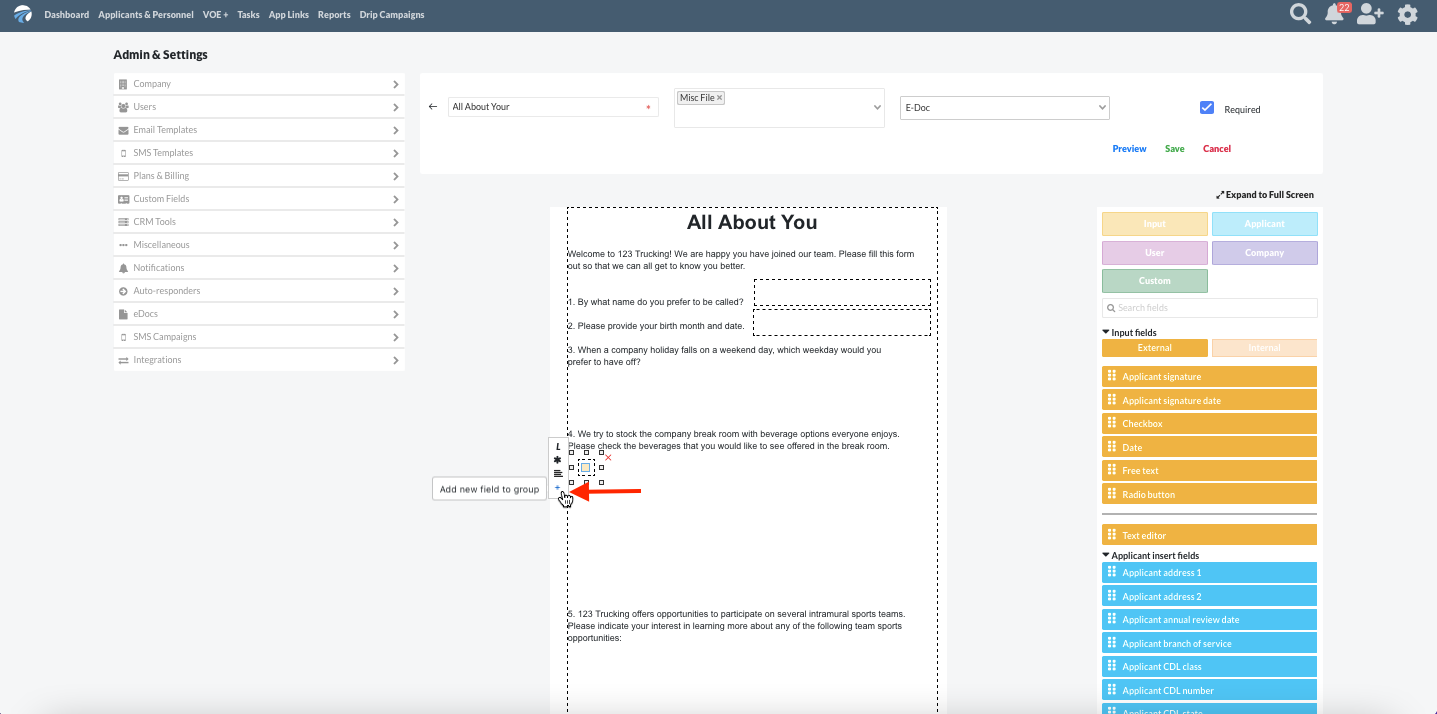
When the checkbox insert field is added, one checkbox appears in the document. This checkbox begins what is considered a group, and this group can consist of as few as one checkbox up to as many checkboxes as the user would like. To add another checkbox to a group, simply click on the checkbox and then select the “+” sign from the input fields menu that appears. Another checkbox will appear directly underneath the first. Continue to do this until there are as many checkboxes as you need to complete the list of choices.
Users may either add checkboxes without text and place them on the document near existing text or add labels to checkboxes by clicking on the small “L” icon at the top of the checkbox toolbar. Type the label name and format the font and alignment of the label using the editing tool that appears when you type. To remove a label, simply click on the small “L” icon again at the top of the checkbox toolbar, and it will disappear.

To move a group of checkboxes to a different location within the document, click on the small alignment tool icon that looks like two perpendicular arrows and hold it to drag the group to the desired location.

To delete an entire group of checkboxes, click on any checkbox in the group and then select the trash can icon at the bottom of the checkbox toolbar.

To delete just one checkbox, click on that specific field and select the small red “x” in the upper right corner to make it disappear.

Date - External or Internal
The date field is available both as an internal and external input field. This field only displays using the mm/dd/yyyy format. The system recognizes when the date field is accessed by a recipient through a mobile device and automatically displays the numerical keyboard for ease of data entry.

To insert a date into an eDoc, simply click on the appropriate button from the list of input fields and drag it to the eDoc.

To delete the date field, click on the field, and then select the small red “x” on the upper right side of the field.
Free Text - External or Internal
The free text field is available both as an external and internal input field. This field allows users to freely type in a response. If the amount of text entered reaches the borders, the field dynamically shrinks the text size to allow the user to continue to input information. If users should reach the text size limit, a validation appears to make them aware that no additional text may be entered.

To insert a free text field into an eDoc, simply click on the appropriate button from the list of input fields and drag it to the eDoc.

To resize the free text field, click on the field. Then hover the mouse cursor over one of the small white squares located near all four corners of the field or at the top and bottom of the field until a small black arrow appears. Click the mouse and hold to drag the arrow back and forth until the field is the desired size.

To delete the free text field, click on the field, and then select the small red “x” on the upper right side of the field.

Radio Button - External or Internal
The radio button field is available both as an external and internal input field and allows users to provide recipients with a list of two or more options from which they must only choose one option (unlike checkboxes, which allow users to select as many checkboxes as they wish). Radio buttons can be placed without a label near existing text, or users may add labels directly to radio buttons.
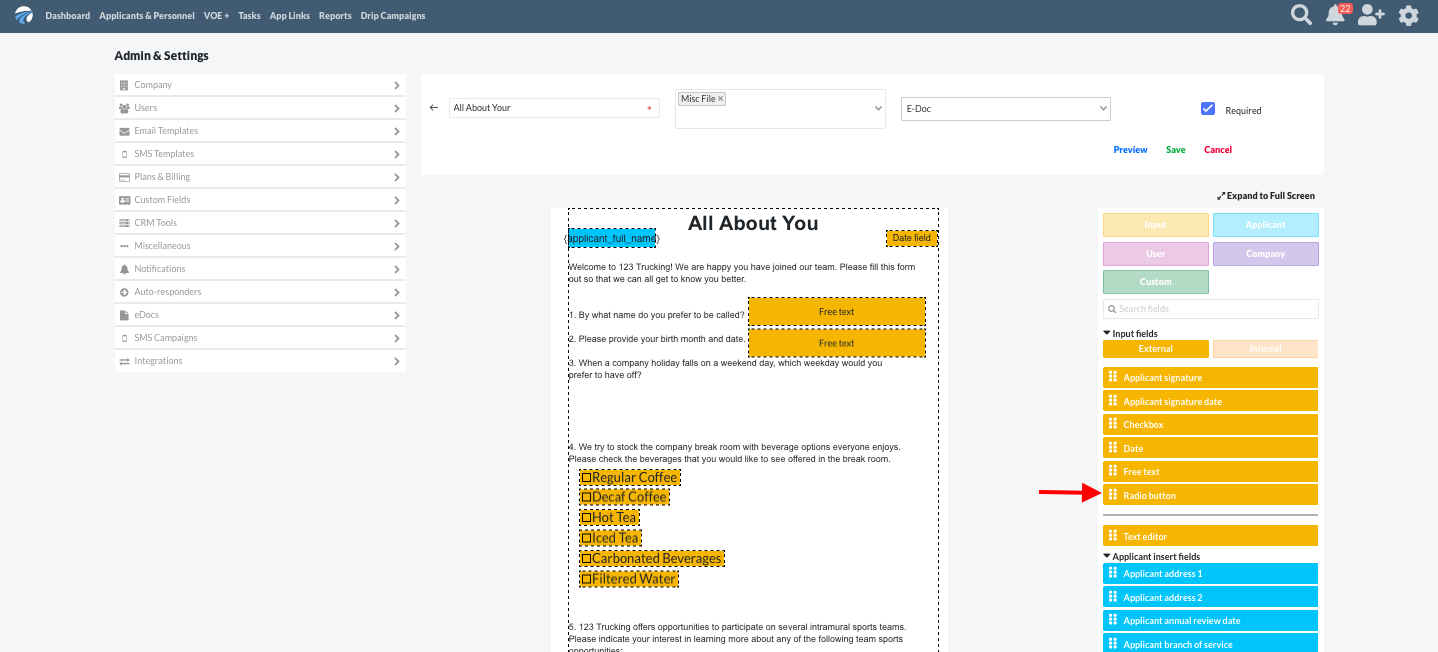
To insert a radio button into an eDoc, simply click on the appropriate button from the list of input fields and drag it to the eDoc.

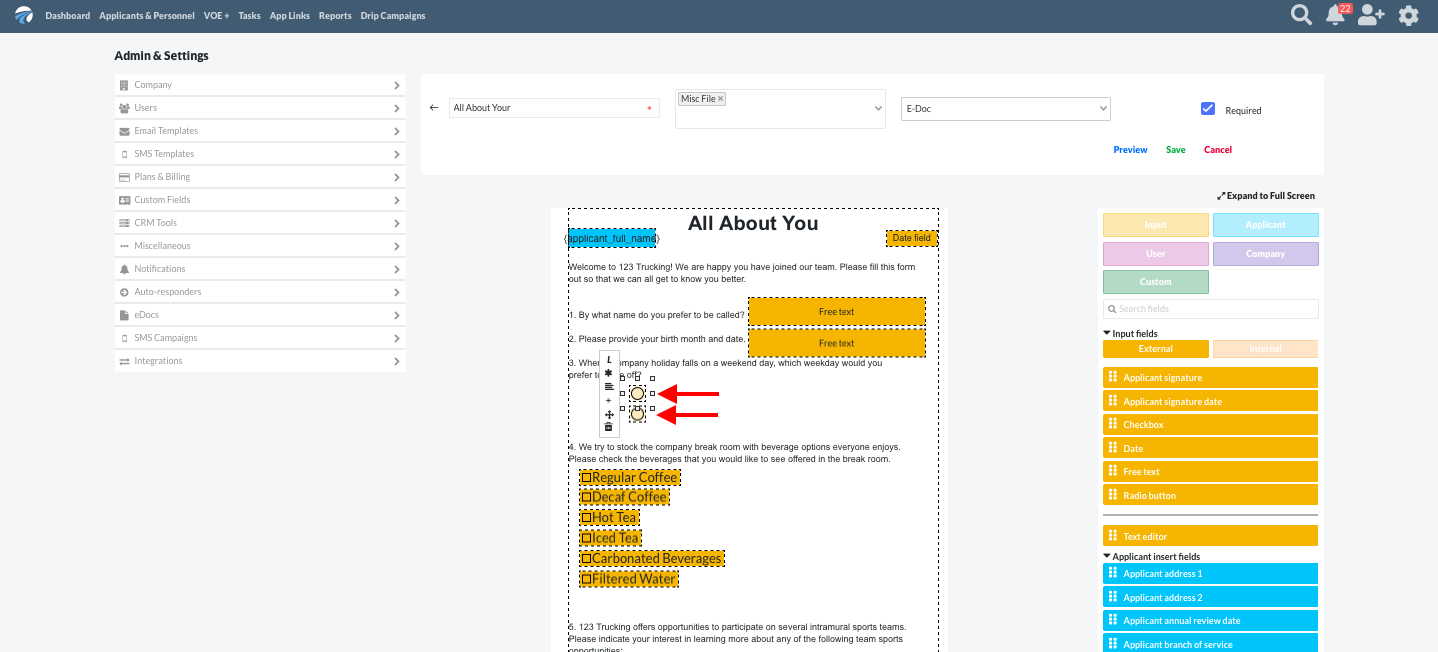
Every time a radio button insert field is added to a document, it begins what is considered a group, and as such, dragging and dropping a radio button field into an eDoc always leaves two radio buttons in its place.
Add labels to radio buttons by clicking on the small “L” icon at the top of the radio button toolbar. Type the label name and format the font and alignment of the label using the editing tool that appears.

To remove a label, clicking on the small “L” icon again at the top of the radio button toolbar will make it disappear.

To add another radio button to a group, click on the group and then select the “+” sign from the input fields menu to the left of the radio button. Another radio button will appear. Repeat this process until there are as many radio buttons as required to complete the list of choices.

To delete an entire group of radio buttons, click on any radio button in the group and then select the trash can icon at the bottom of the radio button toolbar.

To delete just one radio button (note that this only works in a group of three or more radio buttons, as each group must contain a minimum of two radio buttons), click on that specific field and select the small red “x” in the upper right corner to make it disappear.

To move a group of radio buttons to a different location within the document, click on the small alignment tool icon that looks like two perpendicular arrows and hold it to drag the group to the desired location.

Signature and Signature Date Fields
In eDocs, applicant signature and applicant signature date fields (external) as well as counter signature and counter signature date fields (internal) feature the same set of capabilities and tools. Just as is true with the date input field, both signature date and counter signature date fields display using the mm/dd/yyyy format. The system recognizes when the date field is accessed by a recipient through a mobile device and automatically displays the numerical keyboard for ease of data entry.
For example purposes, we will use applicant signature in the descriptions below, but these instructions apply to all four of these signature-related input fields.


To insert a signature-related input field into an eDoc, click on the appropriate button from the list of input fields and drag it to the eDoc, dropping it in the correct location.

To delete a signature-related input field, click on that field and select the small red “x” in the upper right corner to make it disappear.

Return to Table of Contents
Data Point Fields
The other four types of insert fields are all data point fields, which means that they are populated by pulling specific pieces of information about applicants, personnel, and leads saved within the DriverReach system. These fields include applicant, user, company, and custom insert fields, and they have one important feature that distinguishes them from input fields: you can insert them into an eDoc inline or via the drag and drop method.
Inline vs. Drag and Drop
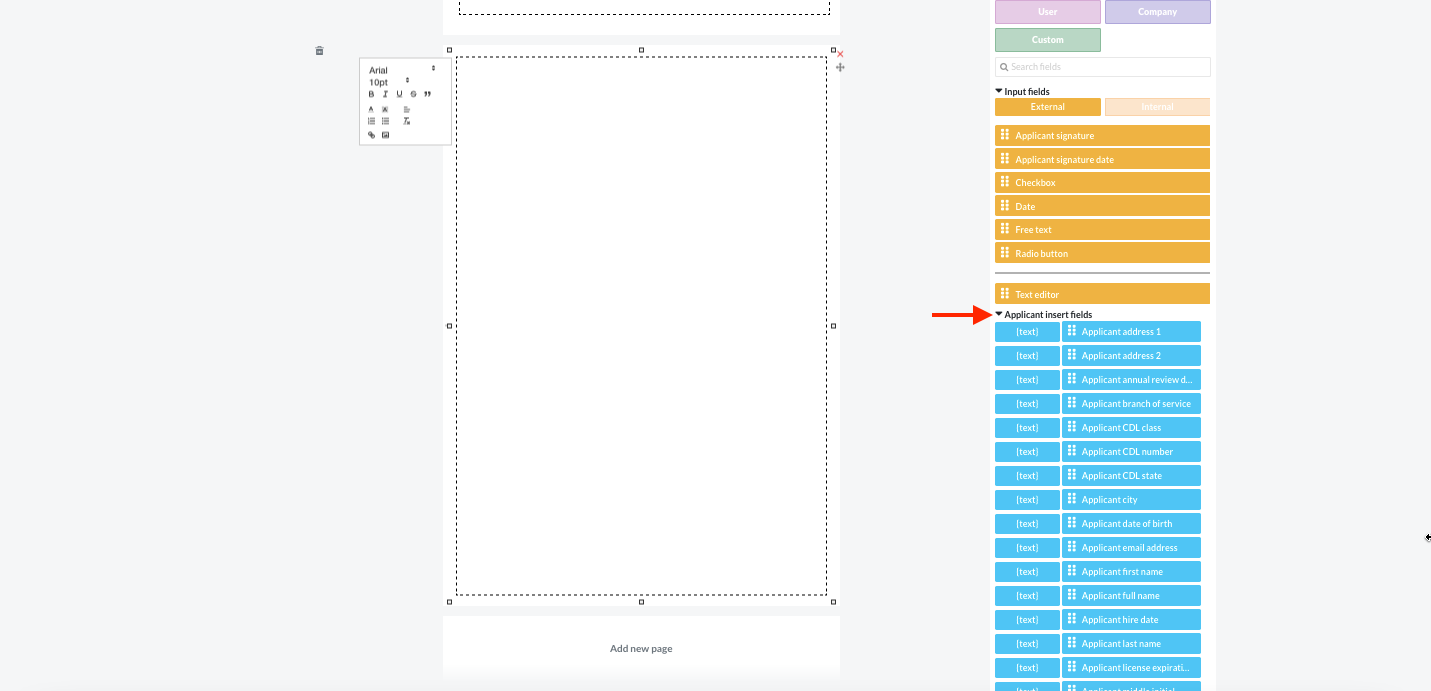
When a user has clicked into a text editor field, both the inline and drag and drop insert fields are visible and available for use for the applicant, user, company, and custom insert fields. If the text editor is not actively in use (no cursor is active inside of it), then the inline insert items will not be visible, and only the drag and drop items will be present. In the image below, the inline fields are listed in the left-side column under the “Applicant Insert Fields” heading, and the drag and drop fields are listed in the right-side column.

The inline insert capability makes it easy to add a data insert field inline to (i.e. right next to/on the same line as) text. Using the inline feature ensures that the data format of the insert field is the same as the format of any typed text. The drag and drop method is useful when a data point input is to be added to a predesigned, uploaded form or when it is to be added directly to an eDoc outside of the text editor. The images below illustrate how these fields look after placement within the text editor using the user and company insert fields as examples.

Applicant Insert Fields
Applicant insert fields, color-coded blue, include all of the various data points that the DriverReach system has for individual records–such as applicants, personnel, and leads–in the system. Examples of these fields include name, social security number, date of birth, CDL number, and the applicant’s record. If a specific data point in the system does not exist for the individual record in question (for example, if a lead record does not have a social security number), then the data point will simply be left blank on the document for that individual's record. This missing data will not prevent the user from sending the document. Applicant insert fields can be added to an eDoc in either of two ways:
- Inline by simply placing the cursor in the text editor and then clicking the (text) button in the left column, or
- Via the drag and drop method by clicking on the item from the right column and dragging and dropping it in the text editor.
User Insert Fields
User insert fields, color-coded magenta, include all of the various data points that the DriverReach system has for the actual user creating the eDoc. Examples of these fields include name, email, phone number, and signature. When building a document template, if one user sends documents to a recipient with user insert fields included, those fields will be populated with that user’s information. If a second user sends documents to the same recipient with user insert fields included, that document will be populated with information from the second user. User insert fields may be added to an eDoc two ways:
- Inline by simply placing the cursor in the text editor and clicking the (text) button in the left column, or
- Via the drag and drop method by clicking on the item from the right column and dragging and dropping it in the text editor.
One of the user insert fields is a signature–this is the user’s signature and is applied to the document at the time the document is sent. This field should not be confused with a counter signature, which only applies to documents that have been returned by a recipient and require a counter signature upon receipt.

Company Insert Fields
Company insert fields, color-coded purple, are mapped to company data housed within the administration section of the DriverReach platform. To change this data, users with the appropriate clearance must edit it there. Contact information for the company, such as address and phone number, correlate to the main location address rather than to any other locations associated with the organization. The company’s DOT link, website address, and EIN number are also available as insert fields.

Company insert fields may be added to an eDoc two ways:
- Inline by simply placing the cursor in the text editor and clicking the (text) button in the left column, or
- Via the drag and drop method by clicking on the item from the right column and dragging and dropping it in the text editor.

Custom Insert Fields
Custom insert fields, color-coded green, correlate to custom questions. Custom questions are an upgrade feature available on the DriverReach platform. If custom questions are included in a user’s DriverReach account, then the option also exists for the user to flag those questions to be available as insert fields. If there are no custom questions included with a user’s DriverReach account, custom questions insert fields for that account will also be absent. Of course, because of the customized nature of the data they are based on, custom insert fields will also look different for every company with this upgrade feature.

Custom insert fields may be added to an eDoc two ways:
- Inline by simply placing the cursor in the text editor and clicking the (text) button in the left column, or
- Via the drag and drop method by clicking on the item from the right column and dragging and dropping it in the text editor.

Insert Field Shortcuts
- Inline Insert Field Shortcut
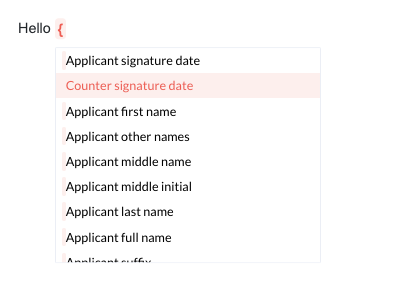
When typing in a free text field, hit the "{" key and a menu will appear to select an inline insert field. Begin to type, and insert fields matching the typed text will be highlighted.
- Moving insert fields
Rather than moving insert fields with a mouse cursor, users can easily move selected insert fields with keys. Simply select the insert field with the mouse, hold down the "Shift" key, and use the arrow keys on the keyboard to move the field. - Copying insert fields
Users can easily copy insert fields with keys. Simply select the insert field with the mouse, hold the "Ctrl" and the "C" key to copy it, and once the cursor is moved to the desired spot, hold down the "Ctrl" and "V" key to paste it. - Cutting insert fields
Users can cut insert fields with keys. Select the insert field with the mouse and hold the "Ctrl" and "X" keys to cut it. - Selecting multiple insert fields
Users can select multiple insert fields with keys. Hold down the "Ctrl" key while selecting the desired insert fields with the mouse. - Aligning Fields
To make it easier to align insert fields with other insert fields, hold down the "Shift" key while moving the insert fields. - Cutting insert fields
Users can cut insert fields with keys. Select the insert field with the mouse and hold the "Ctrl" and "X" keys to cut it.
Beyond Insert Fields
Now that we’ve introduced eDocs insert fields and explained how they work, visit the Creating eDocs section for step-by-step instructions on building eDocs that make excellent use of these powerful, versatile tools.
Return to Table of ContentsPre-filling and Post-filling eDocuments
If an eDocument was built in the DriverReach system using internal input fields as insert fields, DriverReach users have the option to add data to that eDocument prior to sending it to a recipient by making use of the pre-fill wizard. While this is not a required step and can be bypassed with a direct send (leaving the internal fields to be filled after the recipient returns the eDocument during the post-fill process), it is a convenient option for users who wish to send a more complete eDocument to a recipient. When a recipient returns an eDocument requiring a counter signature or containing internal input fields that remain blank (because they were not completed during the pre-fill process), the post-fill wizard guides DriverReach users in completing those eDocuments. Let’s take a closer look at how the pre-fill and post-fill wizards work within the eDocs system.
What is the difference between pre-filling and post-filling?
The pre-fill workflow occurs before an eDocument is sent by a DriverReach user to a recipient, while the post-fill workflow occurs after an eDocument is returned to the DriverReach user by the recipient. If a document contains internal input fields, users have the option to add data to the document(s) prior to sending to the recipient (pre-fill), or they can wait to add data after receiving the document back from the recipient (post-fill).
**Note that to ensure data integrity, any information that is entered at the pre-fill stage will not be editable during post-fill (once the document is returned by the recipient).**
Pre-filling eDocuments
What type of eDocument can be pre-filled?
The only type of eDocument that can be pre-filled is one that was built containing internal input fields as insert fields. For a refresher on internal vs. external input fields and how they work, visit the section about Insert Fields for more information. Examples of eDocuments that users may wish to pre-fill include evaluation documents with the scores and comments that must be pre-filled prior to sending them to the recipient, an offer letter requiring updates based on the new hire’s negotiated pay rate, or an incident report that must include specific information about the event in question.
How does the look of pre-fillable fields differ from the look of external input fields within the pre-fill wizard?
Users in the pre-fill wizard will note that any external fields will appear on the document but will not be selectable, while internal fields that can be pre-filled will be highlighted in yellow. Users may pre-fill any of these yellow-shaded internal fields within the form. Below is an example of what an eDocument containing both internal and external input fields looks like when viewed within the pre-fill wizard.

How does pre-filling work?
Step 1
Before executing this step, users must be on the eDocs tab within the recipient’s profile and have already checked the boxes next to the document(s) they wish to send. If any of those documents contain internal input fields, then a yellow “Pre-Fill” button will appear next to the blue “Send” button. Clicking on the yellow “Pre-Fill” button will open a new tab and launch the pre-fill wizard.

Step 2
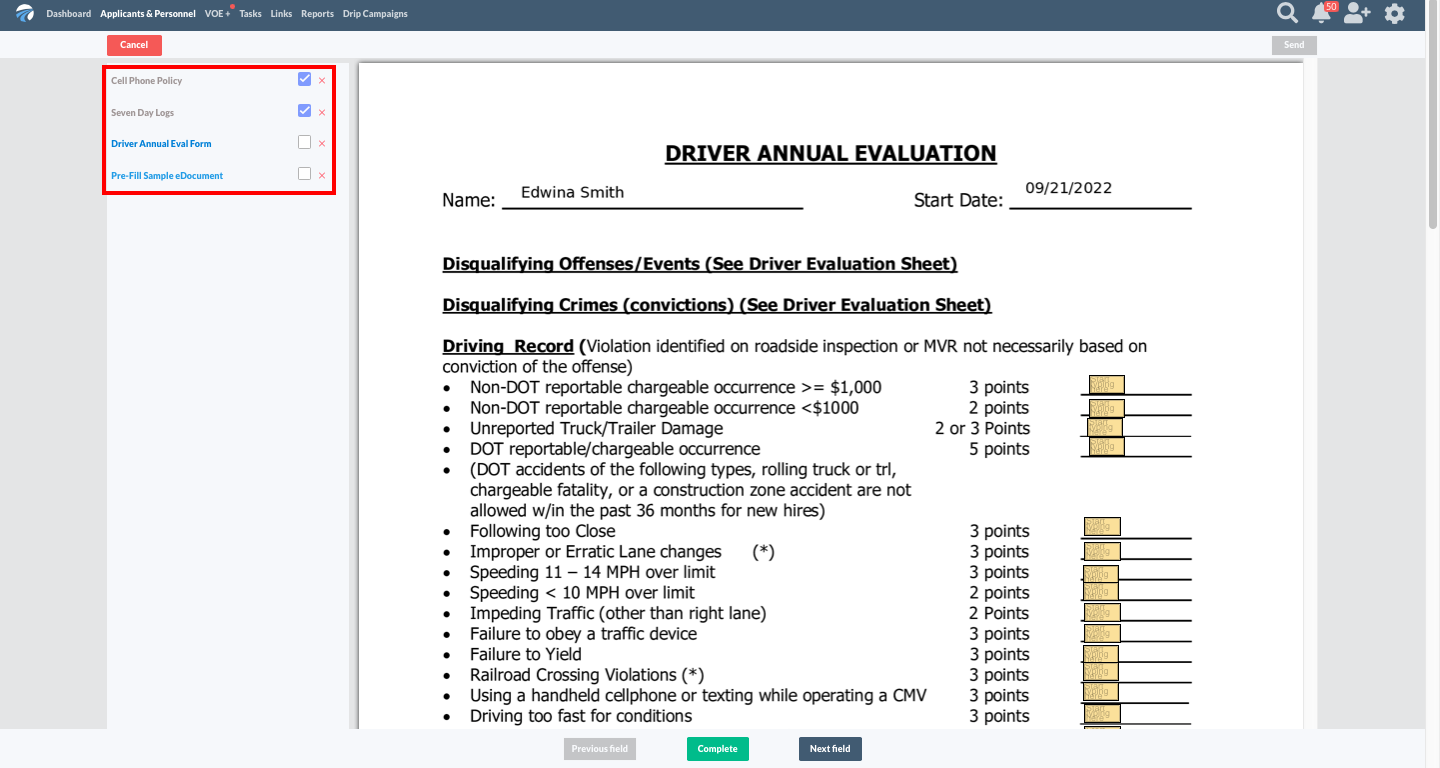
Because users have the option to batch-send eDocuments, the pre-fill wizard includes all of the documents that have been selected in that particular batch to send–even documents that do not contain any internal fields and therefore have no option to pre-fill. This allows users to review the entire batch in one streamlined workflow. Users will find all eDocuments in the batch listed in the upper left-hand corner of the pre-fill wizard, as illustrated within the red box below.
The example below shows what the initial screen looks like after a batch of four eDocuments has been loaded into the pre-fill wizard. The first two eDocuments are view-only because they have no internal input fields and therefore there is nothing for the user to edit; these have gray document titles and are marked with a blue checkmark showing that they are complete and ready to send. The second two eDocuments in this batch contain internal input fields; these have blue hyperlink titles and require action to move to a state of completion; the checkbox next to these documents is unchecked to show that they remain incomplete. The first pre-fillable eDocument in the list, “Driver Annual Eval Form”, has been automatically loaded with all of the pre-fillable fields shaded yellow and ready to fill in as illustrated below.
Step 3
The pre-fill workflow allows users to pre-fill none, some, or all of the internal input fields. Any fields the user chooses not to pre-fill will remain blank. When all internal input fields are as the user wishes them to be, selecting the green “Complete” button at the bottom of the document closes that eDocument and loads the next one in the batch. Any fields that were not filled before selecting “Complete” will be populated by the user during the post-fill process–i.e., after the recipient has returned the document. As a reminder, any information that is entered at the pre-fill stage will not be editable once the document is returned by the recipient in order to ensure data integrity.

Step 4
Sometimes, users make a mistake and realize it before they have actually sent the batch of documents to the recipient. To fix any issues with a pre-fillable eDocument that has been marked complete, simply click on the title of the document in the batch list to reopen it, and then click the yellow “Edit” button at the bottom of the pre-fill wizard to access each input field and correct any mistakes or omissions. The user will then click on the green “Complete” button when the eDocument is accurately pre-filled.

Step 5
Some pre-fillable eDocuments are incredibly lengthy, and it can be difficult to locate each field by scrolling and to keep track of which pre-fillable fields are complete and which have been left intentionally blank. To simplify navigation in these instances, users may wish to click on the gray “Previous field” and “Next field” buttons to quickly jump forward or backward through the eDocument from one pre-fillable field to the next or the one previous in order to ensure the eDocument is accurately pre-filled.

Step 6
Once all of the eDocuments in the batch have been given a “Complete” status by the user (either by checking the box next to the document title in the batch list or by clicking the green “Complete” button for each pre-fillable eDocument), click the green “Send” button in the upper right-hand corner to send the batch of eDocuments to the recipient.

Post-filling eDocuments
What type of eDocument can be post-filled?
The only eDocuments that can be post-filled are those requiring a countersignature or those with blank internal input fields that were not completed during the pre-fill process.
How does post-filling work?
The post-fill wizard allows users to countersign documents and also add data to any internal input fields that were left blank during the pre-fill workflow. To protect data integrity, any data entered by the recipient or entered by the user during the pre-fill process is not editable in the post-fill wizard.
Step 1
To begin, navigate to the “Document Status” tab on the profile page of the recipient. Documents and their status are listed, and anything requiring post-filling is labeled with a white “Post-fill” button, which users may click on to launch the post-fill wizard.

Step 2
Similar to the pre-fill menu, the post-fill menu provides a batch list of all of the eDocuments pertaining to this recipient that still require action to complete, not just the document for which the user clicked on the “Post-fill” button. This list is found in the upper left-hand corner of the post-fill wizard. Those eDocuments with gray titles require only a counter signature, while eDocuments with blue hyperlink titles contain blank internal input fields yet to be completed by the DriverReach user. Any eDocument containing internal fields that have all been populated with data during the pre-fill stage and that require no counter signature are complete and therefore will not be found in the post-fill wizard batch list.

Step 3
As with the pre-fill format, any internal input fields that remain blank will be highlighted yellow to make it easy for users to determine which fields require attention. Users may find it easier to navigate between fields using the gray “Previous field” and “Next field” buttons at the bottom of the eDocument, although scrolling is another option.

Step 4
If an eDocument has a required internal field that contains no data, a small red notification will appear near the field alerting the user that the eDocument cannot be completed until data is entered into that field. If an optional internal field contains no data, users do not have to fill it in before completing the eDocument and, should it remain blank, no notification will appear.

Step 5
If an eDocument contains both internal fields and a counter signature (and the user also has the countersignor role), that user will be able to both complete and countersign the document in one workflow. This pertains to the document illustrated below, and clicking on the small green arrow next to the green “Complete and countersign” button will launch a drop-up menu allowing the user to select “Complete” in case the user doesn’t wish to countersign the document at this time but does wish to complete the internal field post-fill. If two separate users are required to complete these steps, then the user who is not a countersignor has the ability to complete the document without countersigning, and the person assigned the countersigning role will then have this eDocument added to his or her task list to countersign.

Step 6
Once the eDocument is correctly filled in and ready to move to the completed stage, clicking on the green “Complete” – or for eDocuments requiring a countersignature, the green “Complete and countersign” button – at the bottom of the eDocument.

Step 7
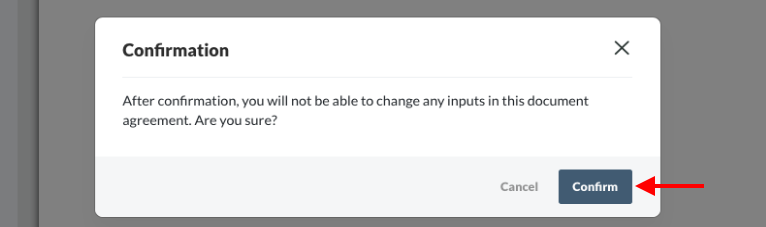
For documents requiring no countersignature, a pop-up confirmation box like the one below will appear to remind the user that after completion, no additional edits to the eDocument are permitted. If a user wishes to go back and make sure the eDocument is truly complete, clicking the white “Cancel” button will close the confirmation pop-up and return the user to the eDocument for further review and editing. If the user is certain no further edits are required, clicking the blue “Confirm” button will move the eDocument to a completed state. This finalized version of the eDocument is automatically saved in the driver’s profile. If the eDocument had a DQ file label, it will also be routed to and saved in the DQ file.
Step 8
For eDocuments requiring a countersignature, a pop-up confirmation box like the one below will appear. If a user wishes to go back and make sure the eDocument is truly complete, clicking the white “Cancel” button will close the pop-up and return the user to the eDocument for further review and editing. If the user is certain no further edits are required, clicking the blue “Complete and countersign” button will countersign the eDocument and move it to a completed state. This finalized version of the eDocument is automatically saved in the driver’s profile. If the eDocument had a DQ file label, it will also be routed to and saved in the DQ file.

Searching, Reorganizing, and Deleting eDocs
This section explains how to search eDocs libraries to quickly find documents, how to rearrange the order of eDocs on the document management landing page, and how to delete an eDoc. To begin any of these tasks, navigate to the eDocs landing page – for help finding it, please visit Introducing eDocs for step-by-step instructions.
Searching eDocs
The search function within the eDocs system allows users to find documents quickly and efficiently. Read on to learn how.
Step 1
Click on the blue magnifying glass icon located to the left of the “Upload a Document” button near the upper right-hand corner of the document management homepage.

Step 2
A text field will appear next to the magnifying glass icon.

Step 3
Type a term into the text box and hit the return or enter key to search across all document fields (title, label, status, etc.) and across all available libraries (Your Library and DriverReach Library). For example, searching the title “orientation packet” weeds out all documents except the desired document bearing that title as seen below.

Step 4
Using a less specific search term, such as “orientation”, returns additional results because it includes all eDocs with labels or any other search field including that term as the example below illustrates.

Rearranging the Order of eDocs
Rearranging the order of eDocs also impacts how the documents appear to drivers and recipients. Specifically, this means the order of the documents as arranged within the eDocs system will also be the order that:
- Documents will appear in the driver profile*
- Recipients will receive documents
*Please note that any eDocs in a draft state will not appear in the driver profile.
Step 1
Just to the left of the document to be moved is a document mover icon that looks like three stacked lines. Click and hold that icon, dragging it up or down to move the document to the desired location within the library. Once you unclick, the document will remain in the location your cursor has left it.

Step 2
If you have completed a search and choose to move documents within your search results, simply select the document mover icon next to the document to be moved. Let’s move the document entitled “Cell Phone Policy” within our “orientation” search results so that it will appear right below the “Orientation Packet” eDoc. Selecting the document mover icon next to “Cell Phone Policy” will cause all of the documents in the library to reappear, as you see below.

Step 3
Next, drag the document to its new location. Once the document is placed and the cursor is no longer selecting the document mover, the search filter will automatically reapply. Only the search results will be visible with the document just moved listed in its new place within those results.

Deleting an eDoc
Step 1
If you wish to delete a document, simply click on the trash can icon located on the right side of that document’s row.

Step 2
In the confirmation pop-up box that appears, click on the blue “Confirm” button to delete the document. Clicking the “Cancel” button will close the pop-up window without deleting the document.

Sending and Receiving eDocs
DriverReach’s eDocument solution empowers DriverReach users to keep the hiring and onboarding process moving forward in a way that is easily manageable for both the user and the recipient. This section explains how this process looks from the perspective of DriverReach users as well as eDocument recipients. The eDocs solution allows users to share eDocs with recipients via text and/or email, select appropriate counter signers for individual eDocuments, and track progress. It also empowers recipients by providing three simple but comprehensive actions (acknowledge, sign, or reject with a reason why) they may take upon receipt of an eDoc. Additionally, DriverReach has created a system of convenient notifications for recipients that help each party stay on task as an eDocument moves through the submission process.
Sharing eDocs with Recipients
Step 1
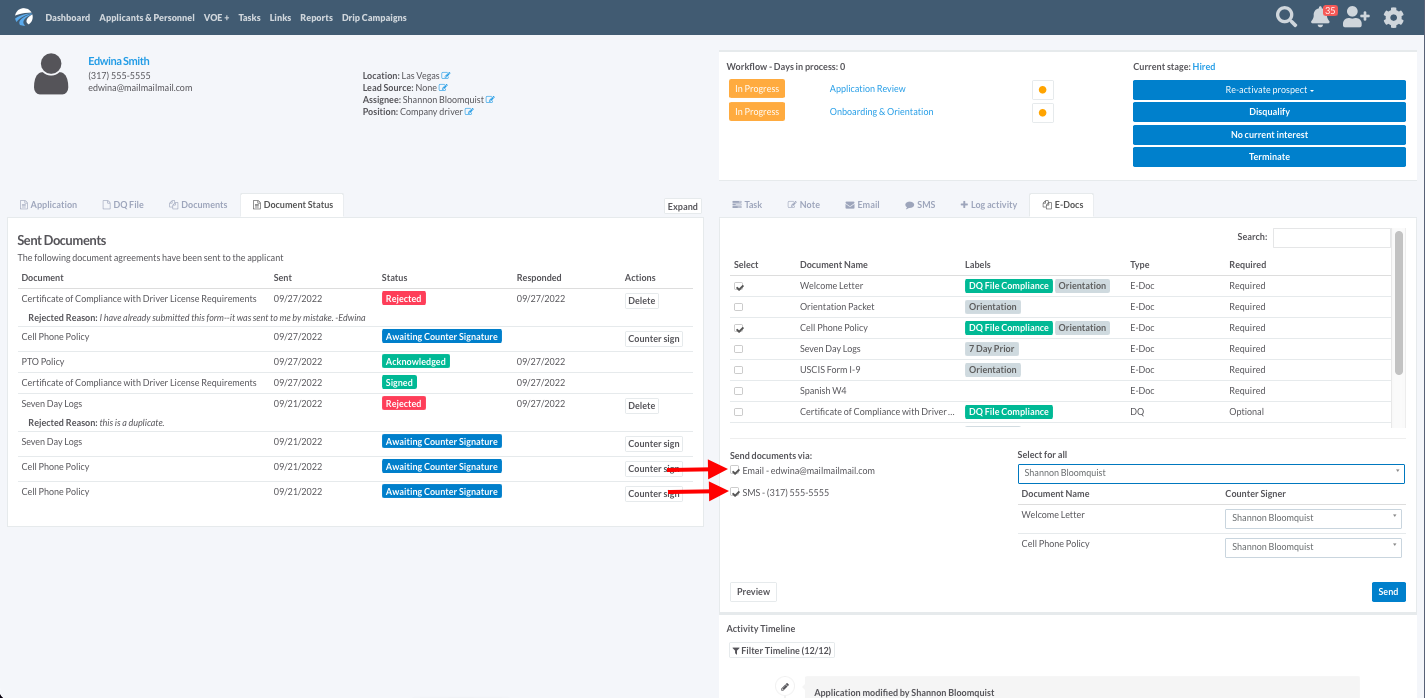
On the recipient’s profile page under the “E-Docs” tab, DriverReach users who have made their selections of which documents they would like to send to a recipient then need to decide how the document(s) should be sent. They may click the checkbox next to text or email, or as a third option they may wish to select both choices as seen below. Please note that for recipients who have indicated that they do not wish to receive text messages, the text option will be unavailable.
Step 2
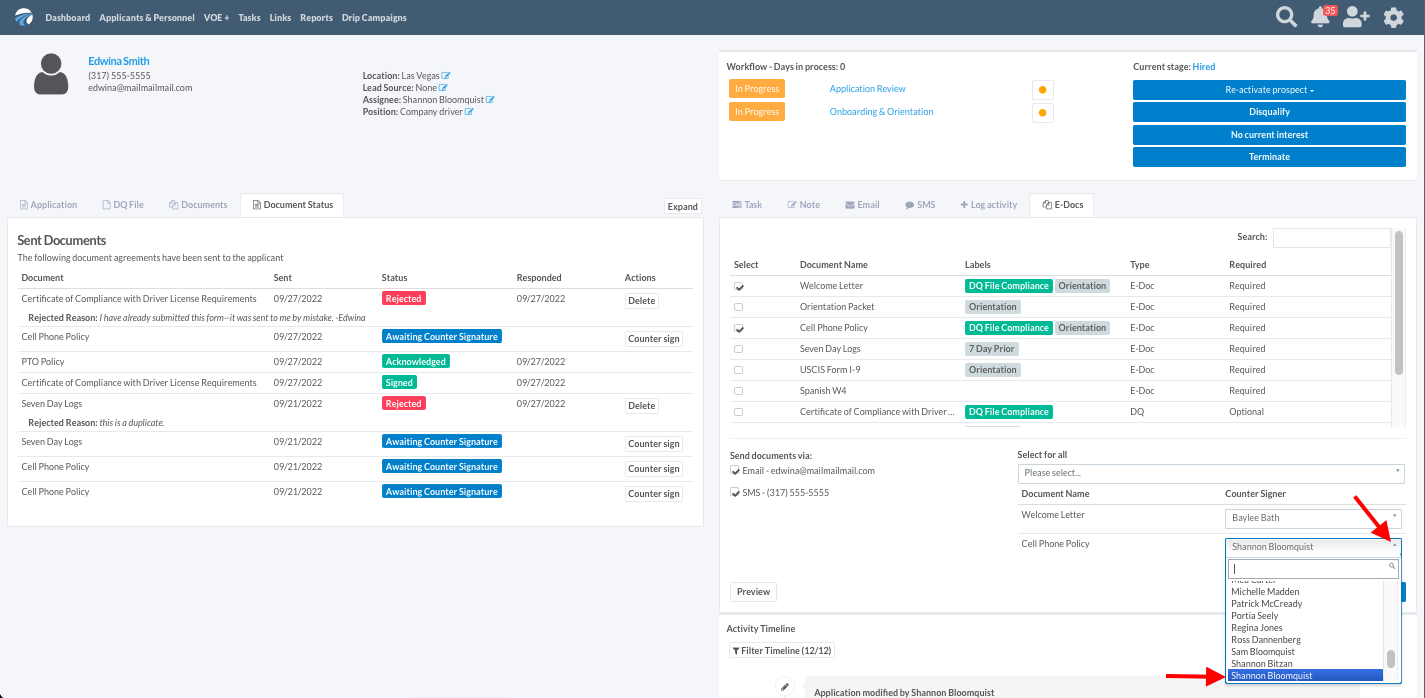
If any documents selected require a counter signature, DriverReach users must also select the individual(s) to whom they would like to assign the role of counter signer for each document. Below, the same individual user is to be the counter signer for both documents. Clicking the drop-down menu next to the “Select for all” field allows the user to select one name from the list of available counter signers so that it will be automatically applied to all documents being sent.

Step 3
If a user is sending several documents and wishes to assign different users to countersign each one, that user may choose from the “Counter Signer” drop-down menu on the right side of the row next to each document name, as seen below.
Step 4
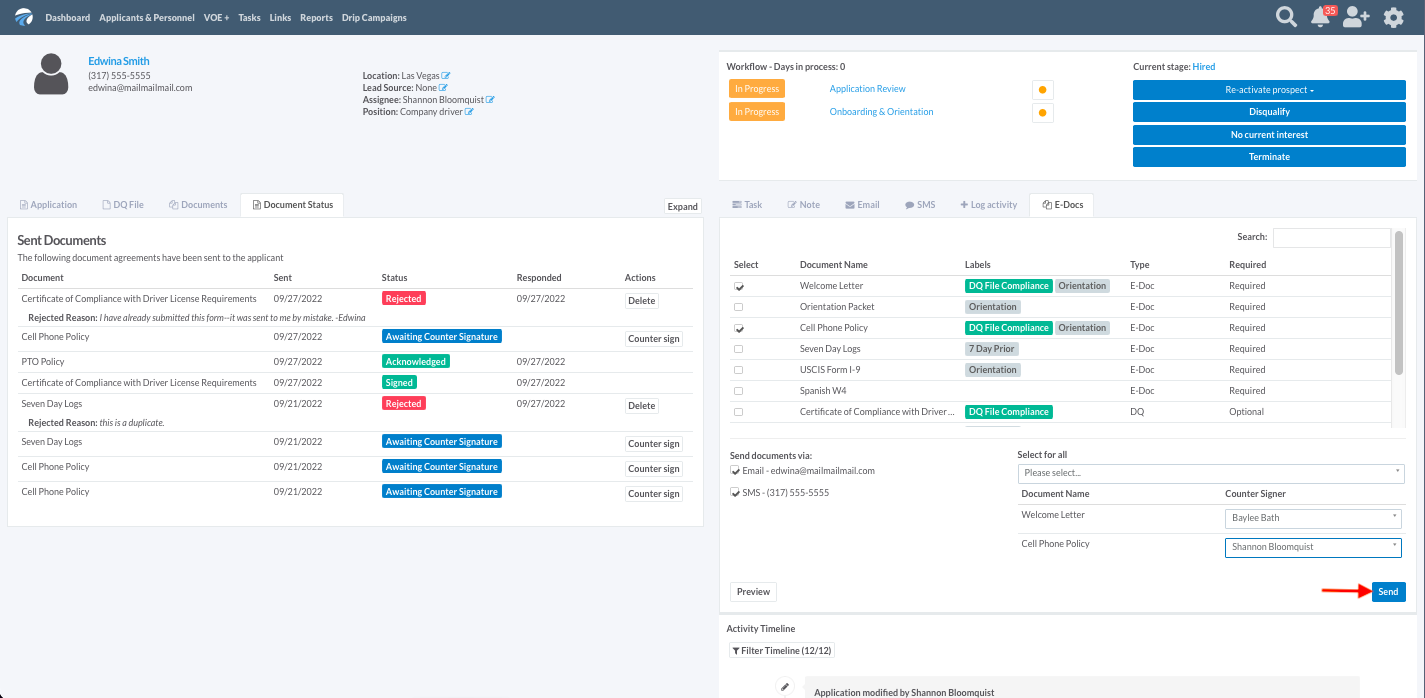
Once these choices have been made, clicking the blue “Send” button at the bottom of the “E-Docs” tab will send all selected documents to the recipient via the mode or modes chosen.
Step 5
To help DriverReach users keep tabs on a recipient’s progress with eDocs, sent documents are added to the “Document Status” tab on the left side of the recipient’s profile page. To learn more about document statuses, see the Acknowledging, Signing, and Rejecting eDocuments section of this article.

Step 6
To provide users with a second failsafe method for tracking eDoc tasks, all selected counter signers are notified when their assigned documents are ready for counter signatures on the “My Dashboard” page. Just above the task list items for that user, click on the blue “See all” link.

Step 7
The task list view will load as seen below, allowing users to easily select the “View Applicant” button on the right side of each document row to visit that recipient’s profile page and navigate to the “Document Status” tab to countersign any outstanding eDocuments for that recipient.

Recipient Notifications
Recipients receive eDocs via email and/or text depending on how the DriverReach user chooses to send them, and they also receive notifications when they complete eDocuments.
Email Notification Example
The email notification option sent to recipients via the DriverReach eDocs solution looks like the example below. Recipients can select the “Click here” link in the email to securely view and, if necessary, electronically sign documents in the order in which they were sent.

Text Notification Example
The text notification option sent to recipients via the DriverReach eDocs solution looks like the example below. Recipients tap the “Click here” link in the email to securely view and, if necessary, electronically sign documents. The order in which the documents appear to the recipient mirrors the order in which the documents are listed on the document management page.

Notification of Completion
Once a recipient completes all documents, a thank you page like the one below appears. Recipients have the option to either close the browser window or navigate to the dashboard.
 Acknowledging, Signing, and Rejecting eDocuments
When a DriverReach user sends an eDoc with no signature field, the recipient will be asked to acknowledge receipt of the document and will be unable to proceed until doing so. When a DriverReach user sends an eDoc requiring a signature from a recipient, the recipient is given the choice to either electronically sign the document or reject the request. Giving recipients the option to reject a request is helpful in cases where errors exist in the document that must be corrected before the document is finalized. DriverReach users receive notifications when recipients acknowledge, sign, or reject an eDocument as well as when an eDocument requires a countersignature.
Acknowledging an eDocument
If a user sends an eDoc that does not contain an applicant signature insert field, the recipient will be asked to simply acknowledge the document. Recipients of this type of document have no option to reject the document, and they must acknowledge receipt of the document to proceed. When the recipient clicks the green “Acknowledge” button at the end of the document, this provides valuable data to the user on when the document came into the recipient’s possession.

When an eDocument is acknowledged by the recipient, a green “Acknowledged” notification will alert the DriverReach user in the “Document Status” tab within the recipient’s record.

Signing an eDocument
If a user sends an eDoc that contains an applicant signature insert field, the recipient will be given the option to e-sign or reject the document. A recipient wishing to sign the document would select the green “E-Sign” button.
.

If there is a signature on file from the recipient’s application, it will be used. If there is not a signature on file, the recipient will be able to sign directly inline and that signature will be stored for future use. Recipients may click on the blue “Cancel” button to reset the signature option.

When an eDocument is signed by the recipient, a green “Signed” notification will alert the DriverReach user in the “Document Status” tab within the recipient’s record.

An eDocument that has been signed and requires a countersignature has a blue “Awaiting Counter Signature” notification in the “Document Status” tab within the recipient’s record. Users can click on the white “Counter sign” button on the right side of that document’s row to open the eDocument and countersign it.

Rejecting an eDocument
If a user sends an eDoc that contains an applicant signature insert field, the recipient will be given the option to e-sign or reject the document. Recipients wishing to reject a document due to an error or omission would select the red “Reject” button.

The option to reject requires that the recipient fill out a free text field describing the reason for the rejection. Here, the recipient can point out any errors or omissions prior to signing the document.
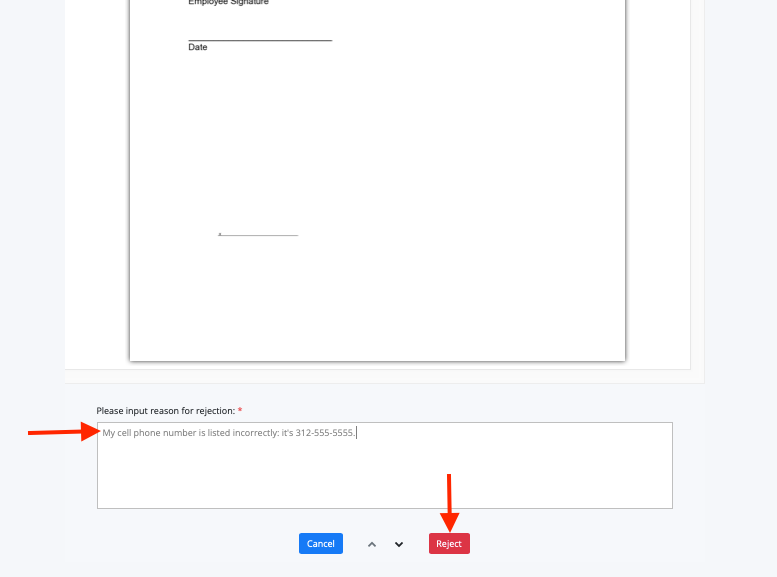
When an eDocument is rejected by the recipient, a red “Rejected” notification will alert the DriverReach user about the rejection and the reason for it in the “Document Status” tab within the recipient’s record. The user can then edit the eDocument if necessary and send the corrected file to the recipient or reach out to the recipient to discuss the rejection reason as needed.
